Disable restored windows when re-opening specific apps
There’s a great tip over on the Macs in Chemistry blog on how to stop Lion from restoring your previous windows when re-opening specific apps. In System Preferences there’s a checkbox for turning this on and off globally, but using a handy little AppleScript you can disable it on a per-app basis.
One of the new features in Lion is the ability of applications to resume activity at the point an application was quit. This means that when you reopen an application it will open and display all the documents you were editing in the state when you quit the application. This is obviously very useful but there are times when you may not want confidential documents automatically opened and displayed when you open an application.
Here’s an example of the script for Safari:
set statePath to POSIX path of (path to home folder) & "Library/Saved Application State/com.apple.Safari.savedState"

set quotedPath to quoted form of statePath
try
   do shell script "test -w " & quotedPath
    set current to "enabled"
on error
   set current to "disabled"
end try

if current is "enabled" then
   tell application "Finder" to delete every item of ((POSIX file statePath) as alias)
    do shell script "chmod u-w " & quotedPath
    display dialog "Disabled window restore for Safari" buttons "OK" default button 1
else
   do shell script "chmod u+w " & quotedPath
    display dialog "Enabled window restore for Safari" buttons "OK" default button 1
end if
Head over to macinchem.org for a quick explanation of how to add it to your scripts menu to give you an easy place to access it.
Quickly add to do items to iCal's Reminders from anywhere with a keyboard shortcut
Until recently, my favourite task management (to do list) app for Mac and iPhone/iPad has been Things. It has just the right balance of Apple-like simplicity and powerful features that makes managing tasks quick and easy and not yet another task in itself. Unfortunately, the developers, Cultured Code, have been very slow at getting the cloud sync sorted out, meaning you still have to manually sync your tasks between your different devices and on top of this it’s still not even possible to sync tasks between multiple Macs.
With that in mind, I’ve been trying out some alternatives, including Wunderlist, but I’ve finally settled on using Apple’s own solution. With the release of iOS 5, Mac OS X Lion and iCloud, finally iCal Reminders on the Mac and the Reminders app on the iPhone are good enough to rival these third party solutions.
One piece of Things functionality I find myself missing, however, is the Quick Entry window. This allowed you to quickly create a new To Do item using a simple keyboard shortcut that worked in any application. This meant I could be reading an email, press the keyboard shortcut and Things would bring up a new To Do item dialog, autofilled with the details of the current email message.
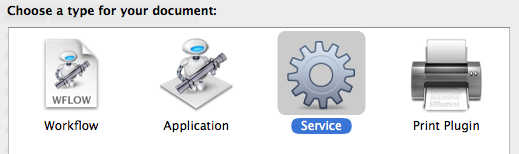
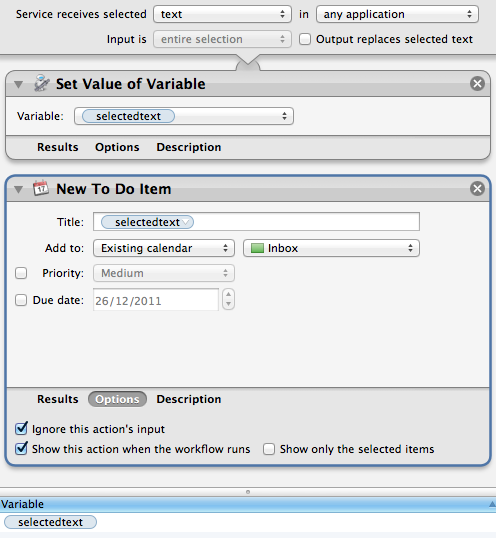
Fortunately, we can go some way to replicating this functionality using an Automator service. Don’t worry if you’ve never used Automator before, this is a really easy workflow containing only a single “Automator action.” Start by opening Automator (located in the Applications folder), and choose the Service type for your new document.
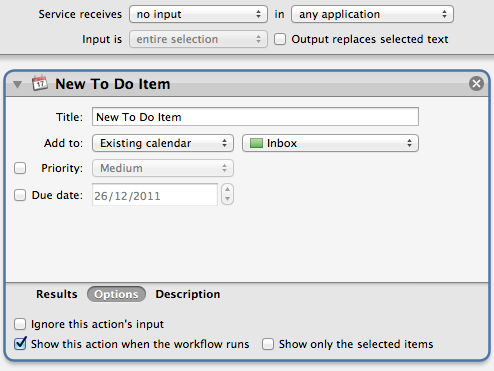
From the Calendar section of the Library, drag the New To Do Item action over into the workflow area on the right. This is the only action we’ll need! Using the fields and drop-down menus, you can customise the default values that will appear when the Quick Entry window is invoked. Before we save, there are two more things we need to set. Firstly, change the drop-down menus above the workflow to specify that the service receives no input in any application. Secondly, click the Options button at the bottom of the action, and check the box Show this action when the workflow runs. When you’re finished, it should look something like this:
To finish, choose Save from the File menu and give it a name like “New To Do Item.”
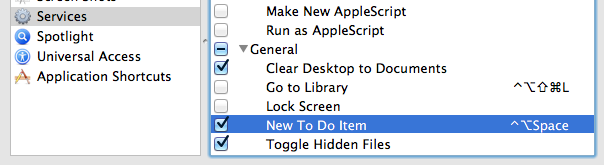
The next step is to add the keyboard shortcut so that we can easily bring up the Quick Entry window without having to go to the Services menu. To do this, open up System Preferences and go to the Keyboard section. Under the Keyboard Shortcuts tab, click Services in the list on the left, and scroll down to the bottom of the list on the right to find your new service. To add the keyboard shortcut, double-click on the area to the right of your service and press whatever shortcut you want. I went for Control-Option Space.
Finally, all that’s left is for you to test it out. Open up Safari or Mail or any of your usual applications, and start going about your normal business. Then try pressing your chosen keyboard shortcut, and the Quick Entry window should appear. iCal doesn’t even have to be open.
Bonus Tip: If you’re feeling adventurous, try creating a second service that automatically takes the currently selected text as the title of the to do item by changing the Service receives drop-down menu to text. Check out the screenshot below for some ideas on how to do this.
Browse man pages in Lion's Terminal
Here’s a handy new feature tucked away in the Terminal in Lion. To quickly view the man page for any command, just right-click on it and choose Open man Page from the context menu. A new window will pop up, displaying the manual for that command.
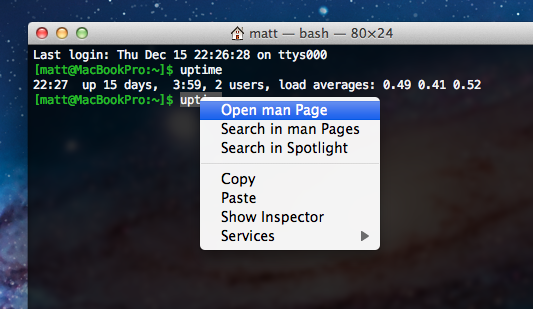
This can save you a little bit of time, especially if you like to open up man pages in a new window alongside whatever you are currently working on. This way, you no longer need to open up a new window and type man <command> every time. It also displays the man pages with a distinctive yellow background, so its easier to distinguish if you have a lot of Terminal windows open.
As with a normal Terminal window, the colour scheme is also customisable. In the Terminal Preferences, just look under the Settings tab and choose the Man Page theme from the list.
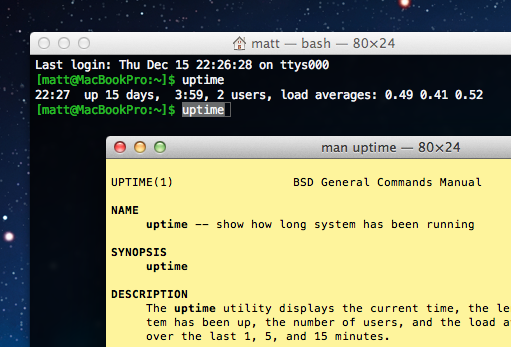
The Open man Page menu item is also available from within the yellow man page windows. I find this really useful when I get to the “See Also” sections that are common at the end of many man pages. Instead of having to remember all the related commands and look at their man pages one at a time, I can simply right-click on each and simultaneously open up man pages for all of them.
Finally, there’s another menu item, Search in man Pages. This uses the apropos command to display a list of all the available man pages for commands that contain the keyword you have clicked on. As you’d expect, you can just right-click on any of the search results and choose Open man Page to view the relevant page.
Spread out application windows in Mission Control
One of the differences between Mission Control in Lion and Exposé in previous versions of Mac OS X is that each application’s windows are grouped into a “stack”. This can make it a little bit tricky to see which window is which and click the one you want, especially if it turns out to be the one at the bottom of the stack.
Luckily there’s an easy way to spread out a stack so you can see all the windows more easily. Just position the mouse cursor over the stack, and swipe up with two fingers. Alternatively you can get the same effect using a spread gesture — swipe three fingers and your thumb in an outward motion. If you are using a magic mouse rather than a trackpad, a simple one finger upwards swipe will have the same effect.
To then get an even closer look at a specific window, just position the mouse cursor over it as before, and press the space bar. This will zoom the window up to near full size.

Create your own EPUB ebook files using Automator
A handy new addition in Mac OS X Lion makes it a piece of cake to create your own EPUBs that can be viewed in iBooks on an iPhone or iPad, or on any other eBook reader. Using a simple Automator action, it’s possible to take text from anywhere, for example from a web page or a PDF file, and convert it into EPUB format that displays beautifully on whatever device you use to read ebooks.
To do this, we need to set up an Automator workflow that does the conversion for us. Once this is done, creating EPUB files will be as simple as selecting some text, right-clicking on it and choosing “Create ePub book with selected text.”
Start by opening Automator, which is located in the Applications folder. If you haven’t used Automator before, don’t worry, it’s just a really simple app that allows you to automate repetitive tasks by building “workflows” using building blocks called “actions.” The type of workflow we are going to build is called a Service, which means it will be accessible via the Services menu when right-clicking on selected text.
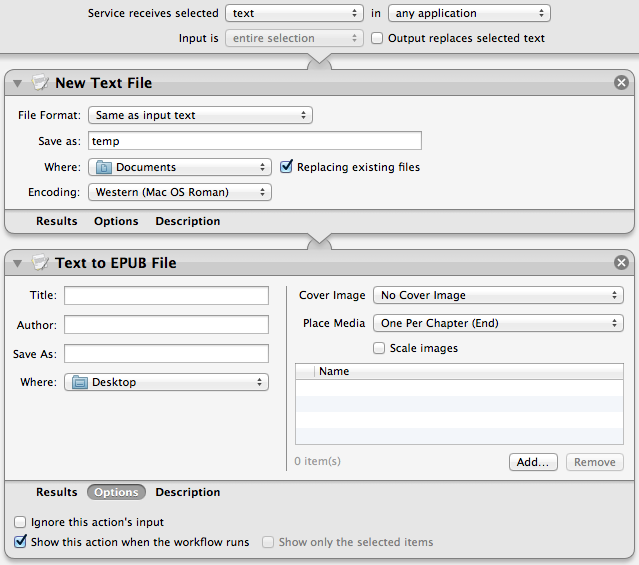
To create the workflow, drag the following two actions from the Library onto the workflow area on the right:
- New Text File
- Text to EPUB file
Change the settings to match the following screenshot. The main things to note are changing the file name to temp, ticking the Replace existing files checkbox, and ticking Show this action when the workflow runs on the Text to EPUB action.
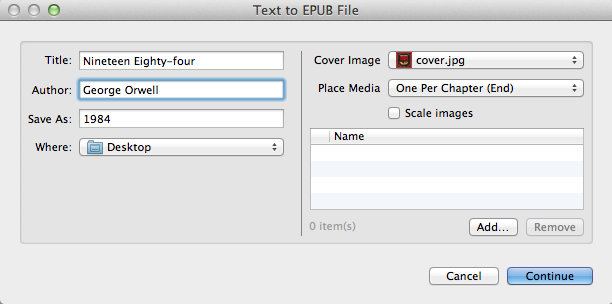
Choose Save from the File workflow and name it “Create ePub book with selected text.” To test it out, select some text (this article for example) and right-click on it. Under the Services menu, choose Create ePub book with selected text. The following dialog should appear, allowing you to specify the title, author, filename, and cover image for the book.
Once saved, simply drag the EPUB file into iTunes to add it to your Library. When you next sync your iPhone or iPad, it will be copied across and will appear in the iBooks app on your device.
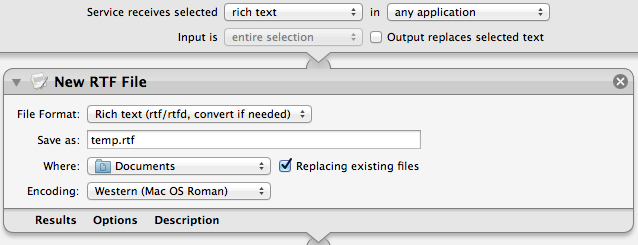
Retain text formatting
If your text contains a lot of formatting like different text colours and bullet point lists, you can modify the workflow slightly to retain this in the EPUB. Simply change the Service receives selected drop-down menu to rich text, and do the same for the File Format drop-down menu in the New Text File action. When you are finished it should look something like this:
Multiple Chapters
The above method creates an ebook with only one chapter. If we want to divide up the ebook into separate chapters and include a table of contents, we have to do things slightly differently.
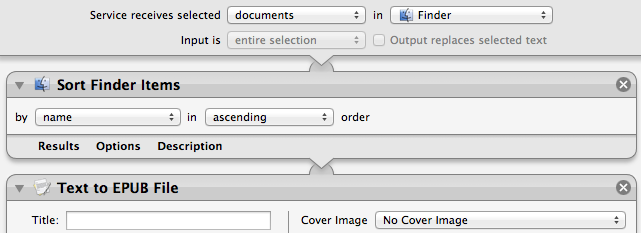
In your Automator workflow, replace the first action with a Sort Finder Items action. You will also need to change the Service receives selected drop-down menu to documents.
Next, prepare your text by saving each chapter as a separate text file, all in the same folder. The names of the files determine the order, so make sure they start with something like “Ch1”, “Ch2”, “Ch3” etc.

Finally, select all the files (Command-A), right-click on them, then choose your service from the menu.
Adding images, audio and video
One last cool feature is the ability to embed media such as images, audio and video in your EPUBs. Unfortunately there’s not a lot of flexibility in how you do this — you can either place one item at the start or end of each chapter, or group them all together in a chapter at the end called “Illustrations”.
To do this, simply click the Add… button on the dialog that appears when your service runs, and choose the files you want to embed. Note that videos need to be encoded in a format that is compatible with the iPhone — you can do this using the great tool HandBrake.
12 Tips for Finder in Mac OS X Lion

Looking through the list of new features in Lion, you might get the impression that Apple doesn’t want you to use the Finder anymore. Features like Launchpad, Versions and Resume all conform to the iOS philosophy of keeping plenty of distance between the user and the file system. As much as this might alarm expert users, it’s simply a natural acceptance of the fact that many users either doesn’t understand or doesn’t care about the file system. As John Siracusa writes (in his epic 19 page Lion review, which is well worth reading):
Fear of the file system practically defines novice users; it is usually the last and biggest hurdle in the journey from timid experimentation to basic technical competence. To put it another way, your dad can't find it if it's not in the Dock.
Even within Lion’s Finder, features like “All My Files” show all your documents and media in one place, with no information about what folders they are in. But even though the file system is a bit more hidden, it’s still there, and the Finder is still a powerful and useful tool for accessing it. In fact, I’d argue that the changes in Lion do little to hinder the expert user, while providing a huge improvement in usability for beginners. For experts and beginners alike, here are 10 tips to help you get to grips with everything that is new in Lion’s Finder.
Arrange by…
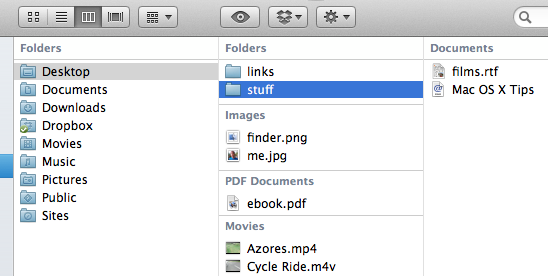
Lion introduces a cool new way to arrange your files when viewing them in the Finder. Either right-click on a window or go to the View menu and choose Arrange By to see all the available options. I personally find that arranging by Kind is the most useful, apart from in the Applications folder where a special Application Category option is available.
As you can see in the screenshot below, this groups your files according to the criteria you choose, and it works in all three view modes — icon, list and column. One of the most useful consequences of this is that it allows you to having all the folders positioned at the top of a list or column, a feature that has long been requested by Windows users.
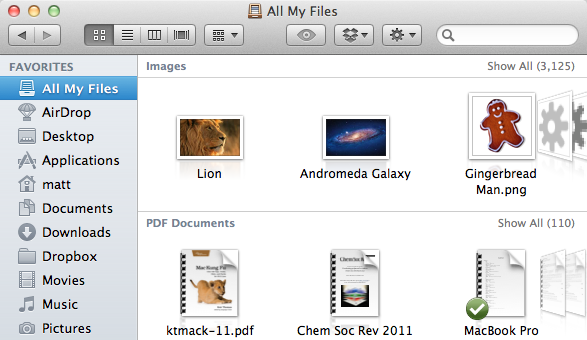
All My Files
This is probably the most easily noticeable new feature in the Finder. Located at the top of the sidebar on every Finder window, All My Files provides an easy way to see all of your most recently used documents, regardless of where they are actually saved. They are organised by kind (e.g. images, PDFs, music) and each section has a fancy “coverflow” way of scrolling. You can get this type of display for any folder you want — simply use icon view, and then choose Arrange by Kind, as described above.
For those that are curious, All My Files is just a simple saved search, a feature that was actually introduced with Snow Leopard. You can still create your own custom saved searches in the usual way by performing a search in the search field in the top right of a Finder window and then clicking the Save button. In fact, if you were a keen user of the Today, Yesterday and All Images saved searches that appeared by default in Snow Leopard, you might want to re-create them.
If you don’t find All My Files that useful, it’s pretty straightforward to hide it away. The first thing you’ll want to do is remove it from the sidebar. Simply right-click on it and choose Remove from Sidebar. If you ever want it back, simply go to the Sidebar tab in the Finder Preferences and re-select it.
At first glance that’s all you need to do, but you’ll soon notice that every new Finder window now opens with All My Files displayed by default. To change this back to the Snow Leopard behaviour of showing your home folder, simply go to the Finder Preferences (located in the Finder menu) and change the New Finder windows show drop-down menu.
Sort by date added
Lion brings a useful new sort order for your files — date added. The one place this is especially useful is in the Downloads folder, where up until now it has been really tricky to sort files by the date they were downloaded. This option is available in icon, list and column view using the new Arrange by method described above, and also using the more traditional sorting in list view by clicking on the Date Added column heading.
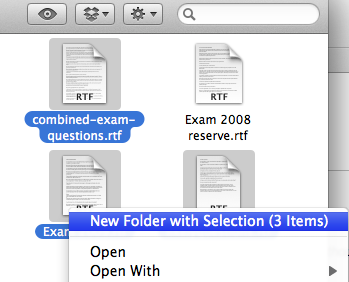
Group a selected files into a new folder
This feature appears to have been inspired by the method for creating new folders for apps on the iPhone and iPad. Whereas before you had to create a new folder, rename it, and then drag all the different files into it, now you can simply select the files, right-click and choose New Folder with Selection. All the items will be combined into a single folder, and the folder’s name will be highlighted, ready for you to type in whatever you want to call it.
You can streamline the process even more by using the keyboard shortcut, Command-Control-N. Now you can simply select the files, press Command-Control-N and type the name of the folder.
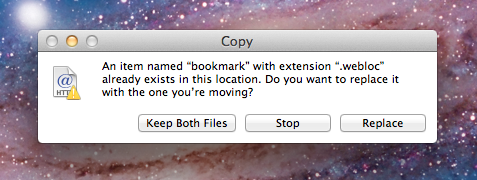
Keep Both Files
This is another little feature that will make you think, “Why wasn’t it always like that!” Up until now, if you moved or copied a file to a location that already had a file with the same name, you had two options: Replace or Cancel. Finally, after the best part of three decades of Mac development, Apple have finally realised that it might be useful to have an option to Keep Both Files.
Bring back missing sidebar items
While this has been a trend for a while now, in Lion more and more things are hidden or disabled by default to stop the UI getting cluttered with stuff that isn’t useful for the majority of users. One place where this will be obvious to more experienced users is in the Finder’s sidebar and on the desktop, where hard drives and connected volumes no longer appear.
Fortunately it’s no trouble at all to turn these back on. Simply go to the Finder Preferences (located in the Finder menu). Under the Sidebar tab you’ll find checkboxes for adding items back into the sidebar, and under the General tab you’ll find the same for the desktop.
Access the Library folder
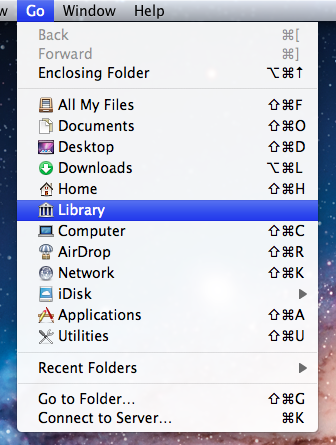
A lot of noise has been made about the fact that the Library folder inside your user home folder is now hidden by default in Lion. Even though you can’t just go to your home folder and click on it any more, there are still plenty of ways to access it. The easiest way that should be suitable for most people is to hold the Option key while clicking on the Go menu. This will make the Library folder appear in the middle of the list of places. If you want to permanently show the Library folder like in Snow Leopard, check out our article on every conceivable way of accessing the Library folder in Lion.
Copy and paste files
Before Lion, the only way to move files was to drag them to a new location, and hold down the Option key while dragging to copy them. Now, it is possible to copy files using the “Copy and Paste” keyboard shortcuts Command-C and Command-V. Users familiar with Windows might be annoyed that the “Cut and Paste” shortcuts Command-X and Command-V haven’t also been implemented for moving files instead of copying them. But don’t worry, this is possible. Just “copy” the file as usual using Command-C, but then use Command-Option-V when “pasting” to move the file instead of copying.
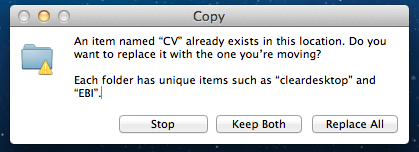
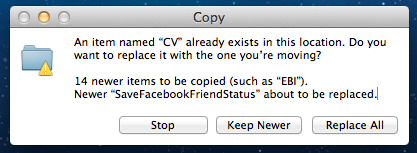
Merge folder contents instead of overwriting
This feature works similarly “Keep both files” described above, but it’s specifically for when you try and move a folder into a location with a pre-existing folder of the same name. As well as the normal options of overwriting the whole folder or cancelling, you can now choose to merge the contents of the folders by clicking Keep both.
There are a couple of quirks to watch out for with this though. Annoyingly, it only seems to work when copying a folder, not when moving one. This means that you either have to hold down the Option key when dragging the folder, or use the copy and paste shortcuts described above. In addition, you have to watch out when merging folders containing files of the same name. If you do so, instead of the option to Keep both, you can now only choose to Keep newer, which means in each case where two files conflict, the file that was most recently modified will be chosen to overwrite the older one.
Bring back the status bar
When you first look at a Finder window in Lion, it looks different, cleaner, but it’s hard to put your finger on what exactly has changed. Probably the most significant difference is that the status bar along the bottom of each window is disabled by default. In general this is a good decision — it took up a lot of space to give very little information — but occasionally you will still want to quickly check how much disk space is available, or how many items are in the current folder.
While you can choose Show Status Bar from the View menu, I’d recommend a quicker method of simply pressing Command-/ to quickly toggle the status bar on and off every time you want to see it.
![]()
Search suggestions and tokens
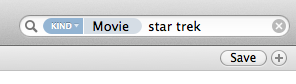
Finder’s search has been seriously revamped in Lion, offering some great new functionality. As always, the words you type into the search field in the top right of any Finder window are searched for everywhere — the contents of every document, the filename, the kind, as well as other specific meta data such as the album or artist for a song, or the name of a website a file was downloaded from. The changes in Lion make it much easier to filter your search to specific aspects of a file. As you type, suggestions will dynamically appear, asking you if you want to filter the results based on their kind, download source or the person who sent it to you.
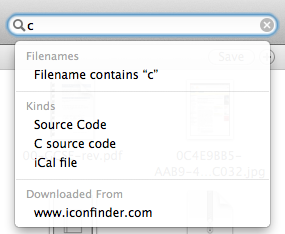
Choosing one of these suggestions creates a blue “search token” that instantly filters the search results. It’s also possible to combine multiple search tokens, and to combine search tokens with normal text queries that search everywhere. If you want to save some time, you can even type the tokens directly, for example using kind:Movie or from:Matt.
Duplicate Exactly
One way of discovering all the new things you can do in the Finder is to open up the menus (File, Edit, View etc.) and see what new things appear when you press the Option, Control and Shift keys.
One interesting change that is easy to miss is that Duplicate (Command-D) changes to Duplicate Exactly (Command-Option-Shift-D). So what exactly does it do? Surely the normal duplicate command is exact?
It turns out the difference is when duplicating files owned by different users (or root). The normal duplicate command will create a copy of the file owned by you, while Duplicate Exactly will make sure the duplicate is still owned by whoever owned the original file.
Similarly, when copying and pasting files, press Command-Shift-Option-V to Paste Exactly.
Resize windows like a pro in Lion
A great new feature in Lion is the ability to resize windows in a much more flexible way. Whereas Snow Leopard only allowed resizing a window using a “handle” in the bottom right corner of every window, in Lion placing your mouse near any edge of a window will result in a new “Resize” cursor indicating that you can resize the window from there.
If this wasn’t enough, there are a few other new resizing features that can make this even more useful.
Firstly, holding the Option key while resizing results in both sides of the window resizing equally. For example, if you have a full screen window and resize it by Option-dragging the left side in towards the centre, the right side will also move in by an equal amount. If you resize from a corner using this method, it essentially has the effect of anchoring the window by its centre rather than by the opposing corner as usual.
Secondly, holding the Shift key while resizing forces the window to keep the same proportions. This is similar to when you resize an image and want to avoid stretching it in one direction. If you double the width of a window, the height will be doubled as well.
Finally, you can use the Command key to resize windows in the background without moving them to the front. This has actually been around since before Lion, but it has become much more useful now you can resize windows from any edge.
Now, if you really want to be a pro, you can try using the modifier keys in combinations. You can also press and release Option and Shift at various points while you are already resizing to add and remove the constraints.
Bonus Tip: If you go to resize a window from an edge, but instead drag the mouse cursor in the wrong direction (i.e. drag up/down while resizing from the left/right edges) you can move the window around. This means you no longer have to only move windows using the title bar at the top.
Every conceivable way of accessing the Library folder in Lion
A lot of noise has been made about the fact that the Library folder inside your user home folder is now hidden by default in Lion. Even though you can’t just go to your home folder and click on it any more, there are still loads of other ways to access it. Here’s every single method we could think of to show the Library folder, either on a temporary or permanent basis.
What is the Library folder for?
First, a quick recap of what the library folder is and why you might want to access it. Mac OS X actually has three different Library folders:
- One located at the root of your hard drive
- One located in a folder called System at the root of your hard drive
- One located in every user’s home folder
The purpose of all three Libraries is to store files that are used by applications and the system that users generally doesn’t interact with directly. The System Library contains all the core parts of OS X that are needed for it to function — there are very few reasons to ever change anything in it. The other two Libraries are very similar, both containing things like fonts, saved preferences and Dashboard widgets. These are all things that you interact with through other applications, so it makes sense to file them out of the way in a Library folder.
The only difference between these two libraries is that things in the hard drive Library are for all users of the computer, while things in the user folder Library are just for that specific user. If you’ve ever had to enter your administrator password while installing an application, chances are it was putting something in the hard drive Library that needed to be accessible to all users of the Computer.
The Library in your user folder is the one that you are most likely to want to access at some point. If an application is playing up, deleting its preference file in the Preferences folder in this Library is a good troubleshooting step. If you ever have to manually install a plugin for any application, this is most likely where you will have to put it.
With this in mind, it might seem a little odd that Apple decided to hide this Library folder. However, it’s also the most obviously visible of the three libraries, and therefore the most susceptible to accidental changes and deletions that cause problems. Now it’s hidden, if you ever need to get to it, simply take your pick from following methods.
Option-click the Go menu
In the Finder, the Go menu offers lots of handy shortcuts to common places like your Documents and Applications folders. The Library folder doesn’t normally appear here, but if you hold down the Option key, it should pop up in the middle of the list. This is probably the best method for most people. It’s great if you only occasionally want to access the Library, as it stays hidden in your home folder but is still accessible fairly quickly.
Go to Folder…
While in the Finder, simply press Command-Shift-G to bring up the Go to Folder dialog. To access the Library, type in ~/Library and click Go. It is possible to type the path to any folder into this dialog. The ~ character is just a shortcut to your home folder. A more verbose alternative would be /Users/matt/Library.
Assign a keyboard shortcut (works in Finder only)
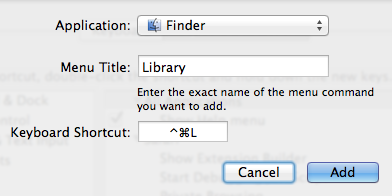
As long as an item appears in a menu somewhere, it’s fairly straightforward to add a keyboard shortcut for it. So as the Library appears in the Go menu, this isn’t too difficult. Simply open up System Preferences, and go to the Keyboard section. Click on the Keyboard Shortcuts tab, then select Application Shortcuts from the list and click the plus (+) button.
In the dialog that appears, choose Finder from the drop-down menu, type Library for the menu title and then choose whatever shortcut you want.
There are two small problems associated with this method: Firstly, for some reason this stops the Library from appearing in the Go menu, even when the Option key is pressed. Secondly, the shortcut will only work when Finder is the active application. To get around these problems, see the next method.
Assign a global keyboard shortcut (works in all apps)
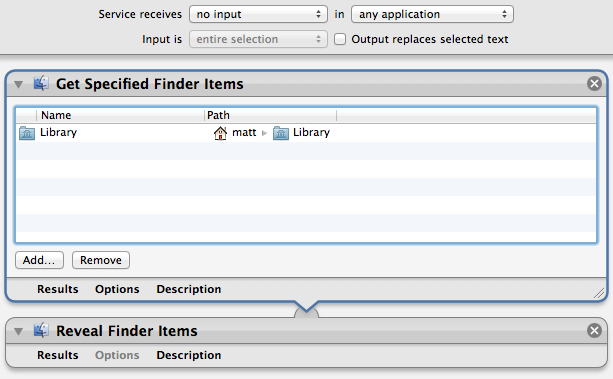
The easiest way to assign a global shortcut is by using an Automator Service. Start by opening up Automator (located in the Applications folder) and choosing the Service template. Drag the following two actions across from the library into the workflow area:
- Get Specified Finder Items
- Reveal Finder Items
Click the Add button in the Get Specified Finder Items action, and navigate to your home folder. Press Command-Shift-. (period) to show the hidden files, select the Library folder and click Add. Finally, change the drop-down menus at the top of the window to no input and any application, then Save the Service.
To add the keyboard shortcut, go to the Keyboard section of System Preferences as above, but instead choose Services from the list. Find your new Service, double click to the right of it and press your shortcut.
Access via the Terminal
If you are comfortable working in the Terminal, it’s still fine to navigate to the Library folder with cd ~/Library and then list its contents with ls.
Alternatively, you can use the Terminal as a way to open up the folder in the Finder. Simply type open ~/Library and press Return.
Add an alias to the Finder sidebar or toolbar
Once you have accessed the Library folder using one of the methods above, it’s easy to drag the folder into the sidebar or toolbar for easy access. This creates an alias to the Library folder that will permanently stay in the sidebar or toolbar until you remove it, while the Library folder remains hidden in your home folder.

Make it permanently visible
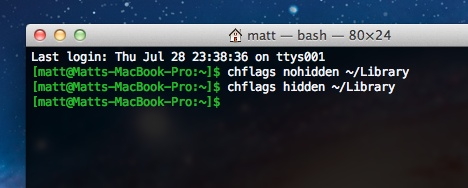
If you think all the above methods are just a waste of time and you want your Library back the way it was in Snow Leopard, it is possible to make it visible again. Open up Terminal (located in Applications/Utilities), paste in the following line and press Return:
chflags nohidden ~/Library
There’s no need to restart the Finder — the change should occur instantly. If you change your mind and want to hide the Library again, use the following command:
chflags hidden ~/Library
Make all hidden files visible
This is probably overkill if the Library folder is the only hidden item you want to access, but there is a simple Terminal command to make all hidden files visible in the Finder:
defaults write com.apple.finder AppleShowAllFiles YES
For more information on this command and how to set a keyboard shortcut to toggle hidden files, check out our article on how to quickly show and hide hidden files.
Preview's new "Magnifier"
Preview has an interesting new feature in Lion - the magnifier tool. Bringing it up allows you to take a closer look at a certain area of an image without having to zoom in the entire thing. There are two different ways to activate it: Either choose “Show Magnifier” from the Tools menu, or simply press the ` (backtick) key.
Once activated, the magnifier follows your cursor, allowing you to move to to different areas of the image. It seems to be yet another feature that is iOS-inspired — it feels very like the iPhone text selection “loupe”.
You can adjust the size of the magnifier using the pinch in and out gestures, allowing you to zoom in further and further until the magnifier occupies the whole screen.
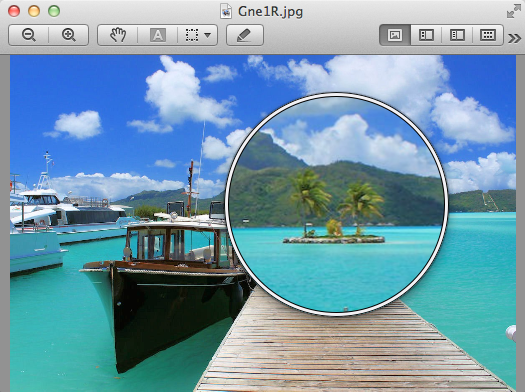
Using the magnifier on PDF files brings up a slightly different, rectangular magnifier. Its size and position also subtly adjust to the content it is magnifying. For example, it will “lock” to the width of a paragraph, which is really useful when scrolling down a page.

Press and hold keys for iOS-style accents popup
Here’s yet another iPhone feature that has cropped up on the Mac in Lion. While typing, simply pressing and holding on a key will bring up a popup showing all the possible diacritics (accents, cedillas, etc.) that can be added to the letter. You can then choose from the possibilities by pressing the corresponding number on your keyboard, or by clicking the one you want.
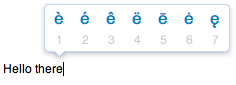
This seems to be a fairly quick way typing accents, and is much easier to use than the old method which involved remembering a number of Option key combinations. It does have one drawback however — it stops you from pressing and holding to write a long line of repeated letters, like thiiiiiiiiiiiiiiiis.
If you don’t regularly type accents, then losing the repeated character functionality might not be worth it for you. In this case, you can disable this new feature using a Terminal command. Open up Terminal (located in Applications/Utilities), paste the following line and press Return.
defaults write -g ApplePressAndHoldEnabled -bool NO
You will need to restart each application for the changes to take effect. Simply repeat the command with YES at the end to reverse.
Bring back the Dashboard "ripple"
In Lion, Dashboard has now been incorporated into Mission Control. The most striking consequence of this is that it is no longer a semi-transparent overlay that fades in over your desktop. Instead, it is now its own Space - the far left one. You can still access it by pressing the Dashboard key on your keyboard or by clicking it in your Dock, but now you can also get to it using the horizontal swipe gesture you use to slide between Spaces.
This means that Dashboard now slides in from the left of the screen when activated, and as there is nothing behind it, it has an opaque patterned background. As a result, Apple has decided to disable the fancy ripple effect that used to be shown when adding new widgets.
If you find that you can’t live without the ripple, don’t worry, you can bring it back by unticking just one checkbox. Open up System Preferences, and go to the Mission Control section. Then simply untick the first checkbox - Show Dashboard as a Space.
This completely restores Dashboard to the way it was in Snow Leopard, including the fancy ripple effect. This also stops the horizontal swipe to activating Dashboard, but you can bring this back using other tools if you really want it.
Replace DigitalColor Meter in Lion
I encountered my first major annoyance with Lion today: For no apparent reason, it seems Apple have decided to remove some of the most useful features from the DigitalColor Meter utility. For anyone who does any web development, DigitalColor Meter was great for quickly getting the hex value of any colour displayed on the screen, simply by hovering the cursor over it.
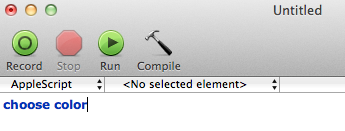
While it’s annoying that DigitalColor Meter is now pretty useless, it’s not too tricky to build our own replacement using a tiny bit of AppleScript with the built in OS X colour picker and a free downloadable plugin.
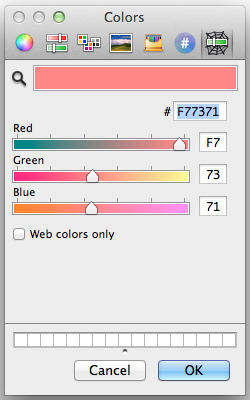
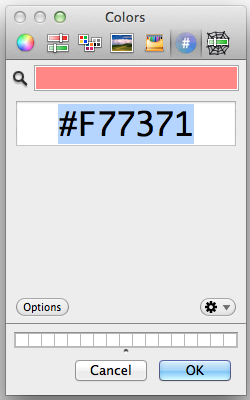
First we’ll start by creating our colour meter application. Open up AppleScript Editor (located in Applications/Utilities) and type choose color in the window that appears. This is actually all the AppleScript we need! To test if it works, click the Run button. Hopefully the familiar OS X colour picker should appear. Close it, choose Save As... from the File menu and give it a name like “Colour Meter.” Also, be sure to change the file format drop-down menu to Application. Now, whenever you double-click on this new application, the colour picker will open.
To get hex values in the colour picker, go to Color Palettes tab (the third one along), and change the Palette drop-down menu to Web Safe Colors. To “choose” a colour from somewhere on the screen, just click the magnifying glass, then click on the colour you want.
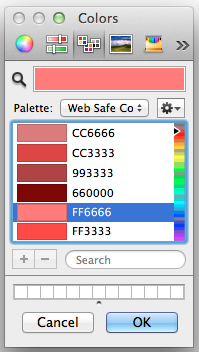
Straight away you might notice a small problem with the hex values that appear: They aren’t all there! This palette only contains “Web Safe Colors,” which basically means R, G and B values of 00, 33, 66, 99, CC and FF. To get the full range of colours, we will need to install a new colour picker plugin.
The two options are RCWebColorPicker from rubicode, and Hex Color Picker from waffle software. They each have their pros and cons, so it’s worth downloading them both and trying them out before deciding on one (or both).
Installation is fairly straightforward, apart from one quirk you might not be aware of — the Library folder within your user folder is now hidden in Lion. The easiest way to get to it is to hold down the Option key while clicking on the Go menu in the Finder, and choose Library from the list. Inside the Library, find the ColorPickers folder and drag the plugin files there. You will need to log out and in again before the new colour pickers will appear.
One final touch for your colour meter application is to give it a proper icon — by stealing the one from DigitalColor Meter. Find both applications in the Finder and choose Get Info for each of them. Select the DigitalColor Meter icon in its Info window and press Command-C to copy it. Then select the icon for your colour picker application, and press Command-V to paste.
![]()
Get to grips with Spaces in Lion
The way you interact with Spaces has changed quite a lot in Lion, so here’s a quick guide of all the new features and changes.
Spaces are now accessed through Mission Control
Apple’s naming of Mission Control is very apt — they have managed to merge Spaces, Exposé and Dashboard into one single interface, giving you one simple but powerful way to manage and navigate through all your open windows and applications. If you have a trackpad or magic mouse it can be accessed using gestures (default is swiping up with three fingers) otherwise you can access it through its Dock icon or assign it to a hot corner.
In Mission Control, you’ll find your Spaces listed horizontally along the top. By default you’ll just have two Spaces - Dashboard, and Desktop 1. To add new Desktops, just move your cursor up to the top right hand corner of the screen and click the new semi-transparent desktop that appears.
Switching between Spaces
The most obvious way to switch to another Space is to just click on it in Mission Control, however there are two other methods that are much quicker: Either by swiping with four fingers to the left or right, or alternatively by holding the Control key while pressing the left and right arrows. You can use either of these methods both inside and outside Mission Control.
You can also set custom keyboard shortcuts for each Desktop in the Keyboard section of System Preferences. On the Keyboard Shortcuts tab, look under Mission Control. Each Desktop should have an entry, where you can enable the default (Control-1, Control-2, etc.) or set whatever you want.
Set a different background for each Desktop
One of Mac OS X’s most requested features is now possible with Lion - setting a different background for each Space. Simply make sure System Preferences is closed, then open it up and change the background while you are in a specific Desktop. The background in Desktop 1 will be the default for new Desktops.
You can go one of two ways with this: The more practical thing to do is to set very different, contrasting backgrounds for each Desktop, making it easy to tell which Desktop you are in from a quick glance. Alternatively, you can use one of these awesome backgrounds that join up edge to edge. These look fantastic when horizontally sliding between Desktops using the four-fingered swipe gesture.
Assign applications to a Desktop
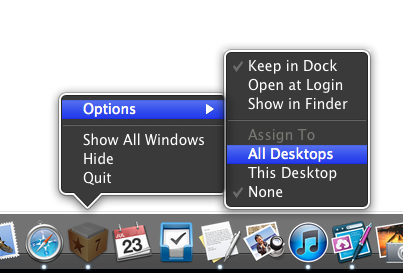
Now that there is no Spaces preference pane in System Preferences, you might think it’s no longer possible to assign applications to a specific Desktop (or all Desktops). Fortunately you can still do this — the settings have just been moved to a new place. You’ll find them by right-clicking on an application’s Dock icon and looking under Options. Here you can assign to All Desktops, This Desktop or the default, None.
Full screen apps get their own Space
Each application you set to appear full screen in Lion will automatically have its own Space created. I find this really useful with applications like iTunes - I want it always running in the background, and I want to be able to access it quickly. As its own Space, it is out of the way, but always quickly accessible with a four-fingered swipe to the left.

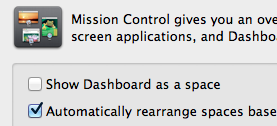
Take a quick look at what’s left in System Preferences
While most of the preferences for Spaces are now gone, there are still a few things you can change listed under Mission Control. In particular, you might want to turn off the option to “automatically rearrange spaces based on most recent use”.
New Growl themes for Lion
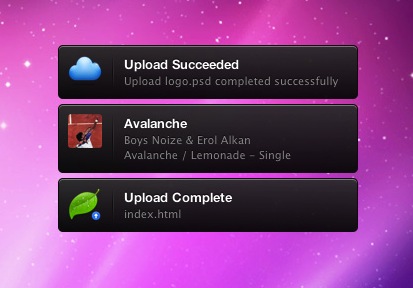
Growl is always one of the first things I install on every new Mac. It’s a fantastic notifications system that displays small popups to let you know when all sorts of things happen. You can get notified when new mail arrives, when a song starts in iTunes, when downloads are finished — literally hundreds of applications are compatible with it.
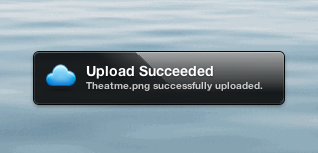
It seems Growl is having a few teething problems in Lion, one of which is that lots of themes need to be rewritten. Luckily, my all-time favourite theme, Mono, has just been updated to be Lion compatible. Check out the beautiful theme in the screenshot below.
While checking out which themes are Lion compatible, I also came across a new theme called Black Glass that might give Mono a run for its money. You can see it in the screenshot below, but you really have to go view the preview to appreciate its slick animations.
One additional problem with Growl in Lion that you might encounter is that sometimes the newly installed themes refuse to appear. There’s an easy fix — go to Activity Monitor (located in Applications/Utilities) and find GrowlHelperApp in the list. Select it and click Quit Process, then stop and restart Growl from its preference pane in System Preferences. Your new themes should now be working perfectly.
[Update: Christian has posted a link in the comments to his own customised Lion-compatible version of the Smokestack theme.]
Fix "Please close iTunes" Xcode installer problem
With Lion, Xcode 4.1 is now free from the Mac App Store. While this is great, lots of people (myself included) have encountered a small problem during the installation.
Once the installer gets to the stage “Updating files…”, the following dialog appears:
In order to continue installation, please close the following application:
iTunes
No matter how many times you quit and re-open iTunes, the dialog refuses to disappear, and the installation is stuck.
It seems this must be a common problem, as Apple have posted a solution right at the top of the Xcode Developer Support Center. It turns out that the background process “iTunesHelper” is still running, and also needs to be quit. To do this:
- Open Activity Monitor (located in Applications/Utilities)
- Start typing “iTunes” into the filter box in the top right
- Select iTunesHelper from the list and click the Quit Process button.
As soon as you do this, the dialog should close, and Xcode should continue to install.
If you are wondering what actually iTunesHelper does, it’s simply a small background process that watches out for when an iPhone, iPod or iPad is connected and automatically launches iTunes. When you install iTunes, it gets set as a login item, meaning it automatically starts up every time you log in. Unfortunately, after installing Xcode, I went to my login items (under Users and Groups in System Preferences) to find this:

It seems something (either the Xcode installation or the upgrade to the latest version of iTunes) had broken the login items link to iTunesHelper. Luckily this is easy to fix. Go find iTunes in the Applications folder, and right-click it and choose Show Package Contents. You’ll find iTunesHelper in the MacOS folder. Simply drag it across into your login items and everything should be back to normal.
Thanks to our sponsors!
I’d like to take a moment to say a big thank you to all our sponsors who help keep Mac OS X Tips running. At the moment, all of our sponsors are developers of great Mac apps, so it’s definitely worth checking them out:
Sketcher - A fun app that can turn any photo into a pencil sketch, watercolor or oil drawing.
MacKeeper - A fantastically useful app that combines a number of utilities to keep your Mac clean, fast and reliable.
Path Finder - The definitive, award-winning Finder alternative that adds a whole load of pro features to the familiar Finder interface.
Home Inventory - A simple app to create and maintain an up-to-date inventory of the items in your home.
PhotoStyler - Makes it easy to apply dozens of preset styles, filters and effects to your photos.
If you are interested in sponsoring Mac OS X Tips, please see our advertising page.
Add signatures to PDFs using Preview and your Mac's built in camera
A new feature in Lion’s Preview application means an end to the tedious and fiddly task of scanning, cropping and pasting signatures into PDF documents. “Signature Capture” allows you to simply sign your name on a piece of paper and hold it up to your Mac’s camera, while Preview takes care of the rest and automatically inserts it into the PDF. Here’s a quick guide on how to do this.
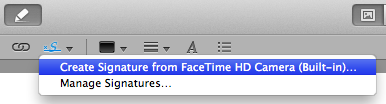
Start by opening up the PDF you need to sign using Preview. Look in the toolbar for the Annotate button (looks like a pencil) and click it to bring up the Annotations Bar. There are a couple of new additions to this bar in Lion, but the one we are looking for is the Signature button. Click this button, and select “Create Signature from Camera” from the menu.
The instructions in the Signature Capture window are fairly self explanatory, but it’s worth emphasising that it’s definitely best if you use a fairly thick pen with black ink. Hold the paper up close to your Mac’s camera, and then click the Accept button when you are satisfied with the Preview. It can be a bit tricky to do all this simultaneously, so it helps if you use a small piece of paper that you can hold with one hand.
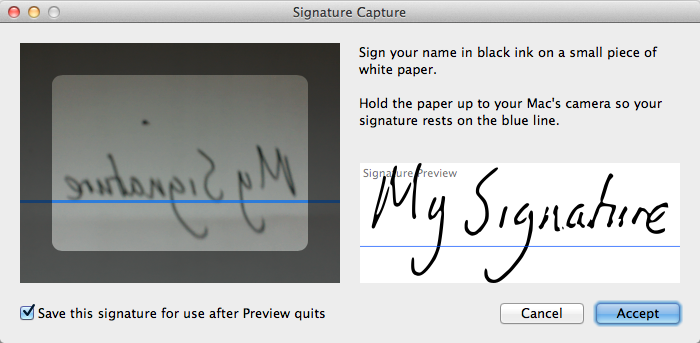
Once you have clicked Accept, it’s simply a case of clicking in the PDF document where you want the signature to appear. If you hover the cursor over different element in the document, you should notice that lines and boxes highlight blue, indicating Preview has detected a suitable place to put your signature.
Any signatures you add using Signature Capture are stored in Preview and are accessible from all your documents, meaning you only have to go through this process once. Clicking the Signature button will show all the signatures you have already imported, and choosing “Manage Signatures” allows you add new ones and remove any you no longer need.
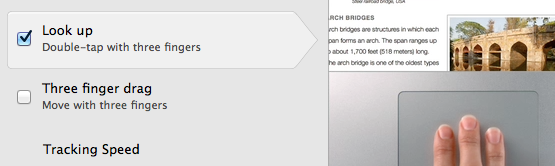
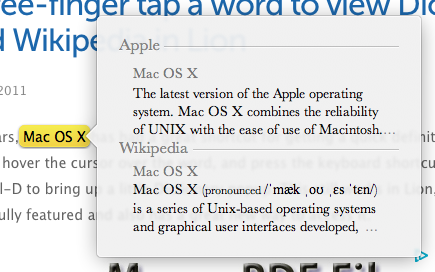
Three-finger tap a word to view Dictionary and Wikipedia in Lion
For years, Mac OS X has had a great shortcut for getting a quick definition of a word: Simply hover the cursor over the word, and press the keyboard shortcut Command-Control-D to bring up a little Dictionary popup. This still works in Lion, but it’s now much more fully featured and also has a great new way to access it.
If you have a trackpad, you can now just double-tap with three fingers to bring up the new “Look up” interface. If you are having trouble getting it to work, make sure you are just gently tapping on the trackpad, rather than fully clicking. You might also need to make sure the “Look up” option is enabled in the Trackpad section of System Preferences.
For those still without a multitouch input device, don’t worry, you can still access Look up through the same shortcut (Command-Control-D) or by right-clicking on a word and choosing “Look up” from the menu.
The big new addition to the Look up interface in Lion is Wikipedia. This transforms an already useful tool into something that is fast becoming one of my favourite new Lion features.
Wikipedia now manages to catch most of the people and place names and the more unusual words that the old Dictionary Look up in Snow Leopard would fail on. Now, while reading text anywhere on your Mac, you are only a quick tap away from a dictionary definition, a list of synonyms and a full encyclopaedia entry.
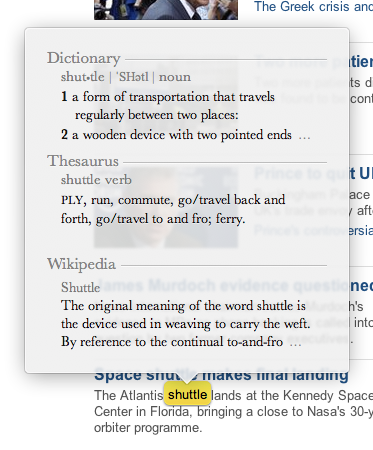
As before, Look up will cleverly group words together before displaying a definition, such as a person’s first and last name, or a well known phrase. This isn’t perfect though, so you can force the grouping of multiple words by selecting them before invoking the popup.
As well as Wikipedia, another new section called “Apple” has also been added. This only appears on words that are Apple brand names and trade marks, offering a quick description of the relevant application or hardware.
Automatically save Mail attachments using AppleScript
Here’s a simple AppleScript that’s great for if you regularly receive email attachments that you want to save in the same folder. This is really useful in situations where you receive regular reports via email, or even if you just want to be able to quickly delete emails without worrying about losing the attachments.
The script works in conjunction with “Rules” in Mail, which makes it really easy to filter out the attachments that you want to save. Once it has these attachments, the script simply adds a timestamp to the name and saves them in the specified folder. Here’s a step by step guide on how to set everything up.
First, start by opening up AppleScript Editor (located in Applications/Utilities). Copy and paste the following script into the empty window:
on perform_mail_action(ruleData)

    -- The folder to save the attachments in (must already exist)
    set attachmentsFolder to ((path to home folder as text) & "Documents:Attachments") as text

    -- Save in a sub-folder based on the name of the rule in Mail
    set subFolder to name of |Rule| of ruleData as text
    tell application "Finder"
       if not (exists folder subFolder of folder attachmentsFolder) then
           make new folder at attachmentsFolder with properties {name:subFolder}
       end if
   end tell

    -- Get incoming messages that match the rule
    tell application "Mail"
       set selectedMessages to |SelectedMessages| of ruleData
        repeat with theMessage in selectedMessages

            -- Get the date the message was sent
            set {year:y, month:m, day:d, hours:h, minutes:min} to theMessage's date sent
            set timeStamp to ("" & y & "-" & my pad(m as integer) & "-" & my pad(d) & "-" & my pad(h) & "-" & my pad(min))

            -- Save the attachment
            repeat with theAttachment in theMessage's mail attachments
               set originalName to name of theAttachment
                set savePath to attachmentsFolder & ":" & subFolder & ":" & timeStamp & " " & originalName
                try
                   save theAttachment in savePath
               end try
           end repeat
       end repeat
   end tell

end perform_mail_action

-- Adds leading zeros to date components
on pad(n)
   return text -2 thru -1 of ("00" & n)
end pad
Click the Compile button to check that you have copied everything correctly. If you receive an error, something isn’t right.
Take a look at the script and see if you can figure out what each part does. One of the great things about AppleScript is that even people who have never seen it before can get the gist of what a script does. The third line specifies the folder where the attachments will be saved — you might want to change this. It is currently set to a folder called “Attachments” located in the Documents folder. Whatever folder you choose, you need to go into the Finder and create it if it doesn’t already exist.
Save the script and remember the location. I recommend creating a “scripts” folder in your Documents folder that you can use to store all your scripts.
The final step is to open up Mail and create a new rule. To do this, go to Mail’s Preferences, and click the Rules tab. Click the “Add Rule” button, and give the new rule a name. This name will be used to create a sub-folder within the Attachments folder, meaning you can create multiple rules to filter different types of attachment.
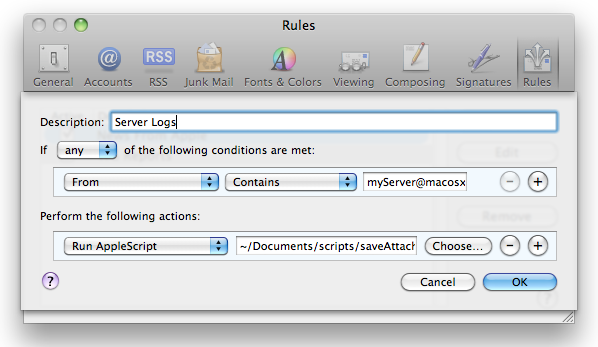
Next, you will need to set the conditions that need to be satisfied for the attachment to be saved. Using the “Any Attachment Name” you can filter attachments of a specific kind using their file extension, for example saving only PowerPoint presentations or only images. Alternatively you can save only attachments from a specific person, or simply save all the attachments sent to your email address.
Once you have set up your conditions, choose “Run AppleScript” from the perform actions drop-down menu, and click the “Choose” button to select the script you saved earlier. You can also add additional actions as well as the script, such as deleting the message or moving it into another mailbox.
One interesting way to use this script would be to put the attachments folder in your Dropbox or iDisk. Then your attachments are automatically synced to the cloud, making them accessible from anywhere.
Keep track of hidden settings changes made using the defaults command

The defaults command is a great way to change hidden settings in Mac OS X. These hidden settings are generally options that developers decided to hide in the final version of their app for some reason — they might be too complicated for the average user, or maybe they cluttered up the preferences window too much. But while these settings no longer appear in the application preferences, we can still change them through the Terminal by using defaults. As long as you know the right command, it’s simply a case of typing it in and pressing Return. For some examples just check out our previous tips.
One problem with this is keeping track of all the changes you have made. A recent article over on MacOSXHints proposed a solution, but it’s a bit inelegant as it involves creating a replacement defaults script that intercepts your commands first. Here’s a much more straightforward solution that I came up with. It basically involves first logging previously made changes to a file, then setting up a script that appends any future changes to the file as they are made.
This simple solution involves using the history command. To see what this does, start by opening up Terminal (located in Applications/Utilities), typing history and pressing Return. Up to the last 500 things you have typed into the Terminal should appear in a numbered list. We don’t care about most of them, so we can filter this list using grep as follows:
history | grep "defaults write"
As before, just enter this line and press Return. A list of all the defaults commands you have ever made should appear. Unfortunately, as history only stores the 500 most recent items, over time the older defaults commands will start to disappear. So on its own this isn’t really sufficient to keep an accurate log, but we can use it to help us make our own permanent log. To do this, start by entering the following command into the Terminal, adjusting the file path if you want to.
history | grep "defaults write" >> ~/Documents/defaultsLog.txt
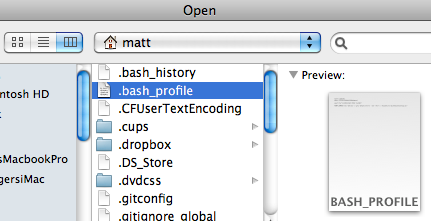
Now we have all our previous changes saved, we can set up a script that adds any future ones onto the end of that same file. Open up TextEdit and choose Open from the File menu (Command-O). Go to your user folder and then press Command-Shift-. (Period) to show hidden files. The one we are looking for is .bash_profile. Don’t worry if you can’t find it — instead you can just create a new file and save it in your user folder as .bash_profile. Either way, once you have this file open, add the following line to the end:
PROMPT_COMMAND='echo "$(history 1 | grep "defaults write")" | sed '/^$/d' >> ~/Documents/defaultsLog.txt'
This is a quick little script that runs every time a new command prompt is shown. It simply checks if the last command contained defaults write, and if so, adds it onto the end of the file.
Fix portrait iPhone videos with iMovie
The iPhone’s ability to shoot video in any orientation is great, but it can be annoying when you realise you accidentally shot a video in portrait when you would prefer the more conventional landscape orientation. Generally there are two common scenarios: The first is where you shot an entire video in portrait, and secondly where you quickly realise and rotate the phone back to landscape for the majority of the video. Here’s how to fix videos in both these situations.
First lets consider the situation where you started filming in portrait, then quickly realised and rotated the phone to film the rest of the video in landscape. The problem with this is the iphone decides the orientation of the video at the start, meaning that after you rotate the phone the video stays in portrait and everything just becomes sideways.
Fixing this is simply a case of rotating the video 90 degrees to the correct orientation. In iMovie, start by selecting the portion of the clip that you want to rotate. This might be as simple as just selecting the entire clip, but if you rotated the phone multiple times during the video you will want to select each portion separately.
Next, click the crop button, located near the middle of the centre bar, as shown below.
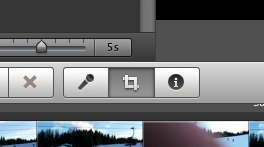
Once you click the crop button, some new controls should appear over the top of the viewing window. The ones we’re interested in are the curved rotation arrows. Simply click the one that corresponds to the direction you want to rotate the video, then click the Done button.

This leaves you free to export your Movie from iTunes using one of the options in the Share menu. It’s really easy to export it straight to YouTube, Facebook or MobileMe or you can just export it back to a movie file to use however you want.
Now lets consider the situation where you have an entire video shot in portrait orientation. Obviously there’s no magic way to convert this into a nice looking landscape video, but we can do our best by cropping and adding black bars down the side. This will allow us to export to a standard landscape HD video, meaning there is no danger of getting a stretched video when uploading on online video sites like YouTube.
As before, start by clicking the crop button on the centre bar to bring up the controls over the viewer. On these controls, click the button that says “Crop”, and then click the button that says “Allow Black.” Now you can adjust the size and position of the green box to choose the new dimensions of your video. Before you click Done, it’s worth clicking the play button to check that you haven’t accidentally cropped something important out of the video.

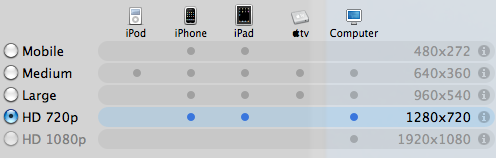
To finish up, choose “Export Movie” from the Share menu. You can choose any quality, but HD 720p (1280 x 720) will preserve the original quality as much as possible.
Add any text to iTunes as a spoken track
There’s a great feature in Mac OS X that allows you to take any block of text and transfer it into iTunes as a spoken track, which you can then easily sync to an iPhone or iPod. This is done using a ‘Service’ that comes built into your Mac, but is disabled by default in Snow Leopard. This article explains how to enable it, and, for those who are interested, I’ve also included a short tutorial on how to add some improvements to make it more like the new version that will be included with Lion.
First, to enable the Service, go to the Keyboard section of System Preferences. This may sound like a bit of a weird place to have the Services settings, but it makes more sense when you consider pretty much the only setting for Services apart from turning them on and off is assigning keyboard shortcuts.

Click the “Keyboard Shortcuts” tab, and then choose “Services” from the list on the left. There are loads of great little features hidden away in here that are worth checking out, but for now just find “Add to iTunes as a Spoken Track” in the list on the right and make sure the checkbox next to it is checked. You might also want to add a keyboard shortcut if you think you might be using this often.
Now, whenever you have a block of text selected, just right-click on it and choose “Add to iTunes as a Spoken Track.” iTunes should open up, and a new track called “Text to Speech” should have appeared in your music library.
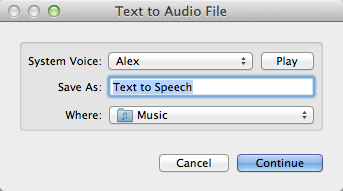
In Mac OS X Lion (coming out next month), this Service is enabled by default, and has been upgraded to give you the option to choose the voice used and the name and location of the track in iTunes. The screenshot below gives a little sneak preview of what to expect.
In the meantime until Lion is available, we can do a bit of tinkering to make our current Snow Leopard version almost as good as the upcoming Lion version. Like many Services, it is actually just an Automator workflow that you can easily modify yourself using ready-made building blocks. To see how this works, open up Automator (located in the Applications folder) and click “Open an Existing Workflow.” Navigate to
Macintosh HD/System/Library/Services/
and choose “Add to iTunes as a Spoken Track.”
First lets familiarise ourselves with how this workflow operates. The selected text input comes in from the top into the “Text to Audio File” action. This creates an audio file with the specified voice and file name, and saves it in your Music folder. This file is then used as the input to the “Import Audio Files” action. This takes the file, adds it to iTunes, then deletes the original file. Finally, the “Add songs to Playlist” action takes this song and puts it in the specified playlist.

It’s quite clear that we can change the playlist, file name and voice from here, but with a bit of work we can make the Service work like the Lion version, where you are prompted to choose these values each time you run it.
First, if the Library isn’t visible, click the “Show Library” button in the top left of the window. This shows all the available actions we can add to the workflow. To start off, our main aims are to:
- Display a popup window that asks us what we want to call our track.
- Put that value in the “Save As” text field in the “Text to Audio File” action.
To do this, we need to add two actions to the start of the workflow. Drag across the “Ask for Text” action and the “Set Value of Variable” action, and place them above all the existing actions in the workflow. In the “Ask for Text” action, set the question to “Track Name:” and tick the checkbox “Require an answer.” In the “Set Value of Variable” action choose “New Variable...” from the drop-down menu, and call it “Name.”
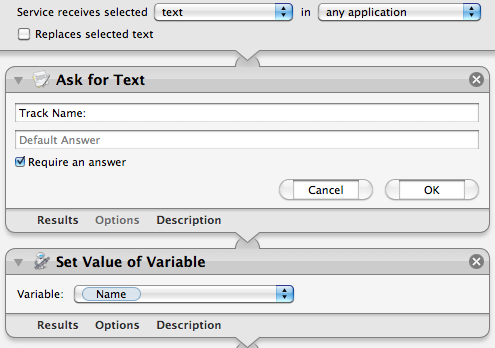
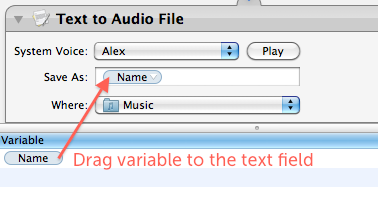
So what exactly is this thing called a “variable” that we’ve just created? Basically it just gives us a way to store a value (in this case the chosen file name) and then use it later in a different place. Once you have created the “Name” variable, you should see it in a new list that has appeared at the bottom of the workflow area. Using this variable in other places is simply a case of just dragging it there. So select “Name” in the list at the bottom, and drag it onto the “Save As” text field in the “Text to Audio File” action.
Great, it looks like we’re all done! But wait — there’s actually a small problem with our workflow. Look carefully at the order of the actions in the workflow, and think about how the output of each action acts as the input to the next action. The selected text comes in from the top, but the first action (“Ask for Text”) just ignores this, and outputs the chosen file name. This is passed on through the subsequent actions, meaning that the text that is spoken is actually just the file name instead of the selected text!
So the two new actions that we have added have got in the way, and don’t allow us to pass the selected text through to the “Text to Audio File” action. What we need is some way of storing the selected text somewhere safe, then retrieving it later to use in another place ... luckily that’s exactly what variables are for!
It just takes another two actions to save and then retrieve a variable. First, add a “Set Value of Variable” action right at the start of the workflow, before all the existing actions. Once again, choose “New variable...” from the drop-down menu, but this time call it “Selected Text.” Now the selected text is stored away safely in a variable while we do other things. To retrieve the value later on when we need it, add a “Get Value of Variable” action just before the “Text to Audio File” action. Finally, make sure “Selected Text” is chosen in the drop-down menu, and also right-click on the “Get Value of Variable” title and choose “Ignore input.” The final result should look something like the following screenshot:

Note: You will find that Automator won’t let you save over the built-in Service, so you will have to choose “Save As” and give this Service a new name. Further extending the workflow to allow the user to also choose the name of the playlist is really easy and can be done in exactly the same way, but choosing the voice is a bit more complicated, and can probably only be achieved using a bit of AppleScript.
Quickly show and hide hidden files
In Mac OS X, files with names that start with a dot (.) are hidden. You may have noticed some of these before, for example when copying files from your Mac to a PC where they aren’t hidden. The most common one you might bump into is the .DS_Store file that Mac OS X puts in every folder (to save various view settings), but there are all sorts of other hidden files used by all sorts of applications.
These files are hidden by default for good reason — the average user almost never needs to change them, so keeping them visible would just cause useless clutter. But every now and again you may find that you need to view the hidden files, for example to browse the UNIX filesystem, to work with .htaccess files or to find a file that you accidentally (or purposefully) hid by naming it with a dot.
Using the Terminal
The easiest way to show hidden files is using the Terminal. Just open up Terminal (located in Applications/Utilities), paste in the following line and press Return.
defaults write com.apple.finder AppleShowAllFiles -bool YES
The Finder needs to be relaunched before the changes take effect, so type killall Finder and press Return. To hide the files again, use the following line instead.
defaults write com.apple.finder AppleShowAllFiles -bool NO
While this method is fine if you only want to change the visibility of hidden files occasionally, it is a bit cumbersome if you find yourself having to do it regularly. Read on for some quicker ways to access hidden files.
In open and save dialogs
In open and save dialog boxes, there is a handy keyboard shortcut to toggle the visibility of hidden files. While the dialog is open, just press Command-Shift-. (dot). Just press it again to hide the files again.
For some keyboard layouts, normally in ones where a comma is used as a decimal point, you may find that this shortcut is Command-Shift-, (comma) instead.
Setting up a keyboard shortcut
While Apple helpfully provided a keyboard shortcut for use in open and save dialogs, they didn’t do the same for normal Finder windows. Luckily, it’s not too tricky to set up a keyboard shortcut yourself.
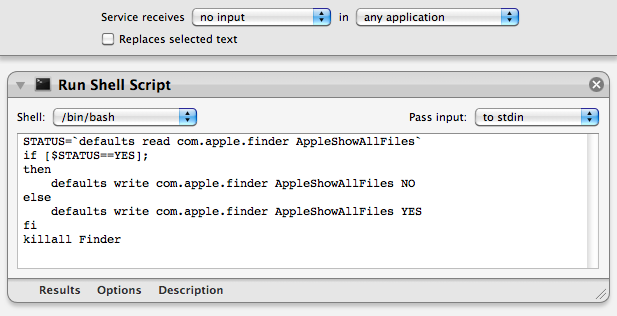
To start, open up Automator (in the Applications folder) and choose a Service template. From the library choose "Run Shell Script" and drag it across to the workflow area. In the text box paste the following command:
STATUS=`defaults read com.apple.finder AppleShowAllFiles`
if [ $STATUS == YES ];
then
    defaults write com.apple.finder AppleShowAllFiles NO
else
    defaults write com.apple.finder AppleShowAllFiles YES
fi
killall Finder
Finally, change the "text" drop-down menu to “no input” and then save you workflow as “Toggle Hidden Files”.
Now if you go to the Finder menu and look under Services, you should find a “Toggle Hidden Files” option. To add the keyboard shortcut, go to the Keyboard section of System Preferences and click the Keyboard shortcuts tab. Select Services from the list on the left, then scroll down to the bottom of the list on the right to find “Toggle Hidden Files”. Double-click on the area to the right of it, then press the keyboard shortcut you want. I used Command-Shift-. (dot).
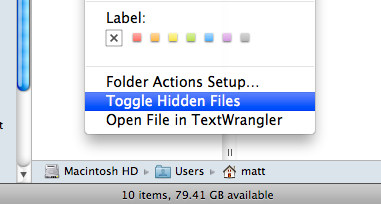
Setting up a context menu item
To use a context menu instead of a keyboard shortcut you just need to follow the same instructions as above, but make some slight changes in Automator. Instead, change the “text’ drop-down menu to “Files and Folders” and the “any application” drop-down menu to “Finder”. Now when you right-click on a file or folder in the Finder, a new “Toggle Hidden Files” option should appear.
Use Presenter Display to enhance your Keynote presentations
A great feature of Keynote is the Presenter Display. If you are giving a presentation with two displays (one for you and one for the audience), this allows you to display notes and other useful tools like a timer on your screen while the audience just sees the slides as usual. Even if you don’t have two displays, the Presenter Display can be really useful for rehearsing your presentation before you give it.
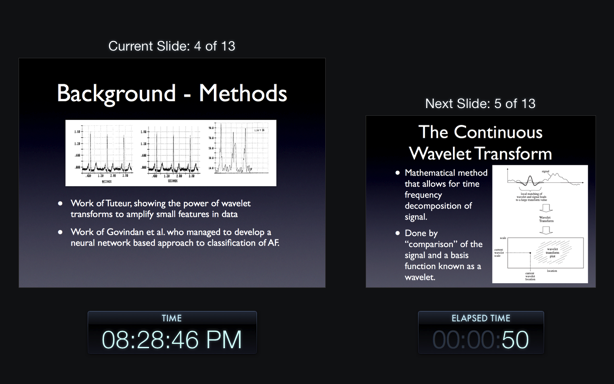
To get an idea of what Presenter Display looks like, just open your presentation in Keynote and choose “Rehearse Slideshow” from the Play menu. It should look something like the screenshot below, with the current slide, the next slide, the current time and the amount of time elapsed.
If you don’t like the default setup, they you are in luck as Keynote allows you to customise what is displayed. To add some extra stuff and move and resize things, go to the Play menu again, but this time choose “Customize Presenter Display”. The Presenter Display will appear again, but now you can drag and resize the different objects.
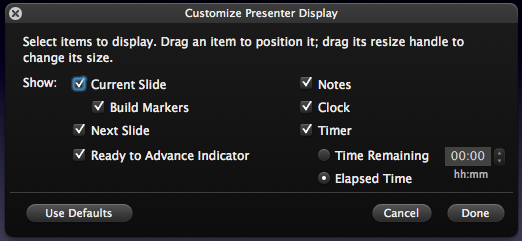
In addition you will also see an extra window that allows you to add and remove items. Most of them are self explanatory, but a couple aren’t so obvious. The “Ready to Advance Indicator” is a bar that appears along the top of the screen that turns green when any animations on the current slide are finished and the next slide is fully loaded and ready to be displayed. The “Build Markers” are useful if you have set the slide to appear bullet point by bullet point, or have an image or chart that is set to animate in after the rest of the slide. They are essentially little blue dots that appear below the current slide to indicate how many more times you have to press “Next” before everything on the slide has appeared. Also, if you are wondering how you add notes to your slides, just choose “Show Presenter Notes” from the View menu.

To make sure Presenter Display appears in your screen (and only your screen!) when you come to give your presentation, you will need to change a few things in the Keynote Preferences. Go to the Preferences (in the Keynote menu) and click on the “Presenter Display” tab. In here, make sure the “Use alternate display to view presenter information” checkbox is checked. If you find the displays are the wrong way around, go to the “Slideshow” tab and click “Present of Secondary Display” at the bottom.
Now, just choose “Play Slideshow” as usual, the Presenter Display should come up on your screen and the audience will never know!
How To Build Your Own Safari Extensions
I’ve just written a tutorial over at Macs in Chemistry on how to create a Safari Extension. It’s aimed at beginners, with no prior knowledge required. A bit of experience with JavaScript will be useful to really understand what you are doing, but this is something you can pick up along the way.
The tutorial guides you through making an extension that searches the PubChem database, but you can easily adapt it to work with any search engine you want. If there is interest I can write a follow up that addresses some more advanced concepts like automatic updating and injecting content into web pages.
If you are interested in Safari Extensions check out the Mac OS X Tips Safari Extensions collection, and feel free to copy any of my code.
Getting started with the Mac App Store
Yesterday the Mac App Store went live with more than 1000 apps already available. Here are a few tips to get you started.

Download the App Store
The Mac App store is available through Software Update, which you can access through the Apple menu. It actually shows up in the list of available downloads as Mac OS X Update Version 10.6.6. You’ll need to restart after installing it, and then the App Store will show up as a new icon in your Dock.
Different ways to access the App Store
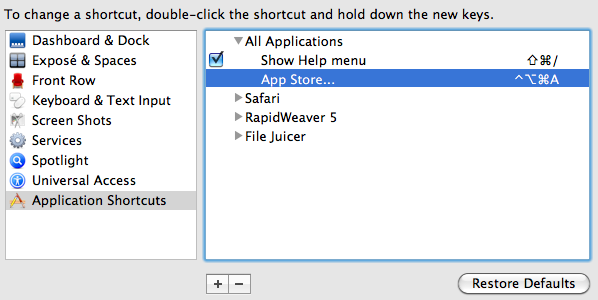
If you would prefer not to have an extra icon in your Dock, it’s fine to just drag it out to remove it like you would for any other application. Then if you still want to access the store, there are a number of alternative ways.
A new item “App Store...” is added to the Apple menu, which gives you quick access no matter what application you are in. This also means you can also set a universal keyboard shortcut for it. Just go to System Preferences, go to the Keyboard section, then click on the “Keyboard Shortcuts” tab. Click the plus (+) button to add a new shortcut, and in the dialog that appears, leave the dropdown menu as “All Applications,” Type “App Store...” as the menu title, and then choose a shortcut.
Alternatively, you can access the App Store just like you would any other application. You can just find it in the Applications folder and double-click it, or use Spotlight (Command-Space is a handy shortcut) or any other application launcher like Alfred.
Fixing Error 100
For many people, everything seems to be working fine until they go to download an app, and then they receive a dreaded error message:
We could not complete your App Store request. An unknown error occurred (100).
Luckily it’s easily fixed. It turns out this is because there is a new set of iTunes Terms and Conditions that you have to “read” and agree to, but the App Store doesn’t give you the opportunity to do this. The best solution I found is the following:
- Quit both the Mac App Store and iTunes.
- Open iTunes, go to the iOS App Store and download a random free iPhone app.
- You should be prompted to agree to the new terms and conditions.
- Delete the iPhone app you just downloaded.
- Open up the Mac App Store and everything should be fine.
What about applications you already own?
When you download an app through the Mac App Store, the little button next to it changes to “Installed” and the app appears in your purchases section. But what about apps that you already own from before the App Store was around?
It turns out that in general, the App Store recognises that you already have the application, and marks it as “Installed.” However, with some applications (like Pixelmator and Rapidweaver) this doesn’t happen due to the version numbers not matching, and for some this can be fixed by updating the application to the latest version.

Unfortunately, this turns out to be pretty useless. These applications won’t show up in your purchases list, and you won’t be able to re-download or update them through the App Store at all. Unless you want to pay a second time, this means you will have to continue to update these applications in the same way as before - by checking the developer’s website or by using the application’s “Check for Updates” feature.
Of course for free applications, it’s not too much trouble to just download them again through the App Store. If you want to do this with an application that is listed as “Installed,” you will have to drag it from the Applications folder to the Trash and then restart the Mac App Store before you can download it again.
It’s still only iWork ’09
Don’t be fooled by seeing Pages, Keynote and Numbers being sold as separate applications. So far iWork ’11 still doesn’t exist, and these are just the same 2009 versions of the iWork applications. While this is disappointing, it turns out that iWork is the exception to the rule when it comes to updating previously bought applications through the App Store. If you already own iWork ’09, Pages, Keynote and Numbers should sown up in your purchases section and you should be able to update them through the App Store in future.
Finder now searches the store for unknown file types
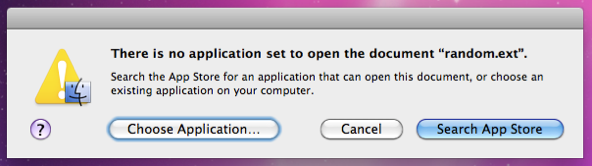
It’s always been the case that if you try to open an unrecognised file type, a dialog will appear asking you to choose which application to open it with. A new button has now been added that allows you to search the App Store for the application that opens files with that extension. All it does is open up the App Store and perform a search using “extension:” as a filter. For example, if you were trying to open a Pixelmator file, it would search “extension:pxm” bringing up Pixelmator as the only result.
Get some good deals!
You may have noticed that many applications are much cheaper on the App Store than elsewhere. For example, Apple applications like the iWork and iLife suites and Aperture and much cheaper than the boxed versions. Many third-party applications like Pixelmator and Rapidweaver are also much cheaper. It’s hard to say if these prices are only temporary or are here to stay, so it might be worth taking advantage if this while you have the chance.
The downside to lower prices is that free upgrades are likely to become less common in future, meaning you will probably have to spend a lower amount on each version, rather than a big one-off payment at the start.
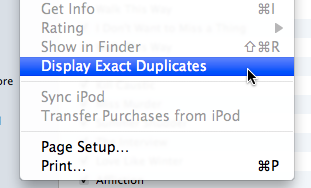
Only show exact duplicates in iTunes
A great feature of iTunes is the “Display Duplicates” option that is located in the File menu. This is really useful for finding duplicate songs in your iTunes Library and deleting them.
However, by default, iTunes is quite lenient about what it defines as a duplicate. As long as the Song Name and Artist are the same, the song will be counted as a duplicate. This can be a bit annoying, for example if you have different versions of the same song on different albums and you want to keep both.
To make iTunes more strict when showing duplicates, hold down the Option key before selecting the menu item. You should see it change to “Display Exact Duplicates.” Now only songs that have exactly the same information will be displayed, allowing you to more easily find the true duplicates.