Add signatures to PDFs using Preview and your Mac's built in camera
A new feature in Lion’s Preview application means an end to the tedious and fiddly task of scanning, cropping and pasting signatures into PDF documents. “Signature Capture” allows you to simply sign your name on a piece of paper and hold it up to your Mac’s camera, while Preview takes care of the rest and automatically inserts it into the PDF. Here’s a quick guide on how to do this.
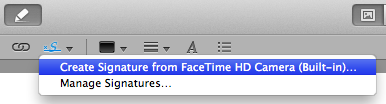
Start by opening up the PDF you need to sign using Preview. Look in the toolbar for the Annotate button (looks like a pencil) and click it to bring up the Annotations Bar. There are a couple of new additions to this bar in Lion, but the one we are looking for is the Signature button. Click this button, and select “Create Signature from Camera” from the menu.
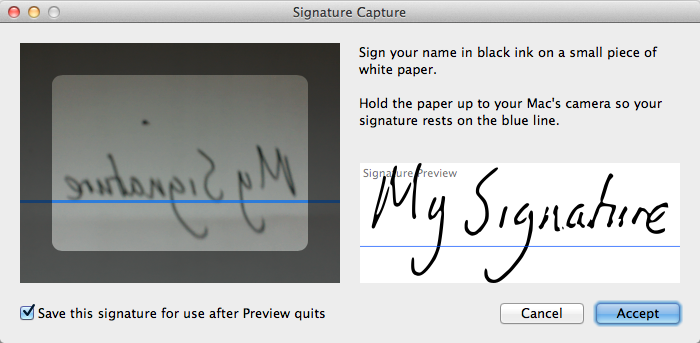
The instructions in the Signature Capture window are fairly self explanatory, but it’s worth emphasising that it’s definitely best if you use a fairly thick pen with black ink. Hold the paper up close to your Mac’s camera, and then click the Accept button when you are satisfied with the Preview. It can be a bit tricky to do all this simultaneously, so it helps if you use a small piece of paper that you can hold with one hand.
Once you have clicked Accept, it’s simply a case of clicking in the PDF document where you want the signature to appear. If you hover the cursor over different element in the document, you should notice that lines and boxes highlight blue, indicating Preview has detected a suitable place to put your signature.
Any signatures you add using Signature Capture are stored in Preview and are accessible from all your documents, meaning you only have to go through this process once. Clicking the Signature button will show all the signatures you have already imported, and choosing “Manage Signatures” allows you add new ones and remove any you no longer need.