12 tips for iTunes 10
iTunes 10 has been released, and with it we get some great new features and some interesting user interface changes. Here is a collection of tips and tricks to help you get the most out of what’s new.
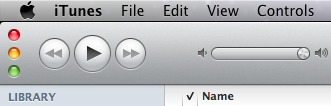
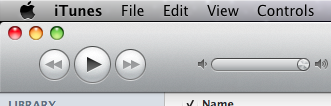
Make the Close, Minimize and Zoom buttons horizontal
Apple’s decision to rotate the red, yellow and green control buttons to save space has caused a bit of an outrage. If you prefer the way the old style looked, you can change it back using a Terminal command. Just open up Terminal (located in Applications/Utilities), paste in the following line and press Return.
defaults write com.apple.iTunes full-window -1
Now just quit and reopen iTunes, and the buttons should be back to their horizontal orientation. If you decide you want the new vertical style back, just use the following line in the Terminal instead.
defaults write com.apple.iTunes full-window -0
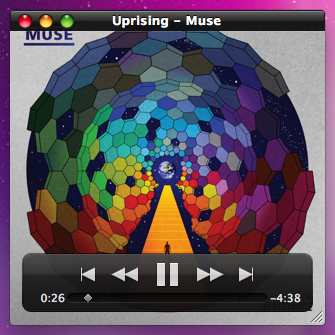
The Artwork player
If you like the iTunes miniplayer (press the green button) then you’ll want to try out the new artwork player. First make sure you have the album artwork displayed by clicking the fourth from left button on the bottom bar. Then, while a song is playing, click on the artwork to bring up the artwork player. When you hover over the artwork, the name of the song and some playback controls will appear. Now you can just close the main iTunes window and use this window to control your music.
Change the new icon
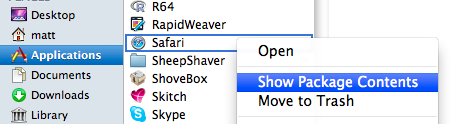
If you can’t bear to part with the old iTunes icon, don’t worry, it’s really easy to change back. First, download the old iTunes.icns file. Then find iTunes in your Applications folder, right-click on it and choose “Show Package Contents.” Find the Resources folder inside the Contents folder, and then drag the iTunes.icns file here. This will replace the new iTunes.icns file, so you might want to create a backup of it in case you ever want to change back.
There are also a load of alternative iTunes icons available on the internet (This one is good). Generally these won’t be available as icns files, but you can still use them as your iTunes icon. Find the image you want to use, right-click on it and choose “Copy.” Then select iTunes in your Applications folder and choose “Get Info” from the File menu. Finally, just click on the icon in the Info window and press Command-V or choose “Paste” from the Edit menu. If this doesn’t work right away, you may need to change your permissions to “Read & Write” at the bottom of the Get Info window first.
Alternatives to broken Automator workflows
Unfortunately there seems to be a bug in the new iTunes that breaks Automator workflows that involve iTunes. Old workflows won’t load, and if you go to create a new one you will find that the iTunes actions are missing. Hopefully this bug will be fixed soon, but for now you can get most of the same functionality using AppleScript. Check out the brilliant Doug’s AppleScripts for iTunes site for AppleScripts that do the same tasks as your Automator workflows.
Creating ringtones
If you were one of the few people who loved paying 99¢ to turn a song you already own into a ringtone, you will be disappointed that this functionality is gone from iTunes 10. Fortunately, you can still do it for free using the usual method.
To do this, first find the portion of a song you want to use as a ringtone, and note down the start and end times. Right-click the song and choose “Get Info" and then go to the Options tab. Enter the start and end times here, then click OK. Right-click on the song again, but now choose “Create AAC version." This should create a copy of the song that is only the length that you specified. Delete this new copy, but make sure you click “Keep File.” In the Finder, go to your Music folder and navigate into your iTunes music and find the file you just created. Change the file extension from “m4a" to “m4r,” then double-click it to add it back into iTunes as a ringtone.
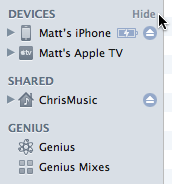
Hiding sections in the sidebar
The disclosure triangles to show and hide the Devices, Genius, Shared and Playlist sections in the sidebar are gone. But if you hover your mouse over one of these titles, a “Show” or “Hide” button appears.
Bring back colours in the sidebar icons
If you hate the lack of colours in iTunes 10, you can do a bit of a hack to bring back some of the old icons. First you will need to find a modified iTunes.rsrc file somewhere on the internet. You can find some here, here, and here, and they all offer slightly different sets of icons.
Once you have found one you like, find iTunes in your Applications folder, right-click on it and choose “Show Package Contents.” Navigate to the Resources folder, and create a backup of the iTunes.rsrc file by dragging it to the Desktop. Then just drag the modified iTunes.rsrc that you downloaded into the Resources folder. You will need to quit and reopen iTunes for the changes to take effect. Just drag your backup file back into the Resources folder from the Desktop if you want to change back to colourless icons.
Remove sidebar icons
If you don’t like the colourless icons or the colourful ones, you can now get rid of them altogether. Just go to iTunes Preferences and un-check “Show source icons” under the General tab. This gives you a tiny bit more horizontal space, and makes the list look a bit cleaner.
![]()
Revert to the old hybrid view
Steve Jobs is very proud of the fact that the new iTunes hybrid view knows not to display the album artwork if you have less than five songs from the album. If you preferred the old system where the artwork was always displayed, just go to the View menu and choose “Always show Artwork.”
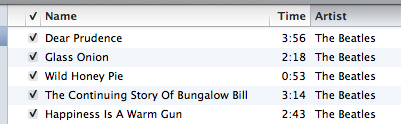
Hide the checkboxes
This is a welcome addition for everyone who doesn’t use the checkboxes that are shown next to every song in list view. In the iTunes Preferences just un-check “Show list checkboxes” under the General tab. Even if you do use the checkboxes (for example to select which songs sync to a iPod), you can still hide them for everyday use, and show them temporarily when you want to change which songs are checked and unchecked.
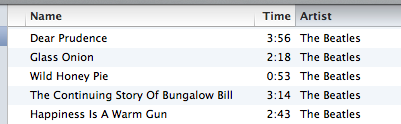
Manually pick “Music I like" on you Ping profile
If you don’t agree with the 10 albums that Ping automatically adds to the “Music I like” section of your profile, you can change them to whatever you want. On your Ping profile click “Edit profile” then scroll down to the “Music I like” section. Here you can click “Manually pick the music to display” and then use the search tool to add your favourite albums.
Share a link to your Ping Profile
If you want to send your friends a link to your Ping Profile, just right-click on your name at the top and choose “Copy link.” You can then paste it into an email, tweet or Facebook message to share it with whoever you want.
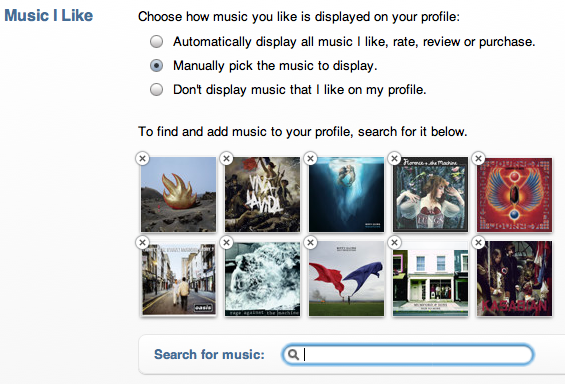
Add columns to Spotlight search results
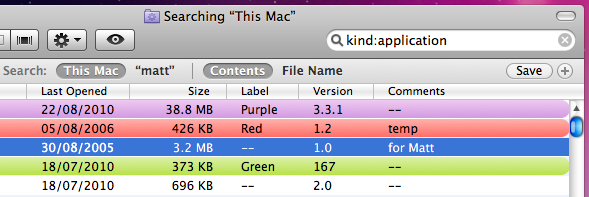
A major complaint about Snow Leopard is that you cannot add the Size column to Spotlight search results window. This is the window that you get by choosing “Show All” in Spotlight or by pressing Command-F in the Finder. When you go to add columns to it by choosing “Show View Options” from the View menu, you’ll find that Size, Comments, Version and Label are all greyed out.
These options used to be available in previous versions of Mac OS X, so it’s unusual that they are now disabled. You might assume that Apple disabled these columns for a reason, so bear this in mind before following these instructions to enable them again.
If you have the developer tools installed, you can enable the columns again using the included Property List Editor. If you don’t already have the developer tools then it’s not worth installing them for such a small task. Instead, you can download and use TextWrangler (free) instead.
Using Property List Editor
If you are using Property List Editor, start by going to your user folder and then navigate to Library/Preferences. In the Preferences folder find the file named “com.apple.finder.plist.” Double-clicking on this file should open it up in Property List Editor. If not, just right-click on it and choose “Open With - Property List Editor.”
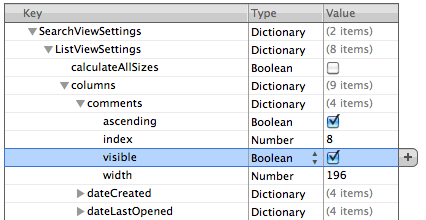
Once the file is open, scroll down the list to “SearchViewSettings.” Click the disclosure triangle next to it, and then do the same for “ListViewSettings” and then “columns.” Now you should see a list of all the available columns. Click the triangle next to the column you want to add, i.e. size, and then check the box next to “visible.”
Once you are done, save the file by pressing Command-S. Finally, you will need to restart the Finder for the changes to take effect. The easiest way to do this is top hold down the Control and Option keys, click on the Finder icon in the Dock and choose “Relaunch.”
Now just press Command-F to bring up a search window and you should have your extra columns enabled.
Using TextWrangler
With TextWrangler, the process is very similar, but just a tiny bit more complicated. Firstly, make sure you have downloaded and installed TextWrangler. Next, go to your user folder and then navigate to Library/Preferences. In the Preferences folder find the file named “com.apple.finder.plist.” Right-click on this file and choose “Open With - TextWrangler.” Once the file is open, you want to find the line that says
<key>SearchViewSettings</key>
Don’t bother scrolling through the file looking for it - for me it is on line 4973! Instead, just press Command-F and type “SearchViewSettings” into the find field. Once you have found the line, look about 8 lines below it. You should see something like this:
<key>comments</key>
<dict>
    <key>ascending</key>
    <true/>
    <key>index</key>
    <integer>8</integer>
    <key>visible</key>
    <false/>
    <key>width</key>
    <integer>196</integer>
</dict>
This should then be followed by a similar 11 lines for each of the other possible columns. Find the one you want to enable (Size, Comments, Version or Label) and look for this:
<key>visible</key>
<false/>
Replace this with:
<key>visible</key>
<true/>
and you’re done! Just save the file by pressing Command-S, then restart the Finder by holding down the Control and Option keys, clicking on the Finder icon in the Dock and choosing “Relaunch.”
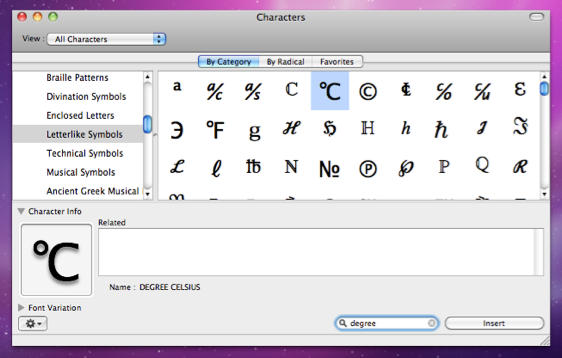
The Input menu and Character Viewer
The input menu is a handy little menu extra that appears on the right hand side of the menu bar. While its main use is for switching between the keyboard layouts of different countries, it’s also really useful for quickly typing special characters.

To enable the menu, open up System Preferences and go to the Language and Text section. Under the “Input Sources” tab, check the “Show Input menu in menu bar” option at the bottom.
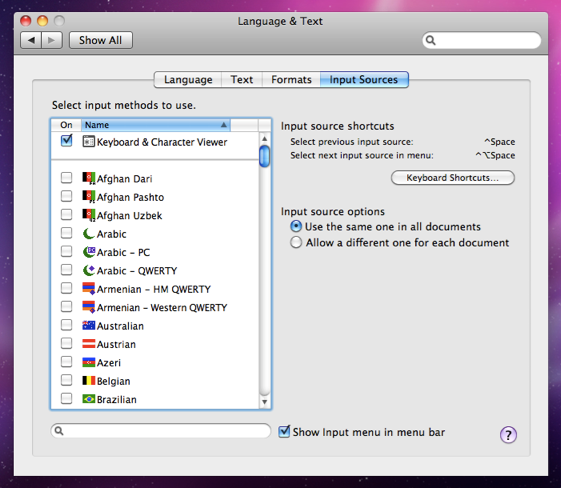
By default your input menu will be pretty empty. Most likely there will be one input method that matches your own country or language. To add items just choose them from the list in the Language and Text Preferences. Each of these input sources is essentially a different keyboard layout, with some extra complexities for non-latin alphabets. The best way to understand how they work is to enable a few, then switch between them using the input menu. Then go to an application like TextEdit and do some typing.
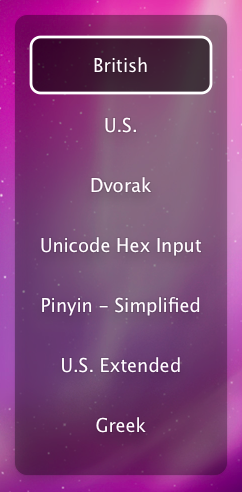
There is a handy keyboard shortcut that allows you to quickly switch between your input sources, but on some Macs it seems to clash with Spotlight. You can resolve this clash in the Keyboard section of System Preferences, for example by setting Spotlight to Command-Space and the input switcher to Control-Space. The input switcher works just like the Command-Tab application switcher. If you keep the control key held down, a menu will appear that allows you to tap the space bar to cycle through the different input sources.
If you only ever type in one language, being able to switch between input sources isn’t of much use for you. However the input menu is also great for quick access to special characters. To do this, enable the Keyboard & Character Viewer, which is at the top of the input sources list.
Now whenever you find yourself wanting a special character, you can just quickly go to the input menu and choose “Show Character Viewer.” Every single character that your Mac is able to produce is available in this window, including punctuation, mathematical symbols and other alphabets. The quickest way to find the character you are looking for is to start typing its name into the search box at the bottom. Once you have found your chosen character, you can either drag it into where you are typing, or click the “Insert” button.
You may notice that if you have only one input source and the Keyboard and Character Viewer enabled, the input menu icon changes to the Keyboard & Character Viewer icon instead of the flag of your chosen input source. If you want the flag back, you will have to add at least one other input source to the menu (even if you never switch to it).
There are a couple of input sources that may still be useful, even if you only use one language. American users may find the US Extended layout is better for typing diacritics using the Option key. Scientists and mathematicians may find that using the Control-Space keyboard shortcut to switch to the Greek input source is quicker than opening up the Character Viewer when adding Greek letters to equations. The Unicode Hex Input source is also a great way for quickly typing special characters. To use it you just hold the Option key and type four hex digits (numbers 1-9, letters a-f), but of course this requires that you remember the 4-digit hex code for the symbols you want to type.
If the Character Viewer is the only thing in the menu you find interesting, you may want to disable the input menu and use another method for opening the Character Viewer. In many applications it is accessible from the bottom of the Edit menu, under “Special Characters,” often with the keyboard shortcut Command-Option-T. Alternatively, the application itself is located in /System/Library/Input Methods/CharacterPallette. You can easily drag this to the Dock or Finder sidebar.
To create a keyboard shortcut for it, open up Automator (in the Applications folder) and create a new Service. Add the “Run Applescript” action, and paste the following lines in:
tell application "CharacterPalette"
   activate
end tell
Change the “text” drop-down menu to “no input,” then save the Service. You can then add the keyboard shortcut from the Keyboard section of System Preferences.
Quickly enable Private Browsing
Normally when you are browsing the internet, Safari keeps a record of things like the pages you have visited, the files you have downloaded and the searches you have made. In most circumstances this is great as it can save time and help you retrace your steps. However, in some cases you may prefer to leave no record of your browsing, for example when you are using a public computer.
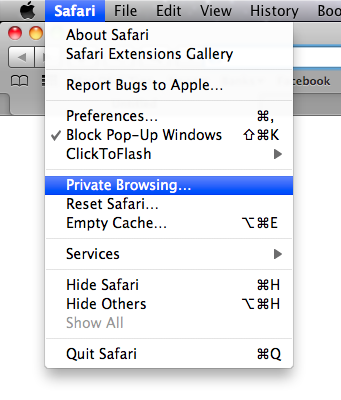
Safari’s Private Browsing mode is great for this. Just go to the Safari menu and choose “Private Browsing.” Click OK in the dialog box that appears and then you are browsing privately. Safari won’t store the sites you visit in the History menu, and your Google searches won’t be added to the Recent Searches menu.
Enabling and disabling Private Browsing through the Safari menu can be a bit annoying, especially if you find yourself doing it often. Luckily there are a couple of ways to speed this up.
In all menus in Mac OS X, an item followed by an ellipsis (…) means that action will be followed by a dialog box. If you hold down the Option key while the Safari menu is open, you will notice that the ellipsis after Private Browsing disappears. Now when you click it, you will skip the dialog box. This is a great trick for skipping the “Are you sure?” type dialog boxes in any Mac OS X application.
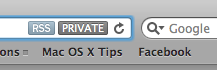
When Private Browsing is enabled, a “Private” button will appear the in address. Just click this button to quickly exit Private Browsing mode and return to normal browsing. This also has an “Are you sure?” dialog box, but Option-clicking it will skip it in a similar way.

You can also create a keyboard shortcut that does the same thing. Open up System Preferences and go to the Keyboard section. Under the Keyboard Shortcuts tab, click the “Application Shortcuts” item at the bottom of the list on the left.
Now click the plus (+) button to add a new shortcut. Choose Safari from the Application drop-down menu, and type “Private Browsing” into the Menu Title field. Make sure you don’t add the ellipsis (…) unless you still want the dialog box to pop up. Finally, choose your keyboard shortcut. I use Command-Shift-P.
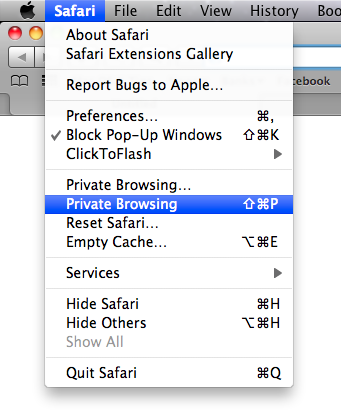
Now when you return to Safari, there should be a new Private Browsing item in the Safari menu, without the ellipsis and with your chosen keyboard shortcut next to it. Pressing these keys should quickly toggle Private Browsing on and off without you dealing with dialog boxes or having to go to menus.
Official Apple Safari Extensions gallery goes live
Just a quick note to say that the official Safari extensions gallery is now live on the Apple site, and Safari 5.01 is available via Software Update. Note that if you visit the extensions gallery with an older version of Safari, you won't see any of the download links.
There are a few extensions by Mac OS X Tips included, but it seems Apple are being quite picky and have only included a small selection of all the extensions that are out there.
You can view and download all of the Mac OS X Tips extensions over on our extensions page.


Automatically set time zone by location
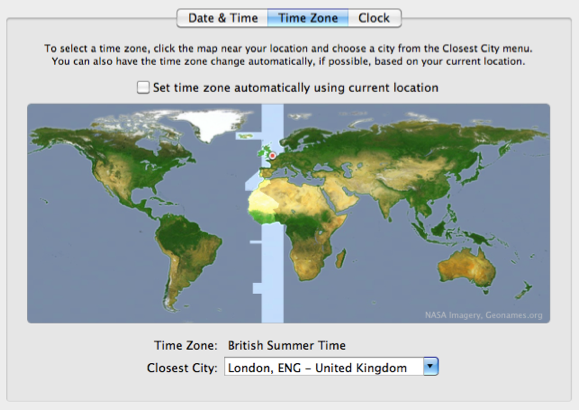
Snow Leopard has the ability to automatically set your time zone based on your location. To enable this, go to System Preferences and click on the “Date and Time” section. Under the Time Zone tab, check the “Set time zone automatically by location” option. The map should become greyed out, and your Mac should determine your current location using CoreLocation.
Generally your Mac won’t have GPS, so instead this works by checking the visible Wi-Fi networks against a database of their locations. As a result this only works when your AirPort is turned on, but it isn’t necessary for you to be connected to the internet through it. Of course this also works much more accurately in urban areas where there are lots of Wi-Fi networks around.
If you have connected a GPS device to your Mac and it is recognised by Mac OS X, CoreLocation should switch over to using that. This means that having nearby Wi-Fi networks is not an issue, but you do need to make sure you have GPS signal.
Now when you travel with your Mac, the time zone should automatically update to your new location.
Other applications can also use CoreLocation. For example, Google Latitude asks for access to your location so it can share it with your friends. While an application must always ask your permission for access to your location information, some people still see this as a bit of a privacy and security risk. To disable CoreLocation completely, go to the Security section of System Preferences and check the “Disable Location Services” checkbox under the General tab.
![]()
Bulk edit Address Book contacts
Unfortunately Address Book doesn’t support bulk editing a large number of contacts at once, but there are a couple of clever workarounds to achieve the same effect. Here are two different methods, the first using TextEdit and the second using AppleScript.
Manually editing a vCard file
This method is great if you have a group of people who share the same information. For example, if you have a whole load of people at the same address, and they have all moved to a new address, or if a group of people share a phone number and they recently changed it to something new.
The first thing to do is to make a backup of your Address Book. Open up Address Book and choose Export - Address Book Archive from the File menu. If anything goes wrong in the following process, you can always just find this file and double-click it to restore your original Address Book.
Next, create a contact group by clicking on the plus (+) icon in the bottom left. Add all of the contacts you want to bulk edit into this group by dragging their names across from the contact list. Once this is done, drag the group from Address Book onto the Desktop to create a single .vcf file that contains contact information for everyone in the group.
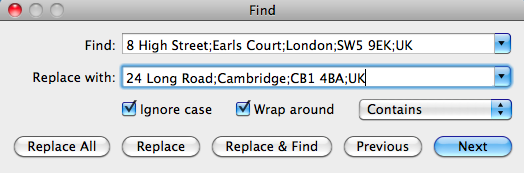
The next step is to open this .vcf file with TextEdit. Either open TextEdit and choose “Open...” from the File menu, or just drag the .vcf file onto the TextEdit icon in the Dock. Now we are going to use TextEdit’s Find and Replace feature to find the existing information and replace it with the new information.
Choose “Find...” from the Edit menu or press Command-F. In the “Find” text field, enter the old information, such as the old address or phone number. You might have to look in the file to see how this is formatted. For example, addresses have semicolons to separate lines like
item2.ADR;type=HOME;type=pref:;;8 High Street;Earls Court;London;SW5 9EK;UK
Press the Next button a few times to check that it is entered correctly, then enter the new information in the “Replace with” field. Now just click the “Replace All” button and every instance of the old information should be replaced with the new information. Check the file to make sure it looks correct, and then save it.
Finally, go to the Desktop and double-click on the .vcf file to import the contacts back into Address Book. You will be warned that the contacts are duplicates and will be updated. If you want, you can click “Review Duplicates...” to check that the changes are correct, or you can just click Import.
Using AppleScript
This second method is actually more flexible, but it does require that you get familiar enough with AppleScript to create your own script or modify one of my examples to suit your needs.
Start by opening up AppleScript Editor (located in Applications/Utilities). This is called Script Editor and is located in Applications/AppleScript if you are using Leopard or earlier.
Copy and paste the following lines into the AppleScript Editor window, and click the Compile button. If the AppleScript has been entered correctly, you should receive no errors.
tell application "Address Book"
    set peopleToChange to people whose (street of first address) contains "321 Old Street"
    repeat with thePerson in peopleToChange
        set (street of first address) of thePerson to "123 New Street"
    end repeat
    save
end tell
One of the great things about AppleScript is that it is designed to be readable by someone who knows nothing about AppleScript. Here’s a walk through what the above script does.
The first line says that we are about to tell Address Book to do something. The second line finds all the people in your address book whose street of their first address (people can have more than one address) contains “321 Old Street.” It then stores a list of all these people under the name peopleToChange. The third line says that we are going to go through the list peopleToChange one item at a time, and we will refer to each item in the list as thePerson. The next line sets the street of the first address of thePerson to “123 New Street.” Then the fifth line says we are finished going through the list peopleToChange, the sixth line saves the changes, and the last line says we are finished telling Address Book to do something.
You will have to create your own AppleScript to fit your exact needs, but the general structure of it will be similar to the above example. When you have created the script you want to use, just press the Run button to run the script and make the changes. Included below are a few more example scripts.
Find and replace phone numbers
tell application "Address Book"
    repeat with i from 1 to (count every person)
        set phoneProperties to properties of phones of person i
        repeat with j from 1 to (count of phoneProperties)
            if value of item j of phoneProperties contains "020 6704 3205" then
                set value of item j of phones of person i to "020 1523 6843"
            end if
        end repeat
    end repeat
    save
end tell
Clear the Notes field for every contact
tell application "Address Book"
    repeat with i from 1 to (count every person)
        set note of person i to ""
    end repeat
    save
end tell
A more advanced address replacement script
tell application "Address Book"
    repeat with i from 1 to (count every person)
        set theAddresses to properties of addresses of person i
        repeat with j from 1 to (count of theAddresses)
            if street of item j of theAddresses contains "321 Old Street" then
                set street of item j of addresses of person i to "123 New Street"
                set city of item j of addresses of person i to "NewCity"
                set zip of item j of addresses of person i to "12345"
                set country of item j of addresses of person i to "USA"
            end if
        end repeat
    end repeat
    save
end tell
Replace googlemail.com emails with gmail.com
tell application "Address Book"
    repeat with i from 1 to (count every person)
        set theEmailAddresses to properties of emails of person i
        repeat with j from 1 to (count of theEmailAddresses)
            if value of item j of theEmailAddresses contains "@googlemail.com" then
                set oldAddress to value of item j of theEmailAddresses
                set AppleScript's text item delimiters to {"@"}
                set firstBit to first text item of oldAddress
                set newAddress to firstBit & "@gmail.com"
                set value of item j of emails of person i to newAddress
            end if
        end repeat
    end repeat
    save
end tell
You can find more information about AppleScript in Address Book by going to “Open Dictionary...” in the File menu in AppleScript Editor and choosing Address Book from the list.
Mail Merge in iWork '09
iWork ’09 has a great mail merge feature that allows you to create documents in Pages that gather data from a Numbers spreadsheet or from your Address Book. This is really useful for creating templates for things like letters and envelopes that automatically fill in names and addresses for a large amount of people. Here's how you set up mail merge using Pages and Numbers.
Before you start writing your document you need to create your data. If you want to get information from Address Book, this is as simple as just creating a new group containing all the contacts whose information you want to use. If you want to get information from a spreadsheet, you need to open up Numbers and create the data that will be added into your document. Normally this will be a list of names and addresses, but in theory it can be anything.
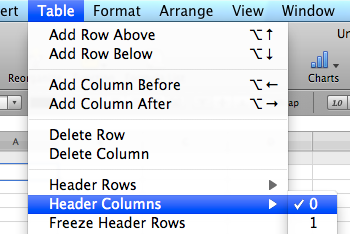
Pages requires quite a specific layout for your data, so if you don't set it up right, it won't work. With a blank spreadsheet open, make sure there is one header row and zero header columns. You can do this by going to the Table menu and setting Header Rows to 1 and Header Columns to 0.
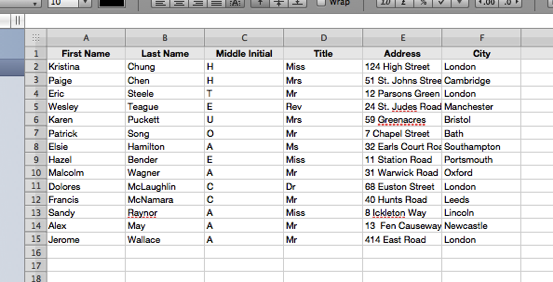
Next, fill in all your data, using the grey header row at the top to enter the header titles such as First Name, Last Name, Address, etc. Your data can be anything, including mathematical formulas. For example you could have a column containing a person's monthly salary, and another column that works out their annual salary by multiplying the monthly column by 12. Once you have finished, save you spreadsheet somewhere you will remember.
Now you can open up Pages and start creating your document. At every point where you want to import some information, just write something like TheFirstName or TheAddress. Later on you can link these up to your spreadsheet or Address Book. If you are using one of the envelope or letter templates, you might find that this placeholder text already exists, and by default this is already linked into your Address Book. You can either delete it and create your own, or leave it and then later modify the settings to point it towards the specific data you want.
Once you have created all your placeholders, open the Inspector Window (Command-Option-I) and click on the Link Inspector tab, which looks like a blue circle with a white arrow in it. Then click on the Merge tab below that. This is where you can link your document to your spreadsheet or Address Book.
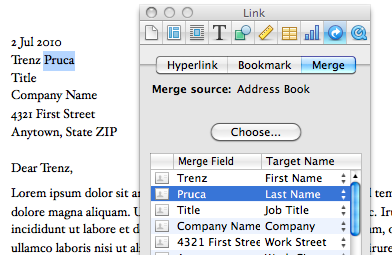
The first thing that you need to set here is the Merge source, which you do by pressing the “Choose...” button. You can either leave “Address Book” selected and choose a contact group from the drop-down menu, or select “Numbers Document” then navigate to the spreadsheet you created earlier.
If you are using a template and have kept the default placeholders, you might find that there are already a load of “Merge Fields” set. Generally these were made to work with Address Book, but Pages will do its best to link the fields to columns in your spreadsheet that have names like “First Name” or “Title.” Any fields that haven’t been linked will show up red.
To create a new merge field, select your placeholder text (for example, TheFirstName) then click the plus (+) icon in the Merge Inspector window. From the menu choose “Add Merge Field” and then select the data you want to import from the drop-down menu in the Target Name column. This will either be a field in your Address Book, or a column in your spreadsheet. You can also add sender fields, which import data from your own Address Book card.
Once you have finished created your document, go to the Edit menu and choose “Mail Merge.” From here you can either choose to print your document right away, or create a new document that has separate pages for each recipient of your letter.
Extract the code from any Safari Extension
If you have been using any of the new Safari Extensions you might want to peek inside them to see how they work. Fortunately this is really easy because .safariextz files are just xar archives that can be extracted using the Terminal. Here's how you do it.
Start by downloading the Safari extension. It should come in the form of a file with a .safariextz extension. If you wanted to install the extension to use it in Safari you would just double-click it, but don't do that now as the file will disappear from your Downloads folder.
Instead open Terminal, located in the Utilities folder inside the Applications folder. In the window that appears, type the following line and then press return.
cd ~/Downloads/
This should be the path to the folder where the .safariextz file is located. You will need to change this if you have saved the extension somewhere else. For example you might use cd ~/Desktop/Extensions or /Users/matt/Documents/safariextensions/
If you are new to using the Terminal, note that starting with ~/ is a shortcut to inside your user folder, and starting with / is for inside your hard drive. The cd command is for changing directory, i.e. 'moving' to a folder.
Next paste in the following line and press return.
xar -xf 'TheExtensionName.safariextz'
You need to replace TheExtensionName with the filename of the extension. The quotes around the filename are only really important if it contains spaces. If you want to avoid typing in the name, you can just drag the file into the Terminal window from the Finder and it will be entered for you.
After you press return, a new folder will appear with the same name as the extension. This folder contains all the javascript, plist and HTML files that make up the extension. You can then go to the Extension Builder in Safari and click the plus (+) button to add the extension and edit it.
Try this out with some of the extensions I've made. Feel free to use any of my code for your own extensions. If you are feeling nice, leave a link back to http://www.macosxtips.co.uk/extensions.
Drag-and-drop to create .ics files from iCal
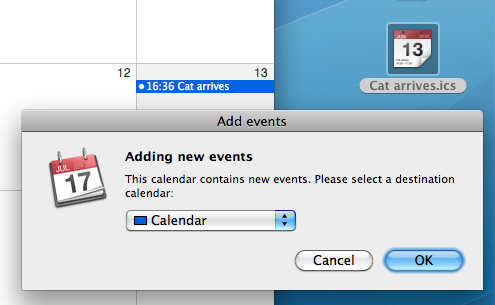
If you want to share an iCal event with others, often the best way is to send them a .ics file that they can then double-click on to import into their calendar.
The easiest way to do this is to just click on the event and drag it onto the desktop, which will automatically export it to a .ics file for you. The icon even shows you the date of the event. You can then email this file as an attachment, or share it however you want.
If the desktop isn’t in view, it can be a bit tricky to drag the event as it doesn’t behave how you would expect when using Exposé or the Command-Tab switcher. In this case, it’s best to drag it up to the toolbar at the top of the iCal window, then hit the show desktop exposé shortcut (normally F11) and drop the event on the desktop.
When the recipient of the file double-clicks on it, iCal will open up and ask which calendar you want to import the event into.
Run a screen saver over the login window
As of Snow Leopard, it is now possible to set a screen saver to run over the login window. Unfortunately Apple haven’t built the settings into System Preferences so the process is a little complicated, but it isn’t too tricky.
Start by going to Macintosh HD/System/Library/Screen Savers/. You can navigate to it in the Finder, or just open up a new Finder window, press Command-Shift-G and then paste in the following line:
/System/Library/Screen Savers/
This folder contains all the possible screen savers you can use. If you have 3rd party screen savers installed, you may have noticed that this folder only contains Apple screen savers, and none of the ones you have installed yourself. Unfortunately, only Apple screen savers are allowed to be displayed over the login window, and even if you try copying another screen saver to this folder, it won’t work.
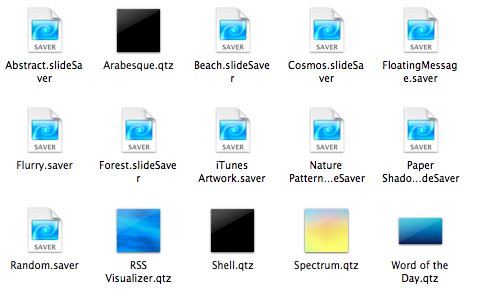
The next step is to choose the screen saver you want, and make a note of the file’s name, making sure you get the file extension and the uppercase and lowercase letters correct. For example, the Flurry screensaver is called “Flurry.saver,” whereas the Paper Shadow one is called “Paper Shadow.slideSaver.”
Next open TextEdit (located in the Applications folder) and press Command-Shift-T to change to a plain text document. Then paste in the following:
<?xml version="1.0" encoding="UTF-8"?>
<!DOCTYPE plist PUBLIC "-//Apple//DTD PLIST 1.0//EN" "http://www.apple.com/DTDs/PropertyList-1.0.dtd">
<plist version="1.0">
<dict>
    <key>loginWindowIdleTime</key>
    <integer>60</integer>
    <key>loginWindowModulePath</key>
    <string>/System/Library/Screen Savers/Flurry.saver</string>
</dict>
</plist>
The number on the 7th line is the time in seconds before the screen saver starts. The file path on the 9th line is to specify the screen saver to use. You can change this to any of the screen savers in the /System/Library/Screen Savers/ folder.
Once you have set these values to what you want, choose Save As... from the File menu. You want to save the file in Macintosh HD/Library/Preferences/. As before, you can navigate to this, or just press Command-Shift-G and paste in
/Library/Preferences/
Save the file as com.apple.screensaver.plist, making sure not to add the .txt extension. Now when you go to the login window, your chosen screen saver should start after the amount of time you specified.
If you ever want to change the screen saver, you can just located this file and modify it to point towards another screen saver. If you want to disable the screen saver, just delete the file.
Undo reopens last closed tab in Safari 5
Here’s a tip I forgot to include in the Safari 5 tips roundup.
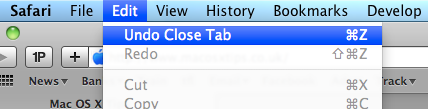
If you accidentally close a tab in Safari 5, you can just press Command-Z or choose “Undo Close Tab” from the Edit menu. This is fast becoming one of my favourite new features in Safari 5, and I use it all the time. Unfortunately it only works with the last closed tab, not the last closed window, but I guess things would start to get complicated if it did both.
Tips for Safari 5
Now we’ve all had a few days to play around with Safari 5, here are some tips for getting the most out of the new features.
1. Update plugins
The first thing you are going to want to do after you install Safari 5 is make sure all your plugins are up to date. Updates are available for 1Password, SafariStand and Saft. PithHelmet is not yet Safari 5 compatible, but an update is expected within days. ClickToFlash doesn’t require updating. For other plugins you will have to check on a case by case basis. Also keep an eye out to see if any of these plugins change to become Safari Extensions.
2. Enable Extensions
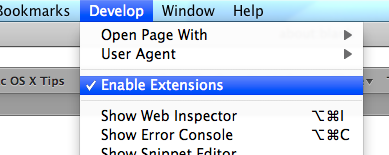
To enable extensions, check “Show Develop menu” under the Advanced tab in the Safari Preferences. Then find the Develop menu in the menubar and choose “Enable Extensions.” Now you can download extensions and double-click on them to install them in Safari. I’ve written a few that are available here, and there are loads of others available on the Safari Extensions Tumblr site.
Update: Extensions are now enabled by default in Safari 5.0.1.
3. Reader keyboard shortcut
On any page where the new reader function is available, just press Command-Shift-R to quickly bring it up. This will only work on pages that Safari decides are suitable for reader. Safari seems to be quite clever at figuring out whether a page contains an article. If there is not enough text in one place, or if there are clearly multiple articles on one page, the feature is disabled.
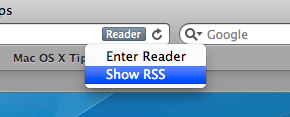
4. Access RSS feed on reader pages
On article pages, the reader button replaces the RSS button. If you want to access the RSS feed for the page, just click and hold on the reader button to bring up a menu with a list of all the available RSS feeds.
5. Print from reader
Reader provides a great way to print articles. It automatically strips out all the unnecessary stuff on a page such as adverts, while keeping in important images. For articles spread out over separate web pages, it even gathers them all together so you can read and print them more easily.
6. Change the look of reader
The only change that you can officially make to reader styles is the text size. With reader enabled, just press Command-+ (plus) and Command-- (minus) to increase and decrease the size.
Modifying the look further can be done by editing a file within the Safari bundle, but be warned that this can disable Safari’s Keychain access (a precaution as the application has been tampered with). If you really want to do it, find Safari in your Applications folder, right-click it and choose Show Package Contents. Inside the package, in the Resources folder, you should find a file called Reader.html, which you can edit in your favourite text editor. To open it properly in TextEdit, choose Open from the File menu, press Command-Shift-G, paste in /Applications/Safari.app/Contents/Resources, and make sure you check “Ignore rich text commands.”
This file is mainly just CSS that defines the appearance of reader. Just experiment with it to figure out what changes what. Some popular changes are stopping the text from being justified, changing the colour of the links, and changing it to white text on a black background. Remember to make a backup of Reader.html before you make any changes.
7. Always open windows in new tabs
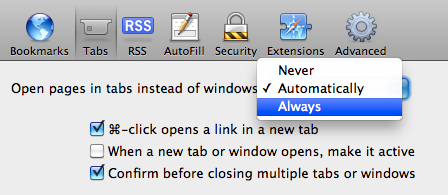
There is now a new setting in the Tabs Preferences to specify the behaviour of links that are set to open in new windows. Choosing “Never” keeps the old behaviour of opening in a new window, whereas “Automatically” opens these links in new tabs instead of windows. New window links that have a specified size like a small popup will still open in a new window unless you choose “Always.”
8. Improved Web Inspector
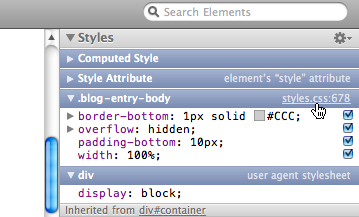
If you’re a web developer, this will be a welcome improvement. It’s also really useful for those developing extensions for Safari. One useful change that I noticed is that you can now click a link in the CSS inspector on the right to jump straight to the rule definition in the source file. The Javascript inspector also has improved breakpoint support, and there is a new Timeline Panel.
9. Searchable address bar
The address bar now Spotlight searches your history and bookmarks. So now when you start to type into it, instead of just matching URLs, pages with titles or contents that contain what you are typing will appear. I’m not sure if I really like this yet, as it’s a bit of a big change to get used to. Also it seems that Apple have decided to go in a different direction to Google Chrome and devote the address bar to history searching rather than Google searching.
10. Private Browsing mode
Safari now reminds you when you are in Private Browsing mode by placing a “Private” badge in the address bar. It’s a helpful reminder if you often accidentally leave Private Browsing enabled. When you’re are done, simply click on the badge to return to normal browsing mode.
11. Go watch some animated gifs
Finally Safari seems to be able to load animated GIFs in an acceptable amount of time, comparable to Firefox and Chrome. To test it out, head over to a page like this. If you’re feeling really ambitious, try loading a whole load of them simultaneously using my Linked Images extension.
Extensions in Safari 5
For me, yesterday’s most exciting announcement was the release of Safari 5. If you haven’t yet downloaded it, you can get it by going to Software Update in the Apple menu, or by downloading it from the Apple site. It has a whole load of great new features like Reader and Extensions, and we get our nice blue loading bar back and animated GIFs actually load in less than an hour.
Arguably one of the best new features is the support for Extensions. If you’ve ever used Firefox or Chrome you might be familiar with these. While the Safari Extensions gallery isn’t opening until “later this summer,” it is possible to enable Extensions right away.
To do this, first go to Preferences in the Safari menu. In the Advanced section, click the checkbox at the bottom to enable the Develop menu. Go to this menu (it should just appear in the menubar) and the select third item in the list, “Enable Extensions.” Now, when you go back to the preferences there is a new Extensions section. Considering the complexity of this process, I’m sure it won’t be long before Extensions are enabled by default.
So now Extensions are enabled, where can you get them from?
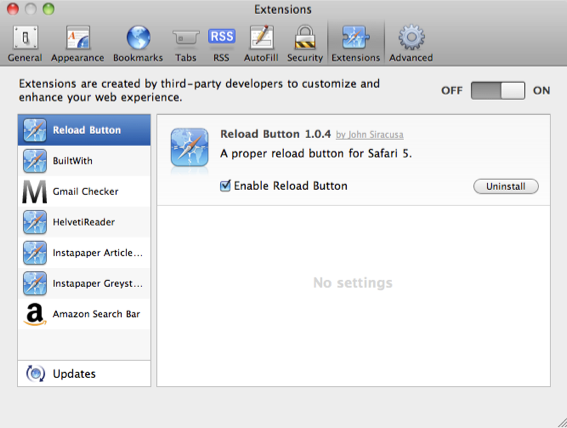
Well, before Safari 5 was even available, Panic managed to announce their Coda Notes extension. It looks great, but unfortunately it’s still “Coming Soon.” Almost as quick was John Siracusa, who has posted a simple extension on his Twitter feed that you can actually download. All it does is add a Reload button to the toolbar, something that many people have been asking for since it moved into the address bar in Safari 4. After you download the file, just double-click on it and it will be installed. It will actually be deleted from your downloads folder after it is installed, so don’t get confused when it disappears. Note that the button won’t be added to the toolbar automatically, you have to go to the View menu and choose “Customize Toolbar” to add it.
There are a whole load of other Extensions listed at this page. Currently there are things like a Gmail unread messages checker and an Amazon search bar, and it looks like new ones will be added as they are released. It is probably worth noting that as far as I know these haven’t been screened by Apple, so there might be an element of risk in downloading them. As always, you should only really download things from sources that you trust, so if you want to be really safe you might want to wait until the official Apple Extension Gallery is live.
[Update: There’s another great list of extensions over at reddit]
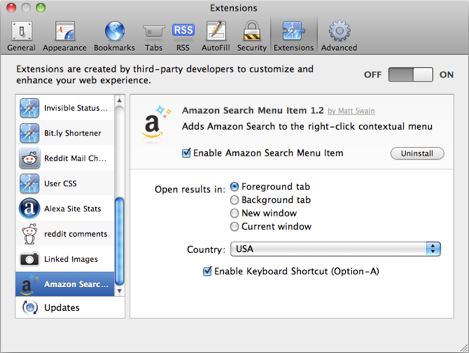
Once each Extension is installed, it should show up in the Extensions section of the preferences. From here you can enable and disable all Extensions, turn on automatic updates and uninstall any Extensions that you no longer want.
Remove the Add Bookmark button in Safari
Since Safari 4, the Add Bookmark button (+) is now attached to the left hand side of the address bar. If you choose “Customize Toolbar...” from the View menu you can remove just about every item from the Toolbar, but unfortunately it doesn’t seem possible to remove the Add Bookmark button without also removing the address bar and the Google search box. However, this is a way to get around this.

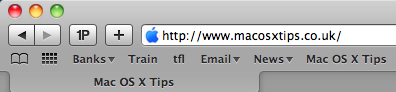

First, open up the Customize Toolbar dialog box and find the Add Bookmark button in the top row that is separate from the address bar. If you drag this to the toolbar, the button that is attached to the address bar will disappear. You are now free to drag off the separate button that you just added. The one that’s attached to the address bar won’t reappear, leaving you with a nice clean toolbar.
Getting started with text substitutions
Text substitutions are a relatively new feature that were introduced with Snow Leopard. They allow you to set up certain phrases to get automatically replaced with something else as you type. If you go to the Language & Text section of System Preferences and click on the text tab, you will see a list of substitutions already set up, for example (c) to © and 1/2 to ½.
Oddly, it seems that the only application that text substitutions are enabled in by default is TextEdit, and you need to enable them separately in every other application. To do this, open up the application in question and right-click (Control-click) on any area where you can type. In the menu that appears, go to Substitutions and choose “Show Substitutions.” This will bring up a dialog box where you enable Text Replacement and various other substitution features. If the application doesn’t support text substitutions, you won’t see this menu.
Doing this separately for every application is a bit annoying, especially if you want to enable text substitutions everywhere. Fortunately it is possible to enable text substitutions globally using a Terminal command. Just open up Terminal (located in Applications/Utilities), copy and paste in the following line, then press return.
defaults write -g WebAutomaticTextReplacementEnabled -bool true
This will turn on text substitutions in every application that supports them, but you can still go into individual applications and turn them off on a per application basis if you want.
Now you have text substitutions enabled, you can add new ones in the Language & Text section of System Preferences by clicking the plus (+) button at the bottom of the list. Here are some ideas for substitutions to set up.
- Expand internet and messaging slang abbreviations. For example you could set
brbto “be right back” andtyto “thank you” - Use something like
lipsumto insert a few paragraphs of Lorem Ipsum placeholder text so you don’t have to Google for it each time. - Use something like
msigto automatically insert your signature at the end of mail messages or forum posts. - Automatically enter commonly used commands and code snippets that are too long to remember or too tedious to type. For example you could set
rrubyto enter the first line of a ruby script#!/usr/bin/env ruby. - Abbreviate email addresses that you find yourself regularly typing, for example set
matt@to give matt@macosxtips.co.uk - Create email templates to automatically write out “canned responses.” For example I have
ssorryexpand to a detailed email reply saying that I can’t help with a computer problem and explaining some places to go to find out.
When you come to enter some of the longer substitutions such as email signatures or whole email messages, you will run into the problem of how to enter a line break, as just pressing Return doesn’t work. There are a couple of ways to get around this. Firstly, you can simply use Option-Return instead. Option-Tab is also useful for inserting a Tab character. This is the quickest and easiest way, especially for short replacements like email signatures that only have a couple of lines. If you are creating a replacement that is more than a few lines, you may find it easier to write it in something like TextEdit and then copy and paste it into the list in System Preferences. All the line breaks will be preserved.
One final use for text substitutions is to exclude words from spelling auto-correction. Sometimes you will have a word that you don’t want to auto-correct, but you don’t want to permanently add it to the dictionary using “Learn word” because it isn’t an actual word. To get around this, just add it as a text substitution and make the text replacement the same as the original word. Now the spelling auto-correction will never happen.
Enter full screen Quick Look using the keyboard
Here’s a quick tip for Quick Look.
Ordinarily you enter Quick Look by selecting a file then hitting the space bar. If you want to view the preview in full screen, you can then click on the Full Screen button at the bottom of the Quick Look window.
A quick way to jump straight to full screen is to press Option-Space instead of Space with your chosen file selected. This will instantly bring up a full screen preview of the document. To exit, just hit the Escape key. Unfortunately this only works in Snow Leopard, but you can get the same effect in Leopard by pressing Command-Option-Y.
I find this is especially useful for quickly reading PDF documents, which are often too small in a normal Quick Look window. Also, if you select multiple images and then press Option-Space, you can quickly start a full screen slideshow.
Change the default duration of new iCal events
In iCal, whenever you create a new event, it is set to last one hour by default. A quick look in the iCal preferences seems to suggest that there is no way to change this, but luckily there is a hidden setting that you can change via the Terminal.
Start by opening up Terminal (located in Applications/Utilities). In the window that appears, paste the following line then press return.
defaults write com.apple.iCal 'Default duration in minutes for new event' 30
The number at the end corresponds to the duration of new events in minutes. You can change this to any number you like, including zero, which will create events with the same start and end time. You will need to restart iCal for the changes to take effect.
If you want to set it back to the default 60 minutes, you can either repeat the command with 60 at the end, or use the following command:
defaults delete com.apple.iCal 'Default duration in minutes for new event'
MacKeeper Competition Winners
Here are the winners of last week's competition to win a copy of MacKeeper. These three were chosen at random from all the people who answered the question with the correct answer. The Mackeeper icon is of course a robot.
Richard S. Anna B. Michael H.
You three should receive instructions by email on how to get your free copy of MacKeeper.
Well done to everyone who got the answer right. Keep a lookout for any new competitions for the chance to win more great Mac applications.
Competition: Win a copy of MacKeeper!
Mac OS X Tips has teamed up with ZeoBIT to give away three free copies of their application, MacKeeper. Check out the bottom of this post your chance to win one of them.
MacKeeper is a new contender in the Mac maintenance arena. Like all these applications (some of which we have reviewed before), it is designed to clean up your Mac, deleting unneeded files to save you space and improve performance. On top of this, MacKeeper also has an assortment of related tools and services to help you keep your Mac in working order. These include a backup service, "Undelete" data recovery, an application uninstaller, a data encryptor and a default apps manager. While there is nothing drastically new, this is the first time I've seen all these things together in one single application.
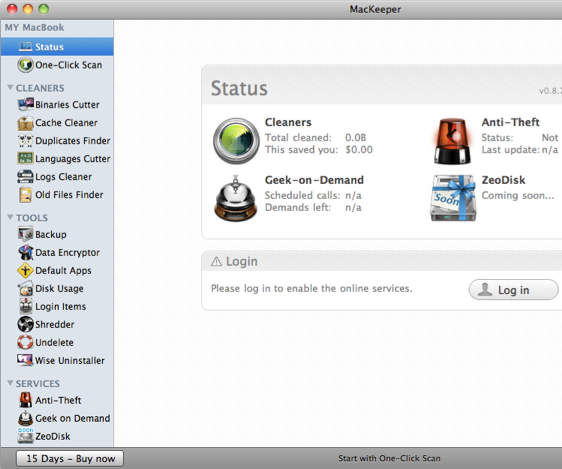
When you open MacKeeper, the window shows a list of cleaners, tools and services down the left hand side. Clicking on "One-click scan" get all the cleaners to scan your hard drive. It searches for universal binaries, caches, duplicate files, unneeded language files, log files and old files that haven't been used for a while.
Most of the cleaners are pretty standard in all maintenance applications, but this is the first time I've seen duplicate and old files finders. For each cleaner you can then examine in detail what files it has found, and choose to keep or delete them on a case by case basis. The scan saved me about 1 GB, but I chose not to delete any old files, duplicates or languages.
The next items in the list are the tools. Each of these could function as its own little application, so MacKeeper is great as an "all in one" kind of tool. The undelete tool is pretty unique, as data recovery of deleted items is notoriously difficult. It seemed to work OK for me, but was very slow as it has to scan the entire hard drive before you can recover anything. I really like the data encryptor tool, which allows you to hide specific files in the Finder and require a password to show them again. It's much easier than the usual way of setting up an encrypted disk image in Disk Utility. I also like the default apps tool, which allows you to assign the default application to open files with a certain file extension. While you could do this in the Finder, MacKeeper makes it much quicker and easier.
On the other hand, I don't quite see the point of some of the other tools. The login items tool seems identical to the section in System Preferences, and the shredder is just the same as using "Secure Empty Trash" in the Finder. Also, the disk usage tool is done better by applications such as Disk Inventory X and GrandPerspective.
Finally, MacKeeper offers three online services. The first is an anti-theft service that reports the location of your Mac if it goes missing. The second service, called "Geek on Demand," offers technical support for any problems regarding your Mac. The final service isn't available yet, but it looks like an online storage service, similar to Dropbox, that can also be used in combination with the backup tool.
Overall, MacKeeper doesn't offer much that is drastically new, but it has an impressive amount of features all in one package. All of the tools work well, and I wouldn't recommend any other service over it (except maybe with the disk usage tool). Over at the MacKeeper site, they estimate buying each of the tools and services separately would cost you $318. I think this is a bit of an overestimate, as you can get some of the tools for free, but MacKeeper is definitely a good deal at $39.95. You can download a free trial to try it out before you buy, and there is a discount available to get 30% off if you follow them on Twitter and Facebook.
MacKeeper has kindly provided 3 free licenses for the application. If you want to win a free copy, just answer the following question. The winners will be chosen at random from all the correct answers.
What is the MacKeeper icon?
a) A robot
b) A sheep
c) A broom
Once you know the answer, head over to this page to enter.
Set a poster frame in iTunes
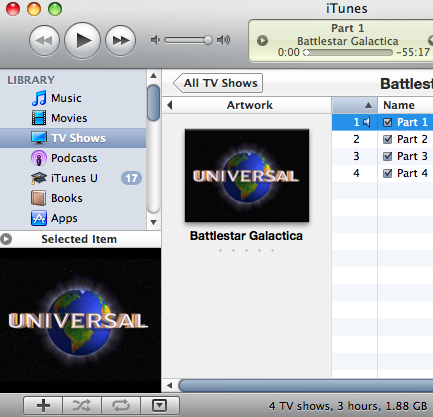
When you add new movies and TV shows to iTunes, it automatically creates an image to display as that video's icon. To create this image it just takes one of the first few frames of the movie, hence why it's called the poster frame. Unfortunately, this normally just gives you an image of some movie studio logo, which isn’t very descriptive.
This isn't a problem if you add a custom poster (check out GetVideoArtwork), but occasionally a proper poster isn't readily available.
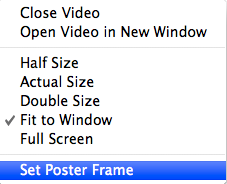
A simple solution to this problem is to choose another frame of the movie to use as the poster frame. To do this, just start the video playing in iTunes, go to the frame you want to use and then pause it. Then just right-click on the video and choose "Set Poster Frame." A good frame to use is when the title of the movie or TV show is displayed.
Use Facebook Chat in iChat
It is now possible to connect to Facebook Chat through a desktop client using the Jabber protocol. This means that you can chat with your Facebook friends without having to log into Facebook. The instructions here are for iChat, but it works with loads of other messaging applications too, such as Adium and Pidgin.
Start by opening up iChat, then go to the iChat menu and select "Preferences." In the Accounts tab, click the plus button (+) and enter the following settings:
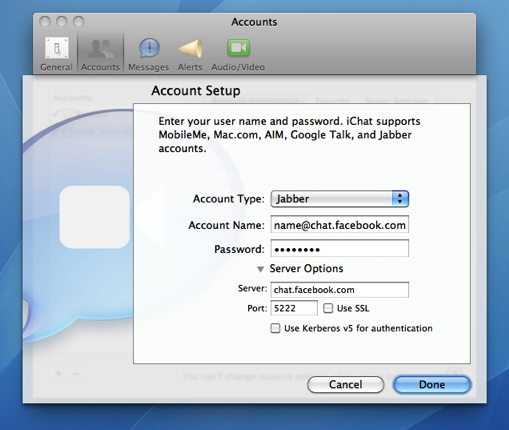
Account Type: Jabber
Account Name: [username]@chat.facebook.com
Password: Your Facebook password
Server: chat.facebook.com
Port: 5222
Uncheck "Use SSL" if it is checked.
Your Facebook username is the name that appears in the address bar when you go to your Facebook profile page. If you can't figure it out, go to this page on the Facebook site to find it.
Finally, click Done, and a new buddy list should appear with all your Facebook friends. It should also sort them into the correct groups if you have set them up in Facebook.
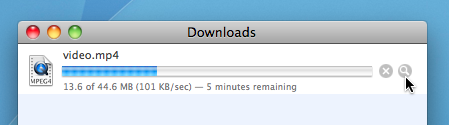
Watch videos before they have finished downloading
When you are downloading a video file to your computer using Safari, it is possible to start watching it before the download has finished. This is great for really long movies that take ages to download.
To do this just go to the downloads window in Safari (Command-Option-L) and find your video that's downloading. Click on the little magnifying glass icon to show the file in the Finder.
You will notice that the file has an extra extension of .download added to the end, and it doesn't open properly if you double-click on it. However, instead you can right-click on the file and choose "Show Package Contents". A new folder should open up, containing two files.
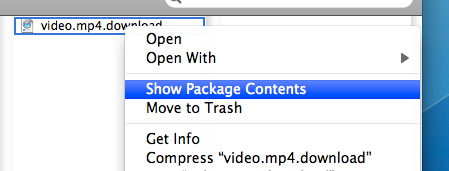
One will be called "info.plist" and the other will be the video you are downloading. Now you can just open it to watch the portion that has already downloaded. For some videos QuickTime will be unable to play them when they aren't completely downloaded. If you have problems, you can try using VLC instead.
Welcome to our new Sponsor: TheMacSale
Just a quick welcome to our latest sponsor, TheMacSale. They’ve got a bundle of 10 Mac apps that they are selling for $49.99. If you bought the apps individually it would cost you over $500, so this is a great value bundle even if you only want a few of the apps.
The apps that jump out at me at first glance are PathFinder, a Finder replacement with more features, ShoveBox, an app that collects all your scraps of information and racing game called MiniOne Racing. There are seven others so head over TheMacSale to check them out.
The offer ends on the 15th March.

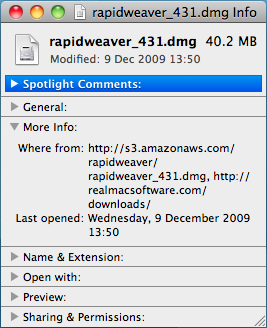
Find out where a file came from
If you have a Downloads folder full of junk like I do, it can be useful to know where some files have come from. Luckily this information is displayed in the Get Info window. Just right-click on the file and choose "Get Info" or press Command-I.
In the Get Info window, click the "More Info" disclosure triangle and some extra fields should appear. If you look in the list you should find one called "Where from."
If you downloaded the file using Safari, this field will show you the web address of the page you downloaded the file from. If you received the file via iChat or a Mail attachment, the name of the person who sent it to you should appear.
Sometimes two web addresses are shown if the page with the download link is on a separate site to where the file was actually stored. See the screenshot below for an example.
Facebook feeds on the desktop with GeekTool
I recently posted a tip over at Geeklets on how to display your Facebook news feed or recent notifications on your desktop using GeekTool. The whole process is a little bit complicated, but here’s a summary of what you have to do:
1) Get your Facebook feed address This is just an RSS feed you can get from the Facebook site.
2) Create an Automator workflow You need to create a short automator workflow that runs regularly and saves the recent items to a text file.
3) Optional: Make your workflow run in background You can disable the Dock icon so the Automator workflow doesn’t bother you every time it runs.
4) Set up the GeekTool Geeklet Finally you can just download the geeklet files that display the feed on your desktop.
Head over to the Geeklets site to see the full instructions. If you are new to GeekTool you might want to check out this introduction.
Option-click menu extras to reveal hidden settings
Menu extras are the little icon menus that live over on the right-hand side of your menu bar. Most people will probably have the Volume and Airport menus, but there are loads more that you can enable.
You can find 26 built in ones located in /System/Library/CoreServices/Menu Extras that you can just double-click to start. On top of this there are many more that come with applications (like Evernote, QuickSilver and Tweetie) and some that are small applications themselves (like Caffeine, F.lux and iStat menus).
If you have a lot of menu extras, you can rearrange them by holding the command key and dragging them around. To remove one, just hold command and drag it off the menu bar.
One not so well known trick is holding down the Option key when clicking on the menus. For some of them this will reveal hidden settings and information that aren't normally shown in the menu. Here's what you'll see in the Option-click menu for some of the most common ones.
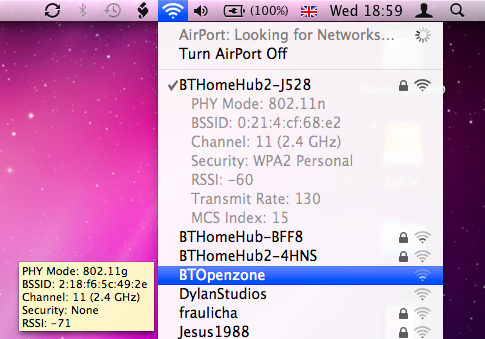
AirPort
In Snow Leopard the Airport menu has already got a lot more informative with the new way the icon displays the current status. In the Option-click menu you'll see a lot of extra information about your current wireless network, including the protocol (e.g. 802.11n), the signal strength (RSSI), security mode (e.g. WPA2 Personal), the channel (e.g. 11) and some other things like the hardware address and the transmit rate. If you want to get some of this information about another wireless network in the list that you aren't using, just hold your mouse over it and a yellow tooltip will appear.
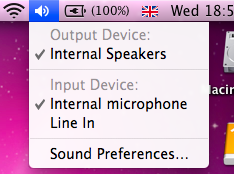
Volume
This menu normally just shows a slider for you to adjust the volume, but option-clicking shows some settings that you can normally change in the Sound section of System Preferences. It allows you to select different input and output devices, such as an external microphone or external speakers.
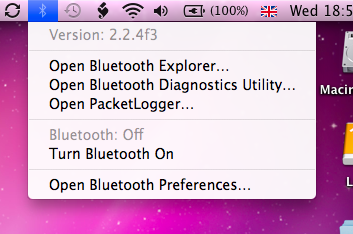
Bluetooth
If you have Bluetooth on your Mac, option-clicking the menu will show you the bluetooth version number. If you have the developer tools installed, it will also give you options to open Bluetooth Explorer and Packetlogger.
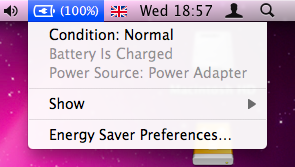
Battery
This one is just for laptop users. Option-clicking will add an item at the top of the menu that displays the condition of your battery. Clicking on this will open up a help page explaining what your condition means. You can find out more information about your battery here.
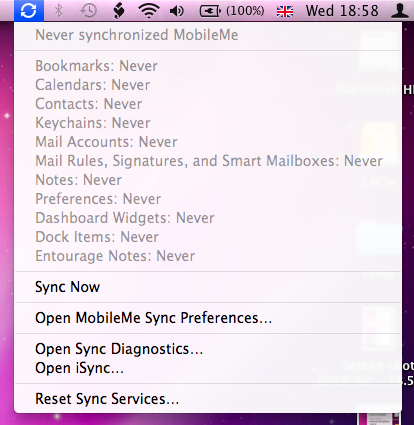
iSync/MobileMe
A normal click on this menu gives the time of the last sync, but option-clicking gives a huge list of the last time each individual data type was synced (i.e. Bookmarks, Calendars, Contacts etc.). It also adds in an option to open Sync Diagnostics and iSync, as well as giving the option to reset sync services.
Time Machine
In this one, Option-clicking changes "Enter Time Machine" to "Browse Other Time Machine Disks". This brings up a dialog listing all the connected drives that contain Time Machine backups. Select one and click Use Selected Disk to browse the Time Machine backup.

Transcriva Competition Winners
Here is a list of the winners of last week's competition to win a copy of Transcriva. These five were chosen at random from all the people who answered the question with the correct answer of iPad.
Clifford
Thierry
Heather
Rob
Roberto
If you’re in the list, you should receive a coupon code by email that will allow you to get a Transcriva serial number for free.
Well done to everyone who got the answer right. Keep a lookout for any new competitions for the chance to win more great Mac applications.
Competition: Win a copy of Transcriva 2!
Mac OS X Tips has teamed up with Bartas Technologies to give away five free copies of their software, Transcriva. Check out the bottom of this post your chance to win one of them.
Transcriva is an application for making text transcriptions to go with audio or video. It works great with meeting minutes, interview, lectures, speeches or even movies and TV shows.
Transcriva's real power comes with the fact that the media player and transcription are combined into one single application, allowing you to transcribe much more efficiently and avoid the constant application switching that a simple word processor would require.
It works as follows. First you need to find a media clip to associate your transcription with. This can be a movie or audio file that is either located on the internet, on your Mac, or you can make a new recording right from within Transcriva.
![]()
Next, you add names and colours for the people who are speaking in the transcript. You can also add separate sections for annotations or comments. Each person has a keyboard shortcut like Command-[number] associated with them, which allows you to quickly specify who is speaking as you transcribe.
Finally, you just click play to start the media going, and begin typing as people speak to add the transcription. Pressing return will start a new entry, or alternatively pressing the keyboard shortcut associated with a person will create a new entry for that person.
![]()
If, like me, you are often not fast enough to keep up, you have two options. You can either slow down the audio or video with a simple slider, or you can play at normal speed but hit Command-Return whenever you miss something skip back a few seconds.
So why should you go for Transcriva instead of just using a simple text editor? In my opinion, you can't really match the speed and efficiency in a normal word processor, which is really an issue if you find yourself doing a fair amount of transcription. When using a word processor, whenever you want to go back or pause your media, you need go through the impractical process of switching over to the application that's playing it then switching back to continue transcribing.
Also, the fact that all the important controls have simple keyboard shortcuts means that you don't have to take your hands off the keyboard at all to use the mouse while you are transcribing.
Transcriva also has a great playback feature that scrolls through your transcription as your media plays. Also, unlike a simple text transcription, you can skip to a place in the text, then instantly start your media playing at this point instead of having to note down the timestamp then switch to your media and find the right point. It also supports exports to RTF, Microsoft Word and plain text formats.
![]()
One downside is that it probably takes a little while to really get the hang of the keyboard shortcuts and become a fast transcriber, but I guess this is probably something that is true of transcription in general, whatever application you are using.
Also, as far as I know, you are limited to QuickTime compatible media, meaning it is a little tricky to transcribe a lot of the flash based videos on the internet without downloading them first. However, with plugins like Perian and Flip4Mac QuickTime should be able to play just about anything.
Overall, Transcriva is a neat little application, and although it is a bit of a niche product it definitely fills a role that many people need. It clearly does what it's supposed to do well, and for what is normally seen as a pretty boring task, it almost makes things fun!
You can download a trial version for free, or purchase the full version for $29.99.
If you want to win a free copy of Transcriva, just answer the following question. The winners will be chosen at random from all the correct answers.
What is the name of the new device released by Apple last week?
a) iPud
b) iPad
c) iPal
Once you know the answer, head over to this page to enter.
Automatically remove clutter from the desktop
John writes:
I was wondering if there was a way for the Mac to automatically clear the desktop and put all the items into the documents folder when shutting down. I'm setting up a computer which has a lot of users and clutter on the desktop is an issue. Thanks.
This is a great example of when AppleScript is really useful for automating simple tasks like moving files around. In fact, you can do it with a script that is only three lines long.
Start by opening up AppleScript Editor, located in the Utilities folder inside the Applications folder. If you don't have Snow Leopard, the latest version of Mac OS X, this might be called Script Editor and instead is located in the AppleScript folder in the Applications folder. In the window that appears, paste the following three lines:
tell application "Finder"
   move items of (path to desktop folder) to folder (path to documents folder)
end tell
If you click Run, you should see all the items on your desktop move into your Documents folder. Choose Save As from the File menu, give the script a name like cleardesktop and change the File Format to Application. Save it somewhere safe where someone won't accidentally delete it. I have a folder inside my Documents folder called Scripts where I keep all my AppleScripts. Other people choose to store their scripts in the Scripts folder in the Library folder, because Apple has already put some ready made ones in there.
The next step is to make it run every time you shut down your Mac. This is pretty tricky to do, and involves using a lot of Terminal commands. Instead, a much easier way is to make the script run when you log in, which will essentially do the same thing. Just go to System Preferences, and click on the Accounts section. Choose your account from the list on the left, and then click on the Login Items tab. You can now either click the plus (+) button and locate your script, or just drag the script from a Finder window into the list.
Now, whenever you turn on your computer, all the clutter left over from the previous user will be automatically moved into the Documents folder.
The above script is just about as basic as you can get. Here’s an idea for a more complicated version. Instead of just dumping everything in your documents folder, it instead creates a folder in there with a name that includes todays date ( e.g. “Desktop 13/01/2010” ) and puts the items in this folder instead.
set foldername to ("Desktop " & short date string of (current date))
set docsfolder to (path to documents folder) as string

tell application "Finder"
   if not (exists folder (docsfolder & foldername)) then
       make new folder at docsfolder with properties {name:foldername}
   end if
    move items of (path to desktop folder) to folder (docsfolder & foldername)
end tell
Alternatively, the following script checks the file extension of all the files on the desktop, and sorts them into the Movies, Pictures, Applications and Documents folders depending on what they are. If you are feeling adventurous, you can modify the script to include your own folders and file extensions.
tell application "Finder"
   set desktopFolder to (path to desktop folder)
    set musicFolder to (path to music folder)
    set appsFolder to (path to applications folder)
    set picsFolder to (path to pictures folder)
    set moviesFolder to (path to movies folder)
    set docsfolder to (path to documents folder)

    set musicExt to {".mp3", ".aac"}
    set appsExt to {".dmg", ".sit", ".app"}
    set picsExt to {".jpg", ".gif", ".tif", ".png", ".psd"}
    set moviesExt to {".avi", ".mpg", ".mov", ".m4v"}
    set docsExt to {".pdf", ".txt", ".doc", ".xls", ".key", ".pages"}

    set allFiles to files of desktopFolder
    repeat with theFile in allFiles
       copy name of theFile as string to FileName

        repeat with ext in musicExt
           if FileName ends with ext then
               move theFile to musicFolder
           end if
       end repeat

        repeat with ext in appsExt
           if FileName ends with ext then
               move theFile to appsFolder
           end if
       end repeat

        repeat with ext in picsExt
           if FileName ends with ext then
               move theFile to picsFolder
           end if
       end repeat

        repeat with ext in docsExt
           if FileName ends with ext then
               move theFile to docsfolder
           end if
       end repeat

        repeat with ext in moviesExt
           if FileName ends with ext then
               move theFile to moviesFolder
           end if
       end repeat
   end repeat
end tell