Every conceivable way of accessing the Library folder in Lion
A lot of noise has been made about the fact that the Library folder inside your user home folder is now hidden by default in Lion. Even though you can’t just go to your home folder and click on it any more, there are still loads of other ways to access it. Here’s every single method we could think of to show the Library folder, either on a temporary or permanent basis.
What is the Library folder for?
First, a quick recap of what the library folder is and why you might want to access it. Mac OS X actually has three different Library folders:
- One located at the root of your hard drive
- One located in a folder called System at the root of your hard drive
- One located in every user’s home folder
The purpose of all three Libraries is to store files that are used by applications and the system that users generally doesn’t interact with directly. The System Library contains all the core parts of OS X that are needed for it to function — there are very few reasons to ever change anything in it. The other two Libraries are very similar, both containing things like fonts, saved preferences and Dashboard widgets. These are all things that you interact with through other applications, so it makes sense to file them out of the way in a Library folder.
The only difference between these two libraries is that things in the hard drive Library are for all users of the computer, while things in the user folder Library are just for that specific user. If you’ve ever had to enter your administrator password while installing an application, chances are it was putting something in the hard drive Library that needed to be accessible to all users of the Computer.
The Library in your user folder is the one that you are most likely to want to access at some point. If an application is playing up, deleting its preference file in the Preferences folder in this Library is a good troubleshooting step. If you ever have to manually install a plugin for any application, this is most likely where you will have to put it.
With this in mind, it might seem a little odd that Apple decided to hide this Library folder. However, it’s also the most obviously visible of the three libraries, and therefore the most susceptible to accidental changes and deletions that cause problems. Now it’s hidden, if you ever need to get to it, simply take your pick from following methods.
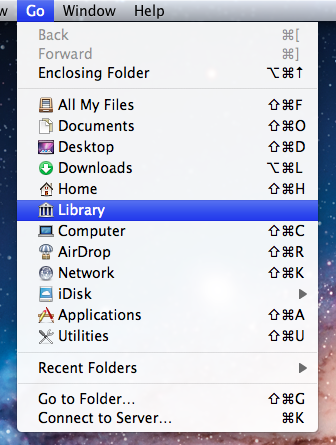
Option-click the Go menu
In the Finder, the Go menu offers lots of handy shortcuts to common places like your Documents and Applications folders. The Library folder doesn’t normally appear here, but if you hold down the Option key, it should pop up in the middle of the list. This is probably the best method for most people. It’s great if you only occasionally want to access the Library, as it stays hidden in your home folder but is still accessible fairly quickly.
Go to Folder…
While in the Finder, simply press Command-Shift-G to bring up the Go to Folder dialog. To access the Library, type in ~/Library and click Go. It is possible to type the path to any folder into this dialog. The ~ character is just a shortcut to your home folder. A more verbose alternative would be /Users/matt/Library.
Assign a keyboard shortcut (works in Finder only)
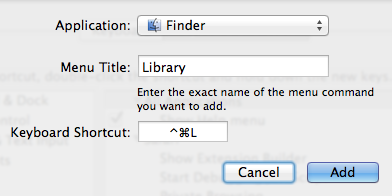
As long as an item appears in a menu somewhere, it’s fairly straightforward to add a keyboard shortcut for it. So as the Library appears in the Go menu, this isn’t too difficult. Simply open up System Preferences, and go to the Keyboard section. Click on the Keyboard Shortcuts tab, then select Application Shortcuts from the list and click the plus (+) button.
In the dialog that appears, choose Finder from the drop-down menu, type Library for the menu title and then choose whatever shortcut you want.
There are two small problems associated with this method: Firstly, for some reason this stops the Library from appearing in the Go menu, even when the Option key is pressed. Secondly, the shortcut will only work when Finder is the active application. To get around these problems, see the next method.
Assign a global keyboard shortcut (works in all apps)
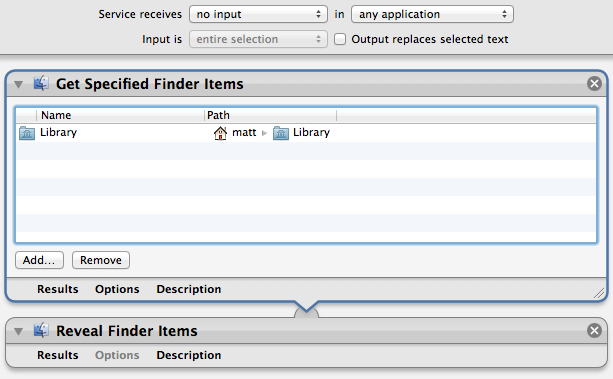
The easiest way to assign a global shortcut is by using an Automator Service. Start by opening up Automator (located in the Applications folder) and choosing the Service template. Drag the following two actions across from the library into the workflow area:
- Get Specified Finder Items
- Reveal Finder Items
Click the Add button in the Get Specified Finder Items action, and navigate to your home folder. Press Command-Shift-. (period) to show the hidden files, select the Library folder and click Add. Finally, change the drop-down menus at the top of the window to no input and any application, then Save the Service.
To add the keyboard shortcut, go to the Keyboard section of System Preferences as above, but instead choose Services from the list. Find your new Service, double click to the right of it and press your shortcut.
Access via the Terminal
If you are comfortable working in the Terminal, it’s still fine to navigate to the Library folder with cd ~/Library and then list its contents with ls.
Alternatively, you can use the Terminal as a way to open up the folder in the Finder. Simply type open ~/Library and press Return.
Add an alias to the Finder sidebar or toolbar
Once you have accessed the Library folder using one of the methods above, it’s easy to drag the folder into the sidebar or toolbar for easy access. This creates an alias to the Library folder that will permanently stay in the sidebar or toolbar until you remove it, while the Library folder remains hidden in your home folder.

Make it permanently visible
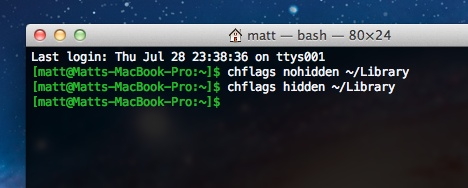
If you think all the above methods are just a waste of time and you want your Library back the way it was in Snow Leopard, it is possible to make it visible again. Open up Terminal (located in Applications/Utilities), paste in the following line and press Return:
chflags nohidden ~/Library
There’s no need to restart the Finder — the change should occur instantly. If you change your mind and want to hide the Library again, use the following command:
chflags hidden ~/Library
Make all hidden files visible
This is probably overkill if the Library folder is the only hidden item you want to access, but there is a simple Terminal command to make all hidden files visible in the Finder:
defaults write com.apple.finder AppleShowAllFiles YES
For more information on this command and how to set a keyboard shortcut to toggle hidden files, check out our article on how to quickly show and hide hidden files.