A collection of tips for iTunes 11
iTunes 11 is the most radical update for iTunes in a long while. It’s a fairly comprehensive redesign, although it’s quite clearly the same app under the surface. Here’s a collection of cool new things you can do in iTunes 11.
Up Next
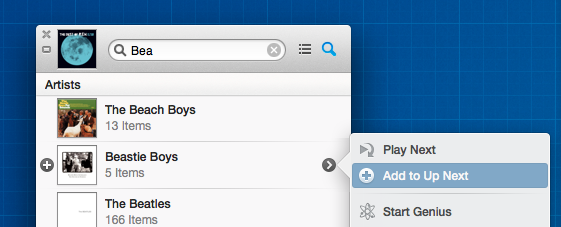
Up Next is the headline new feature that is a great improvement on iTunes DJ which it replaces. For any song you can right-click and choose Play Next to add it to the top of the Up Next List, or Add to Up Next to add it to the end. You can also just drag a song up to the centre display in the top toolbar. Alternatively, just hold down the Option key and click the plus (+) icon that appears next to the song, or press Option-Return while the song is selected.

All of the above applies to entire albums and playlists as well as individual songs, or an arbitrary selection of multiple songs. It even works with songs from a shared library on another Mac or on a connected device.
Unfortunately the rarely used song voting features that were part of iTunes DJ have gone, but Up Next is much simplified and will undoubtably be more widely used.
Click and drag
Since the sidebar is now gone, you could be forgiven for thinking you can no longer just drag songs into a playlist or onto a connected iPhone, iPod or iPad. But if you try it, you’ll find a sidebar slides in from the right as soon as you start dragging a song — allowing easy access to all your playlists and devices.
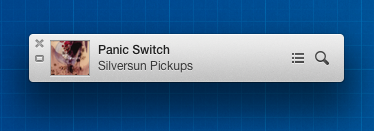
The new miniplayer
iTunes has had a miniplayer for years, but it has been completely redesigned in iTunes 11 with a few new features. Firstly, the way you switch to and from the miniplayer has changed: Instead of clicking the green zoom button, there’s now a small rectangular icon in the top right of the iTunes window, next to the full screen button. You can also use keyboard shortcuts - Command-Option-M will switch to the miniplayer, and Command-Option-3 will open up a separate miniplayer in addition to the regular iTunes window. The benefit of having both is that you can have the main iTunes window full screen, with the miniplayer still present on other desktop spaces.
The miniplayer displays the song and artist until you place your mouse cursor over it, when it switches to display playback controls. Be aware that if you have full keyboard access enabled in the Keyboard section of System Preferences, the miniplayer will only display the controls. You can tell this is the case if you have a blue “halo” around one of the control buttons that moves when you press the Tab key.
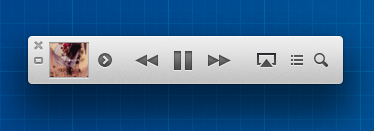
The best new feature of the miniplayer is that you now have access to your entire music library without having to switch back to the full size iTunes window. Just click the magnifying glass search button (or press Command-F) and begin typing the name of the artist, album or song you want to play. You can play it right away by selecting it and pressing return, or add it to the “Up Next” list by pressing Option-Return.
If you find yourself wondering where the volume controls have gone, try clicking in the AirPlay button. This should display a popup that allows you to control the volume on your Mac and separately for any connected speakers.
Navigate with the keyboard
With the sidebar gone, navigating to the different areas of your library can feel a bit harder, even though it’s only one extra click away. To make things easier, you can use the Command key with the numbers one through seven to access different areas:
- Command-1 : Music
- Command-2 : Movies
- Command-3 : TV Shows
- Command-4 : Podcasts
- Command-5 : iTunes U
- Command-6 : Books
- Command-7 : Apps
You’ll need to make sure none of these sections are disabled in the iTunes Preferences otherwise the shortcut won’t work.
Another cool trick is navigating with the arrow keys in the album view — up, down, left and right will move the selecting from album to album, sliding out the song lists as the selection moves. Press Tab to move the selection to the song list, then Escape to go back to the albums.
Redeem gift cards with your camera
While in the iTunes Store, clicking Redeem in the menu on the right now brings up a camera view in addition to a simple text field. This allows you to hold up your gift card and the code is inserted automatically. I haven’t been able to test this as it doesn’t seem to be available for me, possibly due to being outside the USA. Also, interestingly this feature was the result of a collaboration with a 3rd party app developer named Geppy Parziale, who may have got a telling off from Apple for blogging about the work.
Search your entire library
The search feature in iTunes used to just act as a way to filter the list you were currently looking at. Now, as you type in the search field, items from your library appear in a popover, no matter what you are currently looking at. The order does change depending on where you are — the media type you are looking at (movies, music, podcasts, etc.) appear higher in the list.
Typing a search term and pressing return will filter the current view, just like older versions.

Change it back!
So you hate everything new? It’s not too tricky to get iTunes back to roughly the same as it used to be. First, click Songs in the navigation bar across the top to return to the classic song list. Next, chose Show Sidebar and Show Status Bar in the View menu to bring those elements back. You might also want to choose Hide Music in the Cloud in the View menu.
Show duplicates
It’s gone! Walt Mossberg assures us though that it will be back soon in the next minor bug fix update of iTunes. It is also likely that minor bugs with missing album artwork and marking a song as a podcast will also be fixed. On the other hand, apparently Apple has no intention of restoring the Cover Flow album art view.
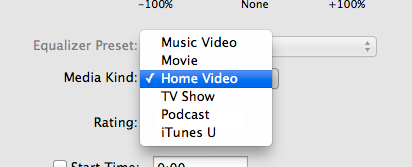
Home videos
There’s a new Home videos classification for movies. This prevents the awkward situation where any videos stored in iTunes had to be shown alongside either your movies or TV Shows from the iTunes Store. Videos imported to iTunes from elsewhere automatically get this classification. To change the classification on a movie, just choose Get Info (Command-I) and change the Media Kind drop-down menu under Options.
Get to grips with Notification Center in Mountain Lion
One of the most visible new features in Mountain Lion is Notification Center - borrowed straight from iOS. It works in a similar way to notifications on the iPhone and iPad, and bears more than a passing resemblance to Growl. Here are a few tips to help you make the most of Notification Center.
Pause all notifications
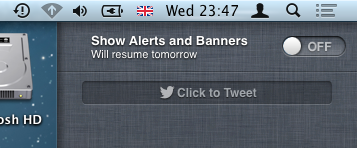
If you want to temporarily stop notifications appearing, the easiest way is to simply hold down the Option (alt) key and click on the notification center icon in the top right corner of the screen. It should become greyed out, indicating that notification center is turned off. Alternatively, while viewing your notifications, scroll up to see a switch that will allow you to pause notifications for the rest of the day. This is great as a “do not disturb” setting - for example if you are watching a movie or giving a presentation.
Access notifications using a gesture
The swipe gesture used to access notification center is a little tricky to get the hang of at first. It’s a two finger swipe from the right towards the left of your trackpad. The best way to do this is to start with your fingers actually off the right side of the trackpad, then swipe left onto the trackpad. Swiping back in the other direction hides notification center again.
Add a keyboard shortcut
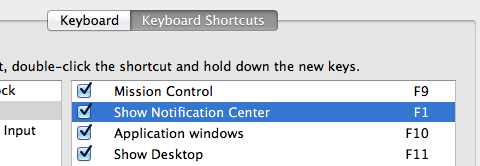
If you don’t have a multitouch trackpad, you can just click the notification center button in the top right to see your notifications. But to speed things up, you might want to add a keyboard shortcut. Just go to System Preferences, and in the Keyboard section click the Keyboard Shortcuts tab and find Show Notification Center under Mission Control. Enable the shortcut by ticking the checkbox, then press whatever shortcut you want to use.
Send Tweets
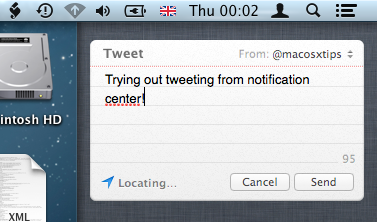
After upgrading to Mountain Lion, when you first visit Twitter in Safari and log in you will be asked if you want to allow other applications to access your account. Alternatively, you can manually add your Twitter account(s) by going to the Mail, Contacts & Calendars section of System Preferences. Once an account is set up, a Click to Tweet button appears in notification center, allowing you to quickly send tweets without first opening Safari or a Twitter app.
There’s no Facebook integration yet, but according to Apple it is “coming this fall.”
Disable notification sound
By default, every notification makes an alert sound as it appears. This seems fine at the moment, but I have a feeling it will start to get annoying, especially with apps like Messages. Fortunately, in the Notifications section of System Preferences you can specify which notifications can make an alert sound on an app-by-app basis. Just un-tick the Play sound when receiving notifications checkbox.

Banners vs. Alerts
Also in the Notifications section of System Preferences, you can specific whether notifications for each app appear as Banners or Alerts. Banners are most like Growl and iOS — they appear in the top right and fade out automatically. Alerts will stay until you click the Close button, and also sometimes have extra options, such as a Reply button for message notifications. I’m yet to figure out which type I prefer, but I suspect each type will be better suited to specific apps.
Bring back “Save As” in Lion
The autosave functionality in Lion takes some getting used to. It’s arguably a better way to do things, but after decades of manually saving files, it can take some time to get comfortable with how the new system works.
One change that particularly irritates me is the way the old Save As workflow has been replaced with Duplicate. The old system worked like this: After opening up an existing document and making changes, choosing “Save As” from the file menu allowed you to save those changes in a new file, instead of overwriting the existing one.
Of course this workflow isn’t really compatible with the autosave system, and as a result it has been replaced with Duplicate. There are two main problems I have with Duplicate:
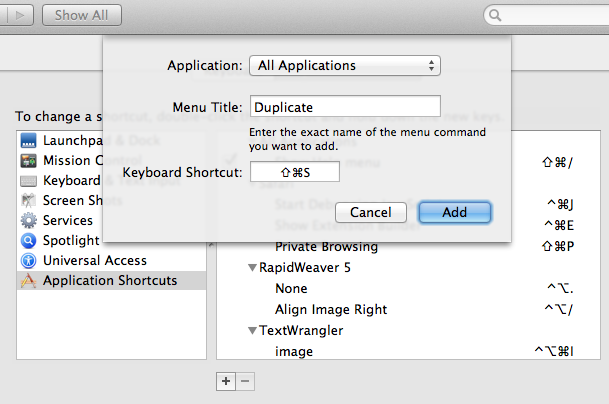
The first is that it has no keyboard shortcut assigned by default, meaning it requires a time-consuming trip to the File menu. Fortunately, this is easily solved by assigning the shortcut yourself in the Keyboard section of System Preferences. Under the Keyboard Shortcuts tab, click on Application Shortcuts in the list on the left, then click the plus (+) button to add a new shortcut. Leave the drop-down menu as All Applications, set the Menu Title to “Duplicate” and assign a shortcut of Command-Shift-S, the same as the old Save As shortcut.
The second problem is that if you duplicate your file after you’ve already made changes (like you would do commonly with Save As), then you are presented with the following cumbersome dialog:
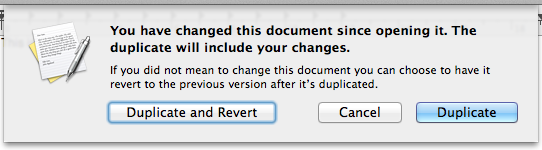
The default option, Duplicate, updates the existing file with the changes you have made as well as creating a duplicate, while Duplicate and Revert is more like the old Save As functionality. While there’s no perfect solution to this problem, there are two ways to avoid this dialog: Firstly, you could always remember to duplicate your files before you start making changes that you don’t want overwrite the existing file. This is probably the safest (and Apple-preferred) way, but will probably take me years to get used to. For those who really can’t stand the new way of doing things, Shawn Blanc has written a hack using Keyboard Maestro that automatically chooses Duplicate and Revert in the dialog for you.
Thanks to our sponsors!
I’d like to take a moment to say a big thank you to all our sponsors who help keep Mac OS X Tips running. We have such a great group of sponsors at the moment, so it’s definitely worth checking them out:
Fantastical - One of my favourite new Mac apps that provides a fantastic new way to access your calendar from the menu bar.
MacKeeper - A great app that combines a number of utilities to keep your Mac clean, fast and reliable.
DropKey - A super simple app for securely sending files with state-of-the-art encryption and no need for passwords.
justcloud.com - A free service for storing your files in the cloud, so you can access them anywhere, at any time, from any device.
Breffo - Innovative stands and podiums for your iPad and iPhone.
Full Control - Remote control your computer from your iPhone, iPad or iPod Touch.
Focusupply - Parts and accessories for iPad and iPhone including colour conversion kits.
If you are interested in sponsoring Mac OS X Tips, please see our advertising page.
A 1Password Power Tip
1Password is my favourite tool for managing my passwords. It help keep all my accounts secure by letting me use randomly generated passwords for every service so if one is compromised, all the others are still safe.
I’ve always thought that I’ve been using 1Password in the quickest and most efficient way possible. When I get to a login screen on a web site, I simply press Command-\ (or click the 1Password button in the Safari toolbar), type in my master password if needed, and voilà, I’m logged in.
However, Brett Kelly recently shared a “Super sweet 1Password trick” that allows you to skip out the login page altogether by adding a bookmark to your bookmarks bar that performs the entire login process for you.
Start by opening the 1Password app, and find one of your commonly used logins from the list. Then just drag the login into your bookmarks bar in Safari (or whichever browser you prefer to use).
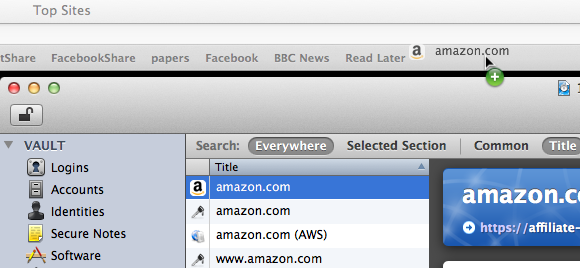
What have we just done? Try clicking on the newly created bookmark — you should see the web site load as expected, but then 1Password automatically fills out your username and password and logs you in. This means you can log into your most commonly used web sites with a single click!
If you haven’t typed in your master password in a long while, 1Password will prompt you for this before logging you in. But this is still quick (just type the password and press enter) and is clearly a good security measure.
8 Tips for iCal in Lion
iCal has been completely overhauled in OS X Lion - here are 8 tips to help you take advantage of all the new features.
Create a quick event
iCal now has a a great new way to add events that means you no longer have to spend ages filling out dates and times with fiddly controls. Instead, just click the + button in the toolbar or press Command-N to bring up the Quick Event popover. This allows you to type in the event details in a human-readable form — for example, “Movie at 7pm on Friday” or “Meeting at 3pm until 6pm” — and iCal will interpret what you mean and create an event.

Specify times in the event name
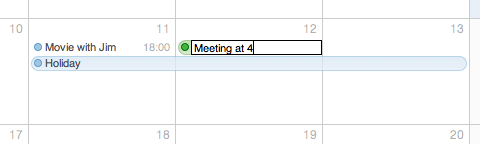
When creating events by double-clicking a day in month view, the new default behaviour is to create all-day events. If you want to create a normal event, just specify the time when typing in the event name. iCal seems to be quite flexible at interpreting what you mean - things like “Gym at 6” and “4pm Meeting” will both work.
You can also specify the length of all-day events in this way. Just type “Holiday until Saturday” or “Jim away until the 14th”.
Remove the leather effect
The new look and feel of iCal was one of the most controversial changes when Lion first came out, provoking outrage amongst many UI purists. If the new look isn’t for you, there are a couple of simple tweaks that will change things back to normal. First, if you just want to remove the torn page effect from the bottom of the toolbar, the Big Bucket Development blog shows you how to achieve this by replacing a single image. Alternatively, if you want to get rid of the new look completely, MacNix has a simple method that can bring back the aluminium look in both iCal and Address Book.
It’s worth making a backup of iCal before trying either method, just in case you ever want to revert back to the new leather style.
Show more (or fewer) than seven days in week view
This is a “top sekret” feature that requires a quick trip to the Terminal before it can be accessed. Start by opening the Terminal app (located in Applications/Utilities) then paste in the following line and press return:
defaults write com.apple.iCal IncludeDebugMenu YES
Quit and re-open iCal, and you should see a new Debug menu in the menubar. In this menu, under the Top Sekret [sic] section you’ll find an option to set the number of days in week view to 7, 14, 21 or 28 days. You’ll need a pretty large screen for these options to be that useful.
It isn’t necessary to enable to debug menu to show fewer than seven days in week view. First make sure you aren’t in week view, then just hold down the Command and Option keys and them press and number between 2 and 6.
Open multiple calendar windows
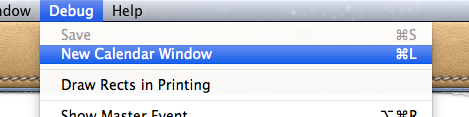
This is another secret feature hidden in the debug menu (see above). Once the debug menu is enabled, it is possible to open up multiple iCal windows by selecting New Calendar Window or by pressing Command-L. This is great if you would live to have two different views open simultaneously — for example separate weeks, or a month view and a day view.
Adjust the font size
It’s now possible to change the size of the text in the calendar view. Just choose Make Text Bigger or Make Text Smaller in the View menu or press Command-minus (-) or Command-plus (+).
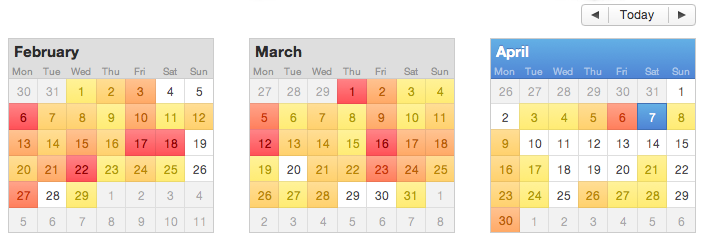
Year view heat map
The new “year at a glance” view is fancy, if not altogether that useful. It allows you to see a “heat map” of how many events you have throughout the year, with busier days shown in red and quieter days show in yellow. Double-clicking any month will bring up the month view for that month.
Set as Full Screen
iCal is one of only two apps that I regularly use Lion’s full screen mode with (the other being Terminal). This allows me to leave it always running in the background, out of the way. Whenever I need to check my schedule or reminders, a simple four-fingered swipe to the left will slide the desktop across to iCal running full screen in its own space. To set iCal as full screen, just click the full screen button in the top right corner of the window. You can even combine this with the multiple calendar windows tip to allow you to swipe between multiple full screen calendars that show the current day, week and month.
Customize System Preferences
It’s always been possible to install and remove your own custom preference panes in System Preferences, but until Lion, the default Apple-provided preference panes were there to stay, whether you used them or not.
Now, in Lion, it’s possible to hide any icon in System Preferences, including the Apple ones. To do this, just go to the View menu and choose Customize. A checkbox will appear next to each of your System Preferences icons, allowing you to turn off the ones you don’t regularly use.
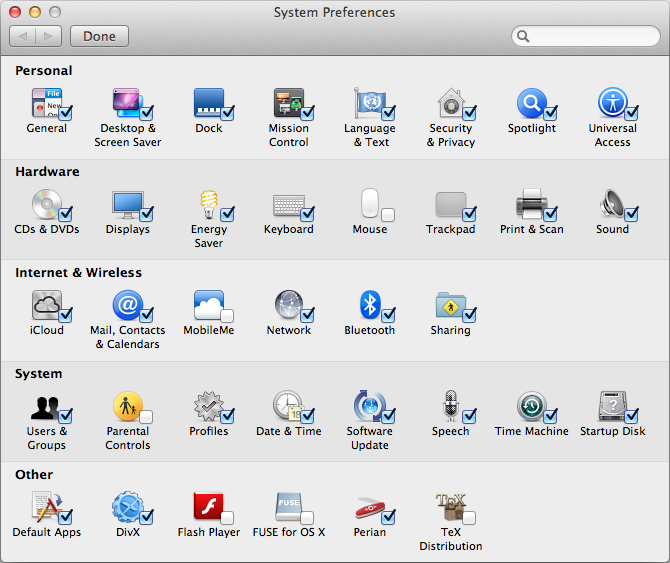
As well as giving you the ability to remove the default preference panes, this also has the benefit of allowing you to hide your own custom preference panes without completely uninstalling them. If you do occasionally need to access one of the hidden preference panes, they are still all accessible from the View menu or by right-clicking on the System Preferences icon in the Dock.
Another new customisation available in Lion is the ability to sort the icons alphabetically, instead of by category. Without the category names taking up space, this gives a nice, slightly more compact System Preferences window. Just choose Organise Alphabetically from the View menu.
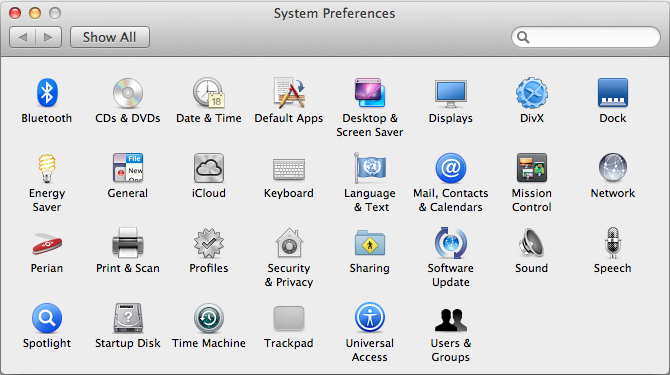
Bonus tip: It is possible to quickly switch between preference panes by clicking and holding on the Show All button. This causes a drop-down menu to appear with a list of all your preference panes (including hidden ones). This is pretty much the same as what is in the View menu, but might save you a few milliseconds by being a little bit closer to your mouse cursor.
Customize the login screen in Lion
A lot of people have complained that the login screen is too bland and boring in Lion - it now sports Apple’s new favourite grey linen texture. Fortunately, it’s not to tricky to make some customisations. It is possible to change the background, add a custom welcome message and display system stats. Find out how below.
Changing the background
In Lion, the background used for the login screen is located at
/System/Library/Frameworks/AppKit.framework/Versions/C/Resources/
The easiest way to get to this folder is to choose Go to Folder in the Go menu while in the Finder. Then just copy and paste in the above line and click Go. The image that is used for the background is NSTexturedFullScreenBackgroundColor.png. You can replace this with any other image, and as long as you give it exactly the same name, it will be used for the login screen background. Before you make any changes, make sure you make a copy of the original file somewhere safe so you can go back to it if you want.
You’ll notice that the image is only a small 256x256 pixel square — this is because it is automatically tiled across the screen. If you want to use a similar type of texture, any size image is fine. However, if you would like to use a full size image without tiling, you need to make sure the image dimensions exactly match your screen and the resolution is 72 dpi. Either way, it must also be in PNG format like the original. It’s pretty simple to use Preview to adjust any image to the correct size and format.
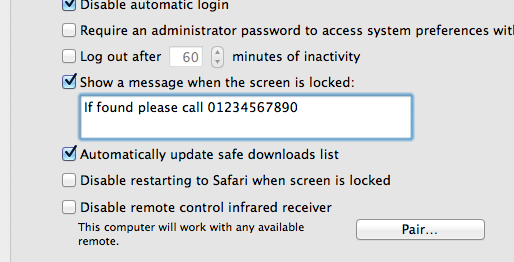
Display a short message
Before Lion, displaying a message on the login screen was a complicated process that involved entering commands into the Terminal. Luckily, Apple have now added an easy way to set a message using System Preferences. To do this, go to the Security & Privacy preference pane, and under the General tab, tick the checkbox Show a message when the screen is locked then add your message. Only about the first 200 characters you enter will be displayed, so make your message short and sweet.
Display system stats
In older versions of Mac OS X, simply clicking on your computer name in the login window would cycle through displaying lots of useful system information. Unfortunately this feature has been removed in Lion, but you can bring it back to a certain extent. Open up Terminal (located in Applications/Utilities), paste in the following line and press Return:
sudo defaults write /Library/Preferences/com.apple.loginwindow AdminHostInfo HostName
Now when on the login screen, clicking on the time in the top right will cause the computer name to appear, followed by the OS version and build number, followed by the IP address.
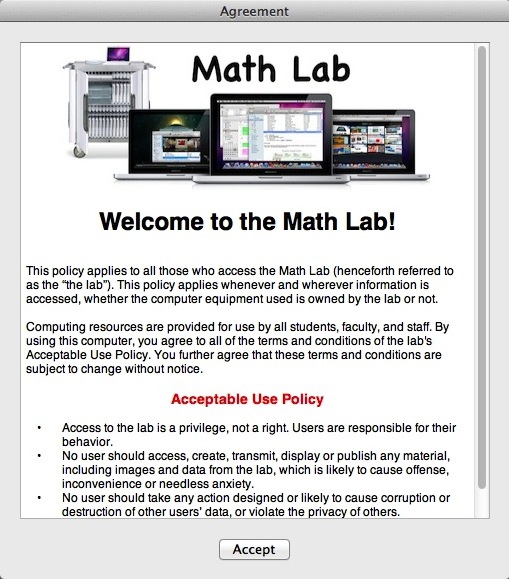
Display a login banner
Apple has a great article over on their support site on how to display an agreement window where users must read and click Accept before logging into the computer. This is really useful for people who manage lots of Macs in a school or company with an “Acceptable Use Policy” that all users must agree to.
To do this, just create a file in TextEdit that contains whatever text you want to display. You can embed images and use whatever text styling you want. Once you are done, save the file with the name PolicyBanner in the Security folder in the Library in Macintosh HD.
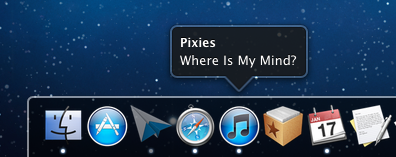
Get iTunes track notifications in your Dock
In Lion there is a cool hidden setting to enable “Now playing” notifications that appear from the iTunes icon in the Dock. Every time a new song starts, a small popup containing the artist and the song name appears and then slowly fades out after a few seconds.
To enable this, start by opening Terminal (located in Applications/Utilities), then paste in the following line and press Return.
defaults write com.apple.dock itunes-notifications -bool YES
For the changes to take effect, the Dock has to be restarted. The easiest way to do this is to type killall Dock into the Terminal and press Return. If you change your mind and want to disable the notifications, repeat the above commands, but replace YES with NO.
For those of you who have your Dock set to hide when not in use, you’ll notice that when the Dock is hidden the iTunes icon is added to the notification. If you want the icon to show even when the Dock is not hidden, just use the following command in the same way as above:
defaults write com.apple.dock notification-always-show-image -bool YES
As before, remember to restart the Dock with killall Dock for changes to take effect.
It’s not entirely clear why this setting isn’t present in the iTunes preferences. It might still be under development — there is still room for improvement. For example it would be better if it included the album artwork like Bowtie, Growl and DockArt already do. It could also be a sneak peak of future plans Apple has for a notifications framework for all apps in Mac OS X, much like Growl provides at the moment.