Watch videos before they have finished downloading
When you are downloading a video file to your computer using Safari, it is possible to start watching it before the download has finished. This is great for really long movies that take ages to download.
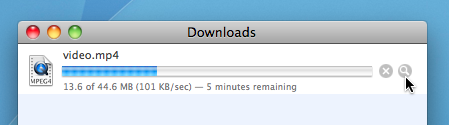
To do this just go to the downloads window in Safari (Command-Option-L) and find your video that's downloading. Click on the little magnifying glass icon to show the file in the Finder.
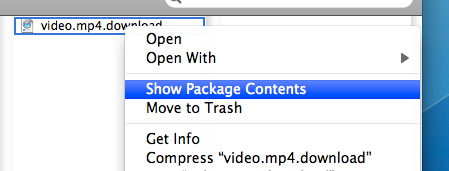
You will notice that the file has an extra extension of .download added to the end, and it doesn't open properly if you double-click on it. However, instead you can right-click on the file and choose "Show Package Contents". A new folder should open up, containing two files.
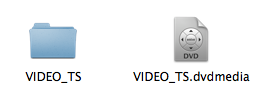
One will be called "info.plist" and the other will be the video you are downloading. Now you can just open it to watch the portion that has already downloaded. For some videos QuickTime will be unable to play them when they aren't completely downloaded. If you have problems, you can try using VLC instead.
Create double-clickable dvdmedia movie bundles
When you rip a DVD to your Mac you end up with a VIDEO_TS folder, which can be dragged to DVD player icon to play the DVD (you might find some stubborn DVDs will only play in VLC though).
As the DVD media is a folder, obviously you can't double-click it to open it in DVD Player. Instead you have to do the cumbersome open-the-app-then-drag-and-drop-to-icon procedure.
The way around this is to rename the folder with the .dvdmedia extension. This will turn the folder into a bundle, and add a nice DVD icon as well. Double-clicking this will automatically open it up in DVD player, but you can easily change this to another app like VLC for example. The easiest way is to choose Get Info on the bundle, choose the new app from the "Open with" section, and click the "Change All..." button. While you are in the Get Info window you might also want to click “Hide Extension” and rename the bundle to the name of the movie. You can also change the icon to the artwork for the movie which you can get from a site like Get Video Artwork.
One annoying side effect of this is that Front Row won't recognise dvdmedia bundles, whereas it will recognise VIDEO_TS folders. Of course, to get your movies to work well in the Finder, Quicktime iTunes, Front Row and iPhone all at the same time you might prefer to run them through a tool like HandBrake. This can also save you some space depending on how you encode them.
Borderless Quicktime Movies
Murphy Mac has a great screencast about creating Quicktime skins, but luckily it is a lot easier to create a borderless movie. It involves creating an image file and a text file to go with your movie, and then combining all three files into one borderless movie.
The first step is to find the dimensions of your movie. Double-click it to open it in Quicktime and press Command-I or choose "Show Movie Info" from the Window menu. The Movie Info window will show you the "Normal Size" of the movie in pixels. Make a note of this size.
![]()
Next, you will need to create a solid back image that is the same size as your movie. There are lots of ways of doing this, but here's a method that should be available to everyone. Download this image to your hard drive by clicking one the link and then choosing Save As from the File menu. Basically its a really big black rectangle.

The next step is to load up TextEdit and type the following lines:
<?xml version="1.0"?><?quicktime type="application/x-qtskin"?><skin><movie src="movie-name.mov"/><contentregion src="black.png"/><dragregion src="black.png"/></skin>
Obviously it is a bit annoying to have three separate files to achieve this. The good news is that you can combine them into one file, but the bad news is that it requires Quicktime Pro ($30).
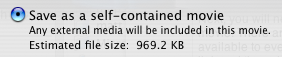
If you have Quicktime Pro, you can do this by choosing Save As from the File menu with the borderless movie open. Choose a file name and make sure you save it as a "self-contained movie", not a reference movie. The resulting file will still work fine if you delete the other files or move them about, meaning you can send it in emails or over the internet.
Now why would you want to do this I hear you ask? Honestly, there's no big reason apart from your movie will take up a bit less space and look a whole load cooler!
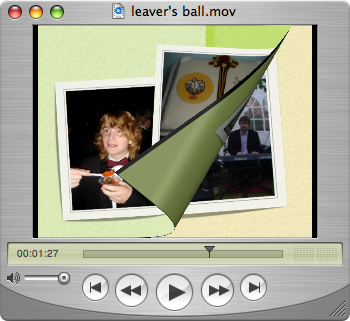
Export an iPhoto book to movie

Once your book is completed, you can view the slideshow by clicking the play button at the bottom. This will bring up the slideshow options. Make sure the random order check box is unchecked (you don't want your pages appearing in a random order) and choose the amount of time you want each page to appear for. To make the movie more book-like you will probably want to use the "page peel" transition, going left. You might also want to add some background music from your iTunes library.

Instead of going to the slideshow, you will now be prompted to choose a location to save your movie. Give it a name and click export. Now your photo book is saved as a Quicktime movie that you can watch and share.
Boost Quicktime Volume
However, with some files, you might find that the audio is too quiet to hear. If you have turned up the volume to full and your Mac's speakers still aren't playing it loud enough, there is a simple way to get an extra volume boost.
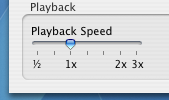
If you hold the Shift key before clicking one the Quicktime volume control the slider has more range than normal. This also works when viewing Quicktime movies embedded in a web page.

If you have opened up the file in Quicktime, you can get the same results by choosing "Show A/V Controls" from the Window menu (Command-K). In the A/V controls there is a slider that goes higher than the maximum volume on the slider in the Quicktime window.
5 Quick Podcast Tips
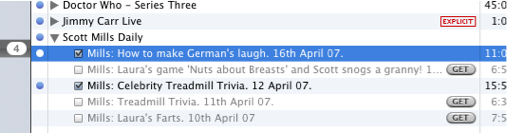
2. It's fairly obvious that you can delete single episodes from a podcast by simply selecting it and pressing delete. However, getting them back is a bit less straightforward. Option-Clicking the triangle next to the podcast title will bring up the full episode list, including any that you have removed in the past. Now you can click "Get" to download the episodes again.
4. Many podcasts have excessively long descriptions (well, too long to fit in the description column of the iTunes window). To bring up a window that contains the episode description and other details, click the small "i" icon on the right side of the description column.
5. If you come across a podcast on the Internet but you can't find it in the iTunes Podcast Directory, you can still subscribe to it in iTunes. Choose "Subscribe to Podcast..." from the Advanced menu and enter the podcast feed URL.