Facebook feeds on the desktop with GeekTool
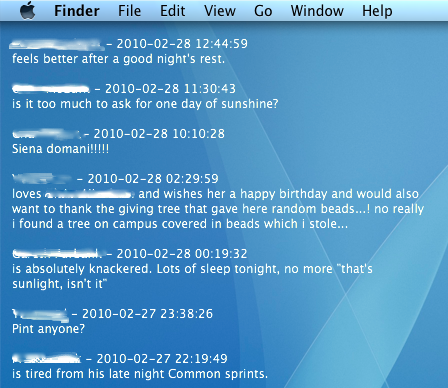
I recently posted a tip over at Geeklets on how to display your Facebook news feed or recent notifications on your desktop using GeekTool. The whole process is a little bit complicated, but here’s a summary of what you have to do:
1) Get your Facebook feed address This is just an RSS feed you can get from the Facebook site.
2) Create an Automator workflow You need to create a short automator workflow that runs regularly and saves the recent items to a text file.
3) Optional: Make your workflow run in background You can disable the Dock icon so the Automator workflow doesn’t bother you every time it runs.
4) Set up the GeekTool Geeklet Finally you can just download the geeklet files that display the feed on your desktop.
Head over to the Geeklets site to see the full instructions. If you are new to GeekTool you might want to check out this introduction.
A place to share your GeekTool setups
I've mentioned GeekTool a couple of times before, and it has recently been updated to version 3. The best thing about the update is how much simpler the interface is. Before the interface was a bit intimidating, but now it is much easier to use.
For those who don’t know, GeekTool is a preference pane that allows you to display different kinds of information on your desktop. These bits of information are called Geeklets, and they can be text, images, files, and the output of shell commands. Some of the most common things to use it for are displaying to do lists, today’s iCal events, the date, the current iTunes song and unread mail.
The latest version now allows you to save your Geeklets and share them with each other, so I’ve created a site just for that. It allows you to submit your Geeklets and vote on others to see which are most popular. If you are new to this, it also has a page for getting started with GeekTool.
Here are a few tips for using GeekTool.
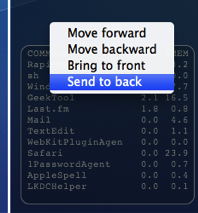
1. Set stacking order
If you have overlapping Geeklets, you might find that the wrong one is on top. Just right-click on the Geeklet and change the order by choosing “Send to back” or one of the other options.
2. Don’t set refresh to zero
By default, GeekTool sets the refresh time to 0, which means it continuously refreshes as quick as it can. It is best to avoid this as it can take a considerable toll on your system, hogging resources and slowing things down. For things that really have to be updated very regularly, consider a refresh time of 5 or 10 seconds instead.
3. Group your Geeklets
By putting your Geeklets into separate groups, you can quickly and easily enable and disable them based on their grouping. Note that Geeklets can be in multiple groups - as long as one of the is enabled, the Geeklet will be shown.
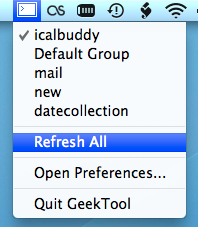
4. Use the menubar item
GeekTool now has a menubar item that you can enable from the preference pane. From here you can enable and disable groups, force a refresh on all Geeklets, disable GeekTool, and access the preference pane.
5. Check out other people’s Geeklets
Check out the Geeklets other people have posted to get some inspiration for your desktop. Vote up your favourites, and share your creations too.
Easily remove preference panes
Here’s a trick that I just learnt. You can quickly remove preference panes from System Preferences by right-clicking (or Control-clicking) on them and choosing remove preference pane. Of course this only works on the preference panes that you have installed yourself, i.e. the ones that appear in the “Other” section.

Even though you can just Trash the preference pane file yourself, this is quite a good timesaver if you can’t remember if you installed the preference pane for all users or just your user. Depending on which you chose, the file could be located in the Library folder in Macintosh HD or the Library folder in your user folder. It’s much quicker just to do it straight from System Preferences. Just like if you were Trashing the file, System Preferences will ask you for your administrator password when removing preference panes for all users.
After a bit of a clean out, I’ve managed to cut down to just the preference panes I actually need. I have
- DivX, Flip4Mac and Perian for video formats (Perian is probably the most useful)
- Growl for notifications
- GeekTool for displaying data on the desktop
- Secrets for tweaking all those hidden settings.
Let us know in the comments if there are any other preference panes that you swear by.
A few more GeekTool tricks
Show Basic System Information
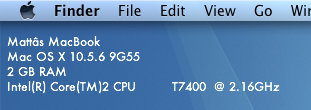
It is possible to use shell commands in GeekTool to display the computer name, operating system version, the amount of RAM and the processor details. This is useful if you have loads of the same model, or if you often remotely control other Macs.
To display this information, just open up System Preferences and click on GeekTool (download it first if you haven't already). Create a new entry, and change the type from File to Shell. Paste the following code into the box:
scutil --get ComputerName;sw_vers | awk -F':\t' '{print $2}' | paste -d ' ' - - -;sysctl -n hw.memsize | awk '{print $0/1073741824" GB RAM"}';sysctl -n machdep.cpu.brand_string;You might notice that each line of the code corresponds to a line of the output. In fact the code is actually 4 separate terminal commands. If you want you can delete or modify any of the lines and it won’t affect any of the others. Just make sure each line ends with a semicolon.
These details pretty much never change, so it's worth changing the refresh time to something very high. It is measured in seconds, so something like 100000 (about one day) should be alright. Once you adjust the font, colour and position, the result looks something like the screenshot below.
Show Free Disk Space
df is a command line utility for getting information on how much disk space you have free. The following command gets the output of the df command and converts it into a more readable format:df -hl | grep 'disk0s2' | awk '{print $4"/"$2" free ("$5" used)"}'Just add this into GeekTool in the same way as usual. "
disk0s2" is the identifier for the hard drive. You can find out what yours is Disk Utility (located in Applications/Utilities). Just click on the hard drive in the list on the left and choose Get Info... from the File menu (Command-I). The Disk Identifier property is near the top of the info window.The second part of the command is awk which rearranges the output. You can change this arround. Just make sure all text is inside double-quotes, and all variables (e.g. $2) are outside. $2 gives the capacity, $3 gives the used, $4 gives the free, and $5 gives the percentage used.
This one would fit quite well with the system info above, but it is likely to change more so you might want to keep it separate and have it refresh more often.
![]()
Display Album Artwork and Song Details of iTunes Currently Playing
I won't go into detail with this, because I don't have it set up on my system. This basically involves using AppleScript to get the details from iTunes. The song details are relatively straightforward to get, but the album artwork is a bit more complicated. Mac OS X Hints shows how to do the song details here, and the album artwork here.
Display a One-line Weather Forecast
Unfortunately this one is for US readers only (or people who want to know the weather in the US). The website Weather Underground gives a single line weather forecast that just compares today or tomorrow to the previous day. As usual, just create a new GeekTool entry, change the type to Shell and paste the following in the box:
curl -s http://www.wunderground.com/cgi-bin/findweather/getForecast?query=12345 | awk '/Today is/ || /Tomorrow is/' | textutil -convert txt -stdin -stdout -format htmlReplace 12345 with your zip code, and you should have a weather forecast for your area. Running this takes a bit of time and system resources, so it's best to change the refresh rate to at least a few hours (about 10000).

Stop GeekTool preventing Sleep
You may have noticed that GeekTool prevents your Mac from going to sleep after the time period set in the Energy Saver section of System Preferences. The display will sleep, but the computer itself will never sleep because it is continuously performing tasks and Mac OS X doesn't think it is idle. This isn't really an issue for me, as I normally close the lid of my MacBook when I'm not using it, but I can see how this would be a problem for others. There is a solution explained over at Mac OS X Hints that uses an application called SleepWatcher to disable GeekTool as soon as the display goes to sleep.
Tweets on the desktop with GeekTool
If you are looking for more Geektool scripts then check out the Mac OS X Tips Geeklets site. It has loads of user-contributed Geeklets all in one place for you to download.
As reported in TUAW yesterday, a reader named Ben G saw my recent tip for displaying iCal events and to do items on the desktop and took it one step further. Inspired by iCalBuddy, he has written a similar command line utility called twitterbuddy that instead displays the latest tweets by the people you follow. Getting this onto your desktop is pretty much the same process as with iCalBuddy.
Once you have downloaded twitterbuddy, double-click the install.command file to install it. To test it works, open up a new Terminal window and type in
twitterbuddy -h. This should bring up the following list of options:
As you can see, typing
twitterbuddy -u yourusername -p yourpassword -n 5 -t Tweets will display the last 5 tweets you have received, with the title “Tweets”. After perfecting your settings in Terminal, adding the command to GeekTool is easy. As with iCalBuddy, the only subtlety is that you have to use the full path, as shown below:/usr/local/bin/twitterbuddy -u macosxtips -p ******** -n 5 -t Tweets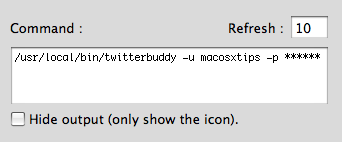
For help setting up GeekTool and formatting your output, check out the iCal on the Desktop tip, as everything is the same. Many thanks to Ali Rantakari, the deveoper of iCalBuddy and Benjamin Goering, the developer of twitterbuddy for all their hard work.
Also, if you want to, follow me on Twitter.
Display iCal Events and a To Do list on your desktop
If you are looking for more Geektool scripts then check out the Mac OS X Tips Geeklets site. It has loads of user-contributed Geeklets all in one place for you to download.
1. Get GeekTool and iCalBuddy
To set this up you need to download two (free) applications. The first is GeekTool, a preference pane that allows you to display files, images and shell scripts on the Desktop. The second is iCalBuddy, a command line utility that lets you access events and to do items without having to open iCal.
Download GeekTool from here and install it by double-clicking on the preference pane. You can now access it by going to System Preferences and looking in the bottom row.
Download iCalBuddy from here and double-click it to unzip the folder. Then double-click the install.command file, and enter your administrator password when the window appears. You can then close the window.
2. Set up GeekTool
Once you click on the GeekTool section in System Preferences, you will see a window with three different icons. Drag the one called “Shell” to a position on the desktop behind the window. A black “Properties” inspector window will appear, where you can enter the settings for this geeklet. The bits you need to change are the Command and Style sections. In the command box, paste
date and click the button below to set the font and colour to something that complements your background and make it a bit bigger. If you look on your desktop now, the date should be written in the top left. You can click and drag this around to where you want it, or you can type in the position in the bottom right of the GeekTool window. As you can see, the time only updates every 10 seconds. You can change this in the Refresh box above the Command box.3. Change the appearance
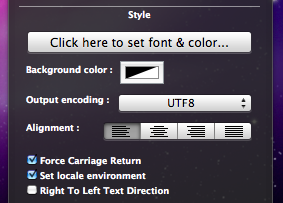
If you have a dark Desktop background, you may find that you can't see the date. By default the date appears in an ugly plain fixed width font with a black text colour. To make this more visually appealing, click on the "Colors and Font" tab and adjust the settings. You can see my settings in the screenshot below. Obviously lighter text colours work better with darker desktop backgrounds and vice versa.
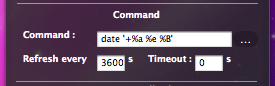
The Shell option on GeekTool works just like the Terminal. If you type
date into the Terminal and press enter, you should get exactly the same thing back as shown by GeekTool. Conveniently, the date Terminal command has a number of options to change the style of the date. As you can see, the default setting includes the time, time zone and year that I don't really want. The command for my preferred date format is date '+%a %e %B' which gives something like Wed 18 February. Apple has a list of formatting options here you can use to change it to whatever you want. You need to put a + at the start, followed by the symbols for the bits you want. You can but punctuation like commas between the symbols, and the whole thing has to be enclosed in single quotes.
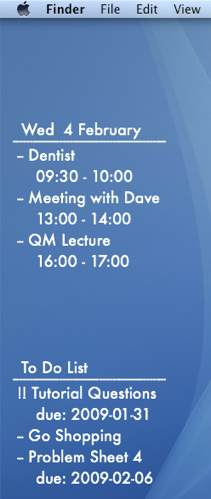
This is where the iCalBuddy application comes in. Create a new geeklet by dragging the “shell” icon onto the desktop as before. In the Command box type
/usr/local/bin/icalBuddy eventsToday. This should bring up a list of today's events on the desktop. There are loads of customisation options for iCalBuddy, so I won't go through them all, but I'll show you mine. The command I use is:/usr/local/bin/icalBuddy -nc eventsToday | sed -e "s/*/--/" | sed -e "s/!/!!/"-nc part removes the calendar name in brackets because all my events are in the same calendar. The sed -e "s/*/--/" part changes the * at the start of each event to a -- because I think it looks better. The "sed" and "awk" commands are really useful for customising the output, but I won't go into much detail here. Just do a Google search for a tutorial if you want more information. For the different iCalBuddy customisation options, check out the man page.One customization to note is the "eventsToday+NUM" option. Replacing
eventsToday with eventsToday+3, for example, will display the events for the next three days in separate sections titled by the date.6. Add to do items
To do items work in pretty much the same way as the iCal events. The command to use is
/usr/local/bin/icalBuddy uncompletedTasks. Similar to before, the command I use is:/usr/local/bin/icalBuddy -nc uncompletedTasks | sed -e "s/*/--/" | sed -e "s/!/!!/"7. Add some titles
If you just want GeekTool to display some text, the easiest way to do it is to use the
echo command. Just create a new entry and use the command echo To Do List to make it display "To Do List" on the Desktop.8. Set the Refresh rate
The next thing to do is to set a suitable refresh rate for each item. It is worth noting that these command take very little system resources, and having them all update every 10 seconds produces absolutely no decrease in performance whatsoever that I've noticed. However, in principle you should only really make them refresh as much as you need them too. I've set all mine to update once an hour (3600). This means that the worst case scenario is that the information is wrong for up to an hour between midnight and 1am each night. If you like having the time displayed in the date command, you probably want that to update every second.
8. Make it pretty
Finally, you just have to change the font and colour of each entry and position them somewhere you want on the Desktop. I went for the far left as it's a place guaranteed not to get covered up by icons.
9. Go crazy
There are hundreds of things you can do with GeekTool, and it's definitely worth trying them out and seeing what you like. In the end, I only kept the iCal events and to do list, but you may like having constant updates of your uptime, running processes, CPU use, local weather maps, IP address, current iTunes track etc. Check out the Mac OS X Tips Geeklets site for more.