Bring back “Save As” in Lion
The autosave functionality in Lion takes some getting used to. It’s arguably a better way to do things, but after decades of manually saving files, it can take some time to get comfortable with how the new system works.
One change that particularly irritates me is the way the old Save As workflow has been replaced with Duplicate. The old system worked like this: After opening up an existing document and making changes, choosing “Save As” from the file menu allowed you to save those changes in a new file, instead of overwriting the existing one.
Of course this workflow isn’t really compatible with the autosave system, and as a result it has been replaced with Duplicate. There are two main problems I have with Duplicate:
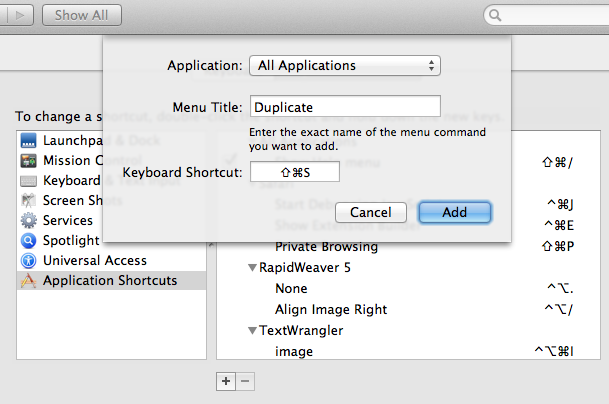
The first is that it has no keyboard shortcut assigned by default, meaning it requires a time-consuming trip to the File menu. Fortunately, this is easily solved by assigning the shortcut yourself in the Keyboard section of System Preferences. Under the Keyboard Shortcuts tab, click on Application Shortcuts in the list on the left, then click the plus (+) button to add a new shortcut. Leave the drop-down menu as All Applications, set the Menu Title to “Duplicate” and assign a shortcut of Command-Shift-S, the same as the old Save As shortcut.
The second problem is that if you duplicate your file after you’ve already made changes (like you would do commonly with Save As), then you are presented with the following cumbersome dialog:
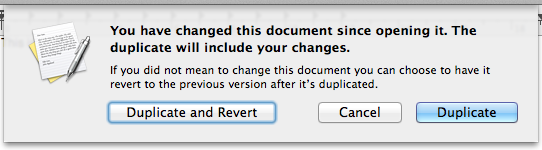
The default option, Duplicate, updates the existing file with the changes you have made as well as creating a duplicate, while Duplicate and Revert is more like the old Save As functionality. While there’s no perfect solution to this problem, there are two ways to avoid this dialog: Firstly, you could always remember to duplicate your files before you start making changes that you don’t want overwrite the existing file. This is probably the safest (and Apple-preferred) way, but will probably take me years to get used to. For those who really can’t stand the new way of doing things, Shawn Blanc has written a hack using Keyboard Maestro that automatically chooses Duplicate and Revert in the dialog for you.
Automatically Insert the Date and Time
How can I set my MacBook to insert today's date, short version or long version, into whatever I'm keyboarding in??? QuicKeys is too expensive for Mac OS X and this Mac should do that!
To install it, create a new folder in your Library folder called "Services" and drag the the WordService.service file into it. Log out then back in again to enable the service.
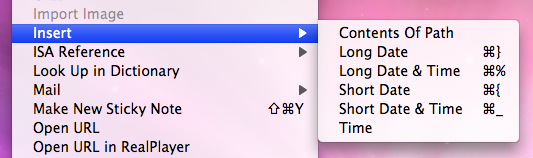
WordService is now accessible form the Services menu. This is under the Application menu in the top left, next to the Apple menu. You will probably have a lot of things in this menu, even if you have never installed any services before. This is because many applications will add things in that they think are useful. The new entries that WordService has added are Insert, Format and Convert. Each of these has a submenu with multiple options. The full features are outlined at the bottom of this page.
To insert the current date or time, you want to look at the options in the Insert submenu. There are different options for inserting the short date, long date, time and combinations of these. Each one has a keyboard shortcut to speed things up.
Inserting the date and time is just one thing WordService is capable of. One of the more fun features is the Rotate13 option in the Convert menu. This allows you to "encode" the selected text with a simple substitution cypher. You can also speed up many repetitive tasks like removing double spaces and setting all caps or lowercase.
WordService works in all Cocoa applications (TextEdit, Mail, Safari etc.) and many Carbon Applications. As a result, you can use it almost everywhere. One notable place where it doesn't work is in Microsoft Word. Luckily, all of the Microsoft Office applications have their own way to insert the date and time. You'll find it under the Insert menu.
Drag Chunks of Text onto Dock Icons
Doing this with different applications will produce different results. If the application will accept the text, it will darken when you hold the selection over it. Note that some applications will only accept the text if it is in a certain format (a web address for example). Here are the results with a few common applications. If you know of any more, add them in the comments.
1. Safari - If you drop a web address (i.e. something that starts with http://) on Safari, it will load up that address. If you drag any other bit of text, it will perform a Google Search on it. This is mainly useful if the text is from a non-cocoa app that doesn't have the "Search in Google" item in the right-click context menu.
2. Firefox - If dropped text is a web address, Firefox will load it. This is helpful if you want to view a site in a browser other than your default browser.
3. Mail - A new message will load up with the dropped text as the main message body. Annoyingly the text is placed in the body even if it is an email address.
4. TextEdit - As expected, this loads a new document containing the dropped text.
5. Skype - If the dropped text is a phone number, Skype will call it. This will also work with nicknames in your contact list.
6. Script Editor - A new script window will open up containing the dropped text. Script Editor will then attempt to compile it.
7. iTunes - If you drop a podcast address onto iTunes, it will subscribe to it. If the address isn't a podcast, iTunes will attempt to do it anyway (and fail).
8. Acquisition - Starts a new search with the dropped text.
9. Newsfire - Adds a new feed with the text as the address. (Why not try it out with http://feeds.feedburner.com/macosxtipsfeed )
10. Stickies - This will make a new Stickies note containing the text open up.
11. Dictionary - This will show you the definition of the dropped word. If you drop a selection of words, Dictionary will display the definition of the first. (In cocoa apps, it's probably quicker to use this keyboard shortcut).
Most of these also work if you drag the text to the desktop to create a text clipping first, and then drag it to the Dock icon.
Make the Most of iPod Notes
Creating Your Notes
![]()
The easiest tool to use to create plain text files is TextEdit. Open it up and press Command-Shift-T or choose Make Plain Text from the Format menu. Once you are done writing your note, choose Save As from the File menu. You'll want to save it in the Notes folder inside your iPod.
Warning: Now you have enabled disk use for your iPod, you will need to eject it before you unplug it. Drag it to the trash or right-click and choose eject.
Each notes file is limited to 4KB by the iPod and if yours is too long, the end will be cut off. To avoid this, Daniel Duris has created an online tool to divide up long eBooks into 4KB sections. At the end of each section is a link to the next one, making it as simple as turning the pages of a book.
Format Notes with HTML
These links are interesting because they show that iPod notes have basic HTML support. You can use this to create links between your notes, just like the links you see on web pages. There are a few HTML tags that are supported by the iPod.
will create a link break, and to choose the title at the top of the iPod screen, put it between
Here's an example:
<title>Chapter 1</title>Once upon a time there was a man named John.<br>He lived in a bright yellow house.<br><br><a href="chapter2.txt">Next Chapter</a>When viewing these notes on your iPod, you can select links using the scroll wheel. If there is more than one link, the active one will have a blue underline. Using the scroll wheel will allow you to activate different ones.
Link to Songs and Videos
These links aren't just limited to notes. You can link to any song, video, album, artist or playlist on the iPod. For example, to link to the song "Song 2" using the text "Play Music" you would type
<a href="song=Song 2">Play Music</a>.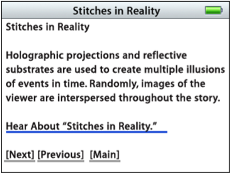
Linking to a video works in much the same way as with a song.<a href="video=Song 2">Link to Song 2 Music Video</A>
To link to groups of songs, you have to use a slightly different tag. Here are a couple of self-explanatory examples:<a href="ipod:music?genre=rock">Link to rock music</A> <a href="ipod:music?artist=Radiohead">Link to Radiohead</A>
You can even combine these to create the equivalent of Smart Playlists:<a href="ipod:music?genre=rock&artist=U2">Combo</A>
Set Notes Preferences
There are a few settings you can change involving the notes on your iPod. The first is a "Notes Only" mode, which was mainly designed for iPods being used as tour guides or in museums. This means that when your iPod loads up you are shown the Notes folder, and can't navigate out of it. You can only get to songs (or a audio tour) via links in your notes.
To enable this mode, create notes file called Preferences (without the .txt extension) and put the following line in it:<meta name="NotesOnly" content="true">
The second setting you can change is the title of the Notes folder. By default it is just called Notes, but if you are using the Notes Only feature, you might want to call it something like "Museum Tour". To do this, add the following line to the Preferences file:<title>Museum Tour</title>
The final setting is to do with linking to songs. Normally when you choose a song from a link in a note, the Now Playing screen appears. To set you iPod to continue displaying the note instead, add the following line to the Preferences file:<meta name=“NowPlaying” content=false>
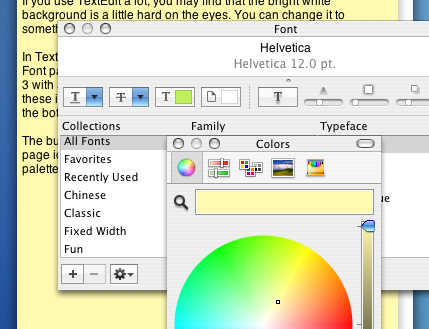
Set a Background Colour in TextEdit
In TextEdit, go to the Format menu and choose Show Fonts. In the Font palette that appears, you will notice four buttons in the top left - 3 with a T on them and one with a small page icon. If you can't see these icons, your font palette might be too small. Drag the handle in the bottom right to resize it.
The button we want is the fourth one along. It should be a small page icon with a white box next to it. Clicking it brings up the colors palette which you can use to select a new background colour.
You are best off using the colour pickers that allow you to drag around to select a nice subtle colour. The preset colours (like in the crayon picker) are far too bright for a background.
Also note that any background colour that you set will be printed, so you will have to change it back to white before printing to avoid wasting ink.
Rectangular Selections
To do this type of selection, hold down the Option (alt) Key while the cursor is over a block of text in a cocoa application. Notice that the mouse arrow changes to a cross.
With the Option Key still held, click and drag to make a selection without the text up to the end of the line being automatically selected when you drag down over multiple lines.
If you want to do something particularly neat, once you have made a selection hold down the Command Key as well as the Option Key, which will allow you to make another selection somewhere else in the document, whilst keeping the first block of text still selected.
This works just about everywhere you are able to edit text, including Microsoft Word (although the cursor doesn't change to a cross) and text boxes in Safari. As you would expect, it works in TextEdit, Mail, and all the other usual Cocoa Apps.
Font Scaling
Most cocoa applications have the ability to scale fonts mathematically. This means that you can resize a selection of text containing different sizes while keeping the relative sizing between fonts. It also means that if you want all the text on a page a little bit bigger, instead of selecting each size and changing it a bit bigger (the 12 point to 14 point, the 16 point to 18 point etc.), you can just do it relatively.
Select all the text in your document and open the Font panel ( Usually Format->Font->Show Fonts) and enter "*1.2" or another mathematical expression. The example given will multiply all font sizes by 1.2, but you can do anything, like "/2" to half the size, "*.0.75" to get 75% of the original size.
Also its worth pointing out you can also use addition and subtraction to change the point size, but that won't make the fonts scale relative to each other.
Word Completion in Cocoa
There are a number of different ways of doing this however. In certain places it isn't possible to press escape, because it does something else (like clearing the Google search box in Safari). In these cases you can use Option-Escape, or just press F5. These two alternatives may take a little longer, but seem to work everywhere.
So now if you can't spell something, you don't have to attempt the whole word, just put in the first few letters and let the system spelling dictionary do the rest.
Clean up Web Formatting
Sometimes copying from websites or odd applications leaves your text with strange formatting, links and spacing when you paste it into word or TextEdit.
One way of clearing this up is using the Services menu, if your source application supports this. Start by selecting the text you want to copy. Then click on the menu in the top left that has the current application name, choose Services and then click Summarize. A new window will open and you will see a clean version of your text. Drag the slider to 100% so all your text is included, then copy to the clipboard and paste into your text editor.
An alternative method, for when you are pasting into TextEdit, or if your source application doesn't support the services menu, is use the make plain text option. Paste your text into TextEdit and choose Format -> Make Plain Text (Command-Shift-T). This should strip most of the formatting, and to be on the safe side you can summarize the text as well.
Finally, if you are pasting into an application that supports it, you can use the keyboard shortcut Command-Option-Shift-V or choose “Paste and Match Formatting” from the Edit menu.
Character Swap
In all cocoa applications (TextEdit, Mail etc.), two adjacent characters can be swaped by positioning the cursor between them and pressing Control-T.
This can be useful if you often end up typing "teh" and "becuase".