Add any text to iTunes as a spoken track
There’s a great feature in Mac OS X that allows you to take any block of text and transfer it into iTunes as a spoken track, which you can then easily sync to an iPhone or iPod. This is done using a ‘Service’ that comes built into your Mac, but is disabled by default in Snow Leopard. This article explains how to enable it, and, for those who are interested, I’ve also included a short tutorial on how to add some improvements to make it more like the new version that will be included with Lion.
First, to enable the Service, go to the Keyboard section of System Preferences. This may sound like a bit of a weird place to have the Services settings, but it makes more sense when you consider pretty much the only setting for Services apart from turning them on and off is assigning keyboard shortcuts.

Click the “Keyboard Shortcuts” tab, and then choose “Services” from the list on the left. There are loads of great little features hidden away in here that are worth checking out, but for now just find “Add to iTunes as a Spoken Track” in the list on the right and make sure the checkbox next to it is checked. You might also want to add a keyboard shortcut if you think you might be using this often.
Now, whenever you have a block of text selected, just right-click on it and choose “Add to iTunes as a Spoken Track.” iTunes should open up, and a new track called “Text to Speech” should have appeared in your music library.
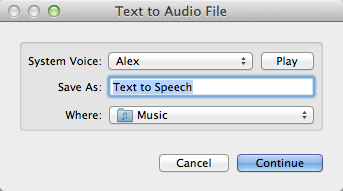
In Mac OS X Lion (coming out next month), this Service is enabled by default, and has been upgraded to give you the option to choose the voice used and the name and location of the track in iTunes. The screenshot below gives a little sneak preview of what to expect.
In the meantime until Lion is available, we can do a bit of tinkering to make our current Snow Leopard version almost as good as the upcoming Lion version. Like many Services, it is actually just an Automator workflow that you can easily modify yourself using ready-made building blocks. To see how this works, open up Automator (located in the Applications folder) and click “Open an Existing Workflow.” Navigate to
Macintosh HD/System/Library/Services/
and choose “Add to iTunes as a Spoken Track.”
First lets familiarise ourselves with how this workflow operates. The selected text input comes in from the top into the “Text to Audio File” action. This creates an audio file with the specified voice and file name, and saves it in your Music folder. This file is then used as the input to the “Import Audio Files” action. This takes the file, adds it to iTunes, then deletes the original file. Finally, the “Add songs to Playlist” action takes this song and puts it in the specified playlist.

It’s quite clear that we can change the playlist, file name and voice from here, but with a bit of work we can make the Service work like the Lion version, where you are prompted to choose these values each time you run it.
First, if the Library isn’t visible, click the “Show Library” button in the top left of the window. This shows all the available actions we can add to the workflow. To start off, our main aims are to:
- Display a popup window that asks us what we want to call our track.
- Put that value in the “Save As” text field in the “Text to Audio File” action.
To do this, we need to add two actions to the start of the workflow. Drag across the “Ask for Text” action and the “Set Value of Variable” action, and place them above all the existing actions in the workflow. In the “Ask for Text” action, set the question to “Track Name:” and tick the checkbox “Require an answer.” In the “Set Value of Variable” action choose “New Variable...” from the drop-down menu, and call it “Name.”
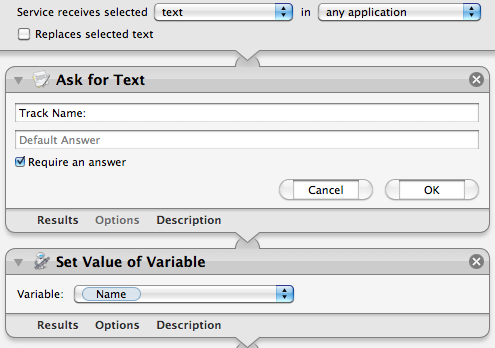
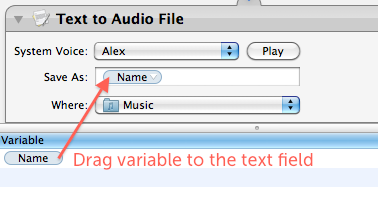
So what exactly is this thing called a “variable” that we’ve just created? Basically it just gives us a way to store a value (in this case the chosen file name) and then use it later in a different place. Once you have created the “Name” variable, you should see it in a new list that has appeared at the bottom of the workflow area. Using this variable in other places is simply a case of just dragging it there. So select “Name” in the list at the bottom, and drag it onto the “Save As” text field in the “Text to Audio File” action.
Great, it looks like we’re all done! But wait — there’s actually a small problem with our workflow. Look carefully at the order of the actions in the workflow, and think about how the output of each action acts as the input to the next action. The selected text comes in from the top, but the first action (“Ask for Text”) just ignores this, and outputs the chosen file name. This is passed on through the subsequent actions, meaning that the text that is spoken is actually just the file name instead of the selected text!
So the two new actions that we have added have got in the way, and don’t allow us to pass the selected text through to the “Text to Audio File” action. What we need is some way of storing the selected text somewhere safe, then retrieving it later to use in another place ... luckily that’s exactly what variables are for!
It just takes another two actions to save and then retrieve a variable. First, add a “Set Value of Variable” action right at the start of the workflow, before all the existing actions. Once again, choose “New variable...” from the drop-down menu, but this time call it “Selected Text.” Now the selected text is stored away safely in a variable while we do other things. To retrieve the value later on when we need it, add a “Get Value of Variable” action just before the “Text to Audio File” action. Finally, make sure “Selected Text” is chosen in the drop-down menu, and also right-click on the “Get Value of Variable” title and choose “Ignore input.” The final result should look something like the following screenshot:

Note: You will find that Automator won’t let you save over the built-in Service, so you will have to choose “Save As” and give this Service a new name. Further extending the workflow to allow the user to also choose the name of the playlist is really easy and can be done in exactly the same way, but choosing the voice is a bit more complicated, and can probably only be achieved using a bit of AppleScript.