Encrypt and Hide your Private Files
Most people store some kind of data on their computer that they don't want other people to see or use. Whether it is financial information, confidential files for work or files you shouldn't have in the first place, it is often hard to guarantee that no one has seen them. If your computer was stolen, for example, you would hope that the thief would just wipe the hard drive, but there is no way to be sure. Leaving your Mac logged on in the office or at home also allows other people to gain access to your private data.
If you want to password anything else, you have to password protect an entire folder. The way this is done is using encrypted disk images. Once created these appear as a single file on your hard drive with a dmg extension. When you double-click on one, it will ask you for the password. If you enter the password correctly, it will mount a disk image on your desktop. So while unlocked, the disk image is just like a temporary folder on your desktop. You can copy files to it and delete files from it, and as soon as you eject it, the contents will be password protected again.
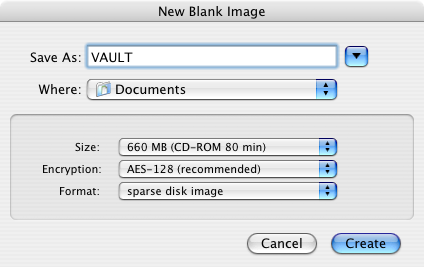
To create an encrypted disk image, open up Disk Utility (located in Applications/Utilities), go to the File menu and choose New, Blank Disk Image. In the dialog box that appears choose a name for your disk image and where you want to save it. The size is a maximum that the disk image can hold, so the preset sizes for CDs and DVDs are useful for if you want to burn the contents when it gets full. Choose AES-128 encryption and sparse disk image from the Format drop down menu.
Probably the best place to put your files is in the Library folder. The main benefits of this are that it isn't searched by Spotlight, and that there are hundreds of other files in there already. The Application Support folder in you Library is a good place, as there are all sorts of random files in there. You might also want to rename your file if it has a name that stands out ( super-secret-file.doc for example).
Encryption
If you just want to protect a single iWork or PDF document, you can do this from within the specific iWork application or from within Preview. In Pages, Keynote and Numbers '09 you can choose “Require password to open” from the Document section of the Inspector window. In Preview, when choosing “Save As...” on a PDF there is a checkbox to encrypt.If you want to password anything else, you have to password protect an entire folder. The way this is done is using encrypted disk images. Once created these appear as a single file on your hard drive with a dmg extension. When you double-click on one, it will ask you for the password. If you enter the password correctly, it will mount a disk image on your desktop. So while unlocked, the disk image is just like a temporary folder on your desktop. You can copy files to it and delete files from it, and as soon as you eject it, the contents will be password protected again.
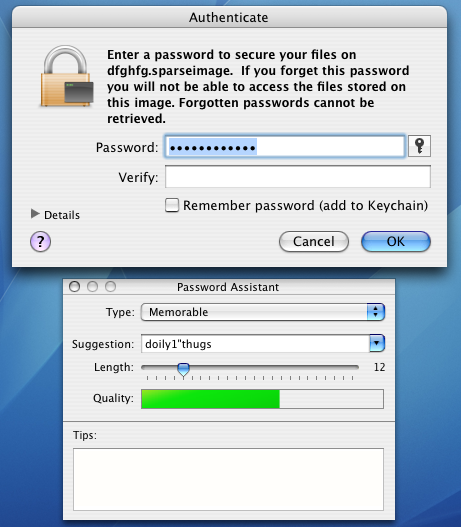
The files won't show up in Spotlight searches and it is almost impossible to decrypt the data without that password, even with data recovery tools.
To create an encrypted disk image, open up Disk Utility (located in Applications/Utilities), go to the File menu and choose New, Blank Disk Image. In the dialog box that appears choose a name for your disk image and where you want to save it. The size is a maximum that the disk image can hold, so the preset sizes for CDs and DVDs are useful for if you want to burn the contents when it gets full. Choose AES-128 encryption and sparse disk image from the Format drop down menu.
Hiding
For some people there is no need to encrypt data. For a quick, temporary solution you can just hide away your files on your Mac. This is much less secure and far from foolproof, but quite often it is as much as you need.Probably the best place to put your files is in the Library folder. The main benefits of this are that it isn't searched by Spotlight, and that there are hundreds of other files in there already. The Application Support folder in you Library is a good place, as there are all sorts of random files in there. You might also want to rename your file if it has a name that stands out ( super-secret-file.doc for example).
blog comments powered by Disqus