Add columns to Spotlight search results
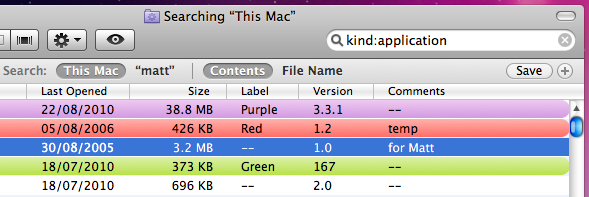
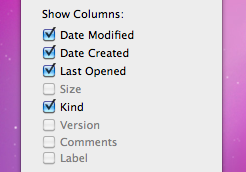
A major complaint about Snow Leopard is that you cannot add the Size column to Spotlight search results window. This is the window that you get by choosing “Show All” in Spotlight or by pressing Command-F in the Finder. When you go to add columns to it by choosing “Show View Options” from the View menu, you’ll find that Size, Comments, Version and Label are all greyed out.
These options used to be available in previous versions of Mac OS X, so it’s unusual that they are now disabled. You might assume that Apple disabled these columns for a reason, so bear this in mind before following these instructions to enable them again.
If you have the developer tools installed, you can enable the columns again using the included Property List Editor. If you don’t already have the developer tools then it’s not worth installing them for such a small task. Instead, you can download and use TextWrangler (free) instead.
Using Property List Editor
If you are using Property List Editor, start by going to your user folder and then navigate to Library/Preferences. In the Preferences folder find the file named “com.apple.finder.plist.” Double-clicking on this file should open it up in Property List Editor. If not, just right-click on it and choose “Open With - Property List Editor.”
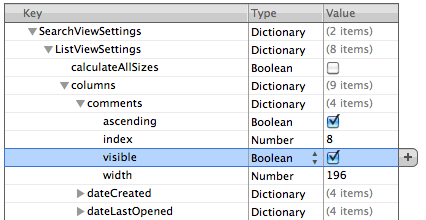
Once the file is open, scroll down the list to “SearchViewSettings.” Click the disclosure triangle next to it, and then do the same for “ListViewSettings” and then “columns.” Now you should see a list of all the available columns. Click the triangle next to the column you want to add, i.e. size, and then check the box next to “visible.”
Once you are done, save the file by pressing Command-S. Finally, you will need to restart the Finder for the changes to take effect. The easiest way to do this is top hold down the Control and Option keys, click on the Finder icon in the Dock and choose “Relaunch.”
Now just press Command-F to bring up a search window and you should have your extra columns enabled.
Using TextWrangler
With TextWrangler, the process is very similar, but just a tiny bit more complicated. Firstly, make sure you have downloaded and installed TextWrangler. Next, go to your user folder and then navigate to Library/Preferences. In the Preferences folder find the file named “com.apple.finder.plist.” Right-click on this file and choose “Open With - TextWrangler.” Once the file is open, you want to find the line that says
<key>SearchViewSettings</key>
Don’t bother scrolling through the file looking for it - for me it is on line 4973! Instead, just press Command-F and type “SearchViewSettings” into the find field. Once you have found the line, look about 8 lines below it. You should see something like this:
<key>comments</key>
<dict>
    <key>ascending</key>
    <true/>
    <key>index</key>
    <integer>8</integer>
    <key>visible</key>
    <false/>
    <key>width</key>
    <integer>196</integer>
</dict>
This should then be followed by a similar 11 lines for each of the other possible columns. Find the one you want to enable (Size, Comments, Version or Label) and look for this:
<key>visible</key>
<false/>
Replace this with:
<key>visible</key>
<true/>
and you’re done! Just save the file by pressing Command-S, then restart the Finder by holding down the Control and Option keys, clicking on the Finder icon in the Dock and choosing “Relaunch.”