Mail Merge in iWork '09
iWork ’09 has a great mail merge feature that allows you to create documents in Pages that gather data from a Numbers spreadsheet or from your Address Book. This is really useful for creating templates for things like letters and envelopes that automatically fill in names and addresses for a large amount of people. Here's how you set up mail merge using Pages and Numbers.
Before you start writing your document you need to create your data. If you want to get information from Address Book, this is as simple as just creating a new group containing all the contacts whose information you want to use. If you want to get information from a spreadsheet, you need to open up Numbers and create the data that will be added into your document. Normally this will be a list of names and addresses, but in theory it can be anything.
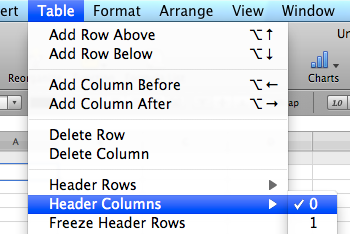
Pages requires quite a specific layout for your data, so if you don't set it up right, it won't work. With a blank spreadsheet open, make sure there is one header row and zero header columns. You can do this by going to the Table menu and setting Header Rows to 1 and Header Columns to 0.
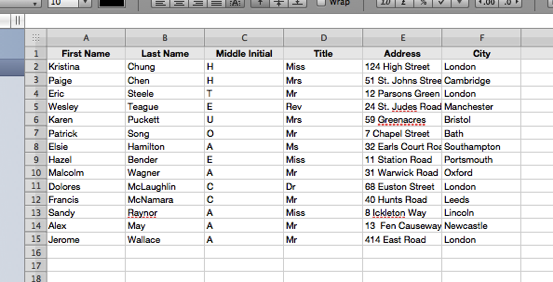
Next, fill in all your data, using the grey header row at the top to enter the header titles such as First Name, Last Name, Address, etc. Your data can be anything, including mathematical formulas. For example you could have a column containing a person's monthly salary, and another column that works out their annual salary by multiplying the monthly column by 12. Once you have finished, save you spreadsheet somewhere you will remember.
Now you can open up Pages and start creating your document. At every point where you want to import some information, just write something like TheFirstName or TheAddress. Later on you can link these up to your spreadsheet or Address Book. If you are using one of the envelope or letter templates, you might find that this placeholder text already exists, and by default this is already linked into your Address Book. You can either delete it and create your own, or leave it and then later modify the settings to point it towards the specific data you want.
Once you have created all your placeholders, open the Inspector Window (Command-Option-I) and click on the Link Inspector tab, which looks like a blue circle with a white arrow in it. Then click on the Merge tab below that. This is where you can link your document to your spreadsheet or Address Book.
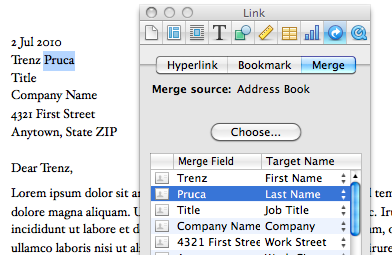
The first thing that you need to set here is the Merge source, which you do by pressing the “Choose...” button. You can either leave “Address Book” selected and choose a contact group from the drop-down menu, or select “Numbers Document” then navigate to the spreadsheet you created earlier.
If you are using a template and have kept the default placeholders, you might find that there are already a load of “Merge Fields” set. Generally these were made to work with Address Book, but Pages will do its best to link the fields to columns in your spreadsheet that have names like “First Name” or “Title.” Any fields that haven’t been linked will show up red.
To create a new merge field, select your placeholder text (for example, TheFirstName) then click the plus (+) icon in the Merge Inspector window. From the menu choose “Add Merge Field” and then select the data you want to import from the drop-down menu in the Target Name column. This will either be a field in your Address Book, or a column in your spreadsheet. You can also add sender fields, which import data from your own Address Book card.
Once you have finished created your document, go to the Edit menu and choose “Mail Merge.” From here you can either choose to print your document right away, or create a new document that has separate pages for each recipient of your letter.