Terminal Commands for Hidden Settings in Leopard
In general, these will only work with Leopard. I have slipped in a few that will work with Tiger, but you should check out the old list for commands that will definitely work.
For the most part, applications will need restarting before changes take place. For the Dock and the Finder, it isn't obvious how to do this. The easiest way is to type a second command into the Terminal afterwards. Type "killall Dock" followed by return for all the Spaces, Stacks and Dock commands. "killall Finder" followed by return for all the Finder related ones.
Spaces
defaults write com.apple.dock workspaces-edge-delay -float 0.5Changes the delay when dragging windows off the edge of the screen to other spaces. Default value is 0.75.
defaults write com.apple.dock workspaces-wrap-arrows -boolean NODisables the wrap-around when using Control-Arrow keys to changes Spaces. To enable again, repeat with YES at the end.

Stacks
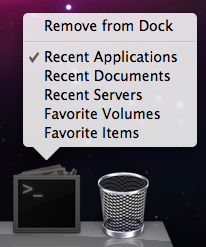
defaults write com.apple.dock persistent-others -array-add '{ "tile-data" = { "list-type" = 1; }; "tile-type" = "recents-tile"; }’Creates a Recent Applications stack in your Dock, that you can change to display other recent items. To remove it, use the command defaults delete com.apple.dock persistent-others but be warned, this will remove all your stacks.
defaults write com.apple.dock mouse-over-hilte-stack -boolean YESAdds a Mouse Over gradient to items in your stacks. To disable, repeat with NO at the end.
Dock
defaults write com.apple.dock no-glass -boolean YESChange to 2D Dock. To change back to 3D, prepeat with NO at the end.
defaults write com.apple.dock tilesize -int 256Allows you to increase the size of the Dock past the maximum allowed by the slider in System Preferences. Don't go larger than 256. Use the slider in System Preferences to shrink the Dock down again.
defaults write com.apple.dock largesize -int 512Allows you to increase the Dock magnification past the maximum allowed by the slider in System Preferences. Don't go larger than 512. Use the slider in System Preferences to shrink the Dock down again.
defaults write com.apple.dock enable-spring-load-actions-on-all-items -boolean YESMakes all items in the Dock spring loaded. For example, hold a file over an application and it will open or come to the front so you can drop the file onto a specific window. Repeat with NO to reverse.
Finder
defaults write com.apple.finder FXListViewStripes -bool FALSERemoves the stripes in list view. Repeat the command with TRUE to reverse.
/System/Library/Frameworks/CoreServices.framework/Versions/A/Frameworks/LaunchServices.framework/Versions/A/Support/lsregister -kill -r -domain local -domain system -domain userResets the "Open With" menu, clearing duplicates. The command is different from the one in Tiger.
defaults write com.apple.finder _FXShowPosixPathInTitle -bool YESChanges the title of a window to its full path. Repeat with NO to reverse.
![]()
Spotlight
sudo chmod 0 /System/Library/CoreServices/Spotlight.appDisables the Spotlight icon. Type "killall Spotlight" for changes to take effect. To re-enable it, type 755 instead of 0.
Time Machine
sudo defaults write /System/Library/LaunchDaemons/com.apple.backupd-auto StartInterval -int 7200Changes Time Machine's backup interval. Requires an administrator password. Default value is 3600 (seconds).
iCal
defaults write com.apple.iCal IncludeDebugMenu YESEnables the Debug menu in iCal, just like the Safari one. Repeat with NO at the end to disable.
Safari
defaults write com.apple.Safari DebugConfirmTossingUnsubmittedFormText NODisables the warning given when closing a window with text entered into a form that you haven't submitted. To bring back the warning, repeat the command with YES.
Check out this article for more Safari 3 tips.
Menubar
Changing the menubar will require an administrator password and you will need to restart the Mac for changes to take effect.
sudo defaults write /System/Library/LaunchDaemons/com.apple.WindowServer 'EnvironmentVariables' -dict 'CI_NO_BACKGROUND_IMAGE' 1Remove translucency in menubar, turns it white.
sudo defaults write /System/Library/LaunchDaemons/com.apple.WindowServer 'EnvironmentVariables' -dict 'CI_NO_BACKGROUND_IMAGE' 0Removes translucency in menubar, turns it grey.
sudo defaults delete /System/Library/LaunchDaemons/com.apple.WindowServer ‘EnvironmentVariables’Reverts back to default translucent menubar.
All Applications
defaults write -g PMPrintingExpandedStateForPrint -bool TRUEApplications use the expanded Print dialog by default. Similar to the expanded Save dialog in earlier OS versions. Repeat with FALSE to reverse.
Get to grips with the "Open With" menu
Firstly, if the application is in the Dock, you can simply drag the file onto its icon in the Dock. Alternatively you can open up the application first, and choose "Open" form the File Menu. A third method is to use the "Open With" menu. You will find this by right-clicking (Control-clicking) on the file and looking near the top of the contextual menu. Within the Open With submenu you will find every application that can open the file, as well as an "Other" option.
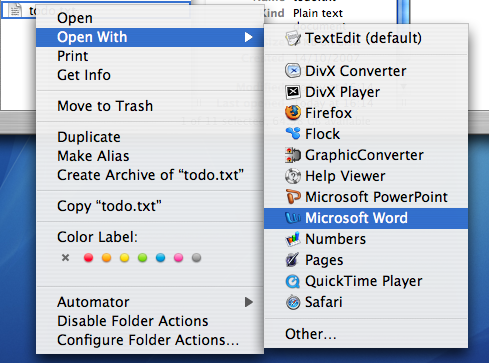
When you use the Open With menu, it is a "this time only" thing. Next time you double-click on the file, it will open with the default application again. To change the default application, bring up the menu as before, but hold down the Option key before choosing the application. The menu should change to "Always Open With".
When you use the Always Open With menu, it is a "this file only" thing. To apply a new default application to all files of that format, you can use the Get Info window located in the File Menu. In the Open With section, set the new application and click the "Change All" button.
To reset all of your files to open with the original default application, you need to delete a certain file. Go to your user folder, and navigate into the Library folder then into the Preferences folder. Find the com.apple.LaunchServices.plist file, and drag it to the Trash. Alternatively, drag it to the Desktop if you think you might change your mind and want to put it back later.
Over time, you may find that the Open With menu gets cluttered with duplicates, older versions or applications you thought you deleted long ago. To get rid of these, you need to use Terminal. Open up Terminal (from Applications/Utilities) and paste the following line:
/System/Library/Frameworks/ApplicationServices.framework/Frameworks/LaunchServices.framework/Support/lsregister -kill -r -domain local -domain system -domain userPress return and your Open With menu should have been cleaned up to only include the most current applications.
Disable the Dock icon for any Application
Luckily, if it is a cocoa application, you can hide the Dock icon yourself. To see if it is possible, right-click (Control-click) on the application icon. If "Show Package Contents" is in the menu that appears, you can hide the icon in the Dock.
If this is the case, select "Show Package Contents" and look for the "Info.plist" file inside the Contents folder. Open this file using TextEdit by right-clicking on it and choosing "Open With - Other" from the menu.
In the file, paste the following two lines just after <dict> on the 6th line:
<key>LSUIElement</key><string>1</string>Save the file and close it. For the changes to take effect, you need to move the application to the desktop and them back to its original location (OS X keeps a cache of the file, so you need to trick it into checking it again).
Now when you open the application, no icon will appear in the Dock. I wouldn't recommend doing this with your regular applications like iTunes and Safari as this also has the side-effect of disabling the menu bar. This means that you will have to quit the application using the keyboard shortcut Command-Q. If the application doesn't have any windows, you will have to quit it from Activity Monitor (in Applications/Utilities).
To bring back the Dock icon, simply open up the Info.plist file and remove the lines you added.
If you are too lazy to do this yourself, FoggyNoggin Software has created an application called Dock Dodger that automates the process.
Tips for Safari 3

Merge Windows
Safari 3 now allows you to drag and drop tabs. You can drag a tab off the bar to create a new window or drag it onto an existing window to add it. You can also use this to rearrange the order of your tabs. If you have lots of open windows each with different numbers of tabs, there is an easier way to get them all into one instead of dragging and dropping. In the Window menu you will find the "Merge All Windows" command. This will instantly combine all your open windows into one tabbed window.
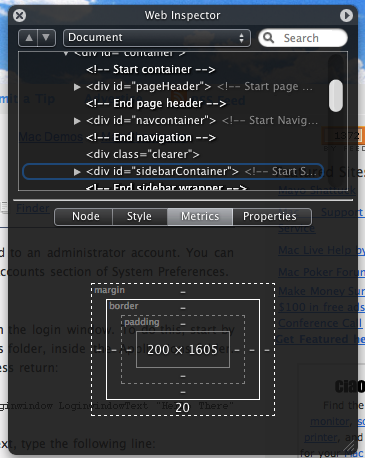
Enable Web Inspector
The Web Inspector allows you to easily see how the source code creates the web page. You can inspect various elements of the web page and view their style, metrics and properties. If you select an element in the inspector window, it will briefly be outlined in red on the web page.
To enable the Web Inspector, open up Terminal (located in Applications/Utilities), type the following line and press return:
defaults write com.apple.Safari WebKitDeveloperExtras -bool trueNow quit and re-open Safari. Open a web page and right-click (Control-click) anywhere. You should see a new "Inspect Element" item in the list.
Pie Chart Loader
Normally Safari indicates how far a page has loaded using the address bar as a progress bar. The box gradually fills with colour from left to right. If you want, you can easily change this to the pie chart type indicator that is used in Mail. Again, open up Terminal (in Applications/Utilities), type the following command and press return:
defaults write com.apple.Safari DebugUsePieProgressIndicator -bool trueTo switch back to the old progress bar, simply repeat the above command with false instead of true.
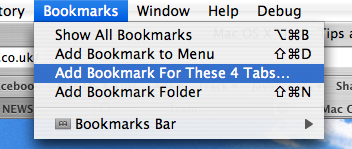
Bookmark all tabs
This new feature obsoletes the tip I wrote last month about bookmarking all tabs in Safari 2. Doing this is now much simpler - you just need togo to the Bookmarks menu. Here you should find an item that says something like "Add bookmark for these 4 tabs...". The default settings creates a bookmark called "Saved Tabs" in the bookmarks bar. This is actually a folder of your tabs, but it has been set to automatically open all the pages in tabs when clicked.
Others
There are loads of other new features in Safari 3 that are well known or don't really require any explanation. For example, the find command now dims the page and highlights the words you searched for, web history now indexes the text content of the page for easier searching, you can reopen the last closed window or the windows from your last session and all text fields are resizable.
5 Login Window Tips
1. Add a message to the login window
You can add a string of text above the list of users in the login window. To do this, start by opening up Terminal. This is located in the Utilities folder, inside the Applications folder. Once it has loaded, paste in the following line and press return:
sudo defaults write /Library/Preferences/com.apple.loginwindow LoginwindowText "Hello There”Replace "Hello There" with your text. To remove the text, type the following line:
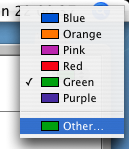
sudo defaults write /Library/Preferences/com.apple.loginwindow LoginwindowText “”2. Hide accounts
If you find yourself with an overly long list of users in the login window or you just want to get rid of that annoying scroll bar down the side, you can stop accounts appearing in the login window.
Start by go to the Accounts pane in System Preferences, and find the "short name" of each user you want to hide. Once you have these, open up Terminal and enter the following:
sudo defaults write /Library/Preferences/com.apple.loginwindow HiddenUsersList -array-add shortname1 shortname2 shortname3Replace shortname1 2 and 3 with the short names of the user accounts you wish to hide. You can hide as many as you like, just separate each with a space.
To make a hidden name appear again, type the command with no names in it, therefore resetting the list of hidden users.
sudo defaults write /Library/Preferences/com.apple.loginwindow HiddenUsersList -array-addNotice that doing this adds an extra option to your login window - "Other..." When you select this, you will be presented with text boxes to enter a username and password.
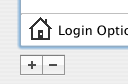
If you aren't running OS X 10.4, this doesn't work. Another option is to replace the list of users with username and password text boxes. Go to the Accounts pane in System Preferences and click on Login Options. There you will find an option to display the login window as name and password fields. This isn't as pretty, but saves time if you have lots of users, and is also more secure.
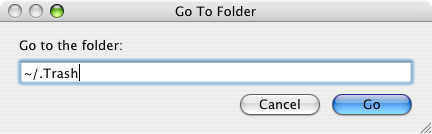
3. Change the Apple logo
You can replace the large Apple logo that appears at the top of the login window with any tiff image that is 90x90 pixels. In the Finder, choose Go to Folder from the Go menu or press Command-Shift-G. In the dialog box that appears, type the following line:
/System/Library/CoreServices/SecurityAgent.app/Contents/Resources/To change back to the Apple Logo, just drag the copy that you made back to the Resources folder.
4. Get useful system stats
The name of you Mac is displayed in the login window below the words "Mac OS X". Since Mac OS X 10.4.3, you can click on the name of your Mac to show different statistics about your machine. Each time you click, it will cycle through different bits of information that are particularly useful when troubleshooting problems.
The order of the statistics are as follows:
One click: Your OS X version number (e.g. Version 10.4.9)
Two clicks: Your OS X build number (e.g. Build 7M271)
Three clicks: Your mac's serial number (e.g. WN1511LHKNW)
Four clicks: Your mac's IP address (e.g. 196.254.0.1)
Five clicks: The status of any networked account
Six clicks: The date and time (e.g. Saturday, January 20 2007 4:02:31 AM GMT)
Seven clicks: Back to where you started, the name of your computer.
So you click a few times and set the information line to your favourite thing, but next time you log in, it has changed back to the name of your mac. To change the bit of information that appears first, you need to do a bit of tinkering in the Terminal (Applications/Utilities). Open Terminal and type the following command:
sudo defaults write /Library/Preferences/com.apple.loginwindow AdminHostInfo HostName Depending on which piece of information you want displayed, replace HostName with one of the following:
SystemVersionSystemBuildSerialNumberIPAddressDSStatusTime
After doing this, hit return, and the next time you view your login window the information you chose will be displayed. To change it back to normal, simply repeat the command with
HostName at the end.5. Change the background image
There are ways to change the background image by replacing the Aqua Blue image, but that is slightly crude. A better way to do it is using the Terminal. Type the following command and press return:
sudo defaults write /Library/Preferences/com.apple.loginwindow DesktopPicture /Users/Shared/mynewbackground.jpg
/Users/Shared/mynewbackground.jpg is the location of the image you want to use. You don't have to type it out. Just paste the command as far as DesktopPicture and put a space after it. Then find your image in the Finder, and drag it onto the Terminal window. The address to your image should just appear. As far as I can tell, you have to place the image in a place that all users have access to (the shared folder is a good place).To change back to the normal Aqua Blue image, type the following command and press return:
sudo defaults write /Library/Preferences/com.apple.loginwindow DesktopPicture /Library/Desktop\ Pictures/Aqua\ Blue.jpg Change the Image in the Tile Game Widget
Luckily, changing the image is easy. Start by finding an image in iPhoto or the Finder to replace it. To avoid stretching, go for an image that is roughly square. Now click on the image and hold. While holding down the mouse button, press F12, or whatever key you have assigned to load up Dashboard. Now simply drag and drop your image onto the Tile Game.
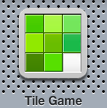
Annoyingly, the image will change back to the tiger if you close the widget. Permanently changing the image is a bit more complicated. It essentially involves replacing an image file hidden within the widget file. If you are familiar with delving into package files, this is quite straightforward.
To change this image, first we need to find the Tile Game widget. It is located in the Library folder inside Macintosh HD. Make sure you don't accidentally go to the Library inside your user folder. Inside the Library, look for the folder called Widgets. In here you'll find the Tile Game. To get inside the package, right-click (or Control-click) on the file, and choose “Show Package Contents” from the menu that appears.

The file we want to change is called game.png, and is located inside the Images folder. Just replace this image with your new one, making sure you give it exactly the same file name.
5 Tricks for the Activity and Downloads Windows in Safari
When you first open the Activity window, it will show a list containing the titles of every Safari window you have open. Clicking the disclosure triangle next to one of the names will expand it to list every item on the page. As well as the HTML files and scripts, this includes media such as images and movies that are on the page.
1. Investigate problems
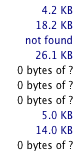
One of the best uses of the Activity window is to check the cause of a problem. If you are browsing a page and it fails to load, or it is taking ages to open, try taking a look in the Activity window. Down the right hand side you will see the size of each item. If an item is still loading this will show you how much has loaded, and if there is a problem you will see "not found" or "timed out".
2. View movies in their own window
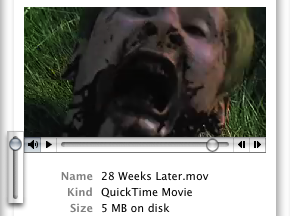
Some services (such as YouTube) provide a full screen button, but often you may find yourself having to watch a tiny video embedded in a web page. To get the movie in its own window, use the Activity window. Click the disclosure triangle on the left of the page with your embedded movie in to expand the list of every element in the page.
If you are watching a Quicktime movie, the item you want is probably the biggest one in the list. It may also continue loading after the rest of the page has finished. Look for a file extension of .mov or .mpg. Once you find it, simply double-click on it to open it up in its own window.
If you are watching a flash video that doesn't have a full screen button, you will need to find the .swf file. This is not necessarily the largest file.
3. Download embedded media
When a movie or music file is embedded in a page, it is not always easy to download it. If there was a link to the file, you could just hold the Option key and click it, but what do you do if there isn't?
For Quicktime movies and MP3 files, this is easy. Open up the Activity Window and locate the file. it should be a relatively large file with something like a .mov, .mpg or .mp3 file extension. Once you have found it, simply hold Option and double-click on it. Alternatively, pressing Option-Return will download whatever item is selected in the list.
For flash videos, you will want the .flv file. It's not always obvious which file this is. It should be the largest file on the page, and may still be loading. For YouTube videos, it is called get_video and doesn't have the .flv extension. Double-clicking this file will start it downloading. If the file doesn't have the .flv extension, you will have to add it on after the download has finished. To watch these movies you will need either the Perian Quicktime plugin or a player such as VLC.

4. Paste and drag into Downloads Window
A little known feature of the downloads window is that you can copy and paste an address into it. Say you want to download a movie that you have listed in the Activity window. Simply select it, choose copy (Command-C) and then click on the Downloads window. Now just choose paste (Command-V) and the movie will start downloading. This works with any kind of link or address. One of the best uses for this is if you have a long list of addresses. Simply select them all together and then copy and paste them into the Downloads window. All of the downloads will begin at the same time.
If copying and pasting isn't for you, you can either use the Option-click method, or you can simply drag things into the Downloads window. Drag links, selections, and even pictures onto the Downloads window to download them.
5. Bookmark all tabs
This is a nice trick to bookmark every page you have open at the same time. This is useful if you want to preserve all your open windows when you quit Safari so you can easily open them all up again next time you open Safari.
Start by opening up the Activity window. Collapse all the disclosure triangles so all you see is the titles of each page. Select all (Command-A) and copy the selection to the clipboard (Command-C). Now open up the Bookmarks window (Command-Option-B). Find where you want to keep these bookmarks and then paste (Command-V).
A good place to put them is in a folder on the Bookmarks Bar. Now, next time you open up Safari you can click on the folder in the bar and select "Open in Tabs" from the bottom of the menu. Alternatively, you can use the Auto-Tab method.
This trick is also great for reordering your tabs. Paste them into your bookmarks and them open them up again in the order that you want them.
Remove Quotes in Email Messages
In many email clients (such as Gmail), quotes are shown as a symbol at the start of each line. If the text has been quoted twice, the symbol is repeated.
Now obviously you could click on each line and press delete, but this would take ages if there are multiple quote levels in a long message. The trick to getting rid of this type of quotes is to use the box selection method. To do this, hold Option (Alt) and drag a selection around the quote marks. This makes it so only the quote marks are selected, not the entire line. Annoyingly, this method doesn't work in some applications (such as Firefox). If you find it isn't working, try pasting your message into TextEdit before removing the quotes and then pasting it back into the email.
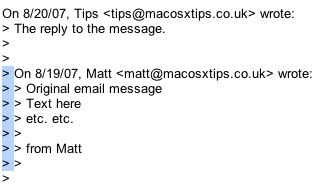
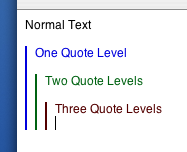
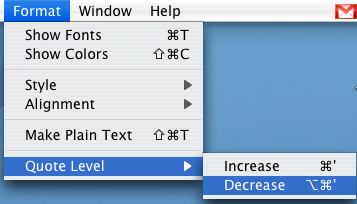
In the Mac OS X Mail program things are slightly different. Quotes are shown by vertical lines instead. While this may look nicer, it's not quite as obvious how to get rid of them. The answer lies in the Format menu, under Quote Level. From here you can increase or decrease the quote level of the selected text.
If you have multiple quote levels you want to remove it would be quicker to use the keyboard shortcut instead. To decrease the quote level simply select the text and press Command-Option-' (the apostrophe key). Every time you press this, one quote level will disappear, much faster than navigating the Format menu multiple times.
Access hidden Preview features through Automator
One topic that came up in the comments of that tip was Preview's inability to scale and resize images. I explained a trick involving zooming and using the Mac OS X Screen shot tools, but this is far from ideal.
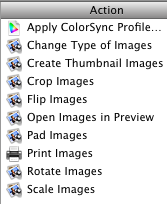
If you have Mac OS X 10.4 Tiger, you will find Automator in your Applications folder. It is an application designed to do repetitive and time consuming tasks for you. You simply create a workflow by dragging and dropping "action" blocks, and then you can set it going whenever you want to perform that action. It's great for doing batch tasks like renaming a long list of files or resizing a large group of images.
If you look in the left hand column, you will find a section titled Preview. Clicking this will bring up a list of Automator actions that you can use. Some are familiar and accessible from the menus in Preview, but some are new.
Let's start with the simplest possible workflow. Say you want to resize an image (or lots of images) to half its size. To do this, drag the Scale Images action over to the right hand side. A dialog box will appear asking if you want the workflow to keep a copy of the original image or not. If you click Add, the workflow will make a copy of your image on the Desktop and resize that instead of the original. Otherwise, it will simply replace the image with its resized version.
The next step is to choose how you want to scale your image. You can set it to a certain width or a percentage of its original size. Once you have chosen, choose Save As from the File menu and give it a name like Resize Images. From the File Format pop-up menu choose Application. The Desktop is a good place to save it.
![]()
Now we can try it out. Find an image file and drag it onto the Resize Images icon. A copy of the image at half the size should appear on the Desktop - Preview doesn't even need to open. You can even drag a large selection of photos. If you find yourself using

You can even extend your workflows to make them more like applications. For example, try adding "Ask for Finder Items" (from the Finder section) to the start of the work flow. Now, once you have saved the workflow as an application, when you double-click it to open, it will bring up a dialog, asking you to choose the images that you want to resize.
Also, take a look at the PDF actions that Automator has. Some of these are really useful if you often use PDF documents in Preview.
Reset a Lost OS X Account Password
If you still know the Administrator Password
If you still know the password to an administrator account, it is very simple to reset any standard or managed user's password. While logged in as the administrator, open up System Preferences and click on the Accounts section. All the accounts on the computer should be listed down the left hand side. Under each account name it should say Admin, Standard or Managed. If the lock at the bottom of the window appears locked, click on it to allow changes to the preferences.
Resetting an Administrator Password
Obviously, if you don't have access to an administrator account, you can't carry out any of the above steps. If you have forgotten the Administrator password or you can't log into your Mac at all, you will need to use the Mac OS X Install Disc.
Enter the Mac OS X Install Disc that is the closest version to that running on the Mac. For example, if you are running Mac OS X 10.6 Snow Leopard, you should enter the Snow Leopard install disk, not any earlier ones. Restart the computer, and hold the C key as it starts up. This might take longer than usual, and you can release the C key as soon as the Apple logo appears on the screen. When the window appears, choose your language and click the right arrow.
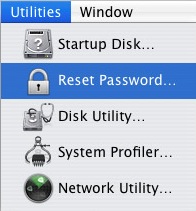
The next step depends on what version of Mac OS X you are using. Generally you need to choose Reset Password from the Utilities menu. For earlier versions of Mac OS X, choose Reset Password from the Installer menu.
Choose your Hard Drive from the top and then choose the Account from the drop down menu. Be careful not to select System Administrator, as this is actually the root user, not the administrator account on your Mac. Now enter the new password, click Save, quit the Installer and restart the computer.
Note that there are a few issues with this method. Firstly, it does not reset your keychain password. You will have to do this separately. Secondly, do not attempt this if you have FileVault enabled. To reset an FileVault protected account, you need the master password.
Resetting a FIleVault Protected User's Password
If you have enabled FileVault to encrypt your Account, you need to know the master password that you set when you enabled it. This is the password that the administrator should know that allows you to reset any password on the computer. If you have forgotten the master password, unfortunately your data is lost forever.
If you know the master password, start by attempting to log into your account. When you get the password wrong three times, you will be able to click “Forgot Password”. Now you will have to enter the master password and then a new login password for your account.
If you have lost the Mac OS X install Disc
If you have lost the install disc, don't try and use one from an earlier version as this might permanently block you out of your account. You really have two options: Firstly, you could buy a new copy of Mac OS X (try Amazon). Secondly, there is a way of resetting an administrator password without the disc if you are running Mac OS X 10.4 Tiger. Note: Do NOT do this with a FileVault protected account, or your data will be lost forever.
First, note the short name of the account. This is the same as the name of its home folder, but not necessarily the name that appears in the login window. Restart your computer, and while it is starting up, hold Command-S. This will start up your Mac in Single User Mode. Once it has started up, you will need to enter three lines of code. Enter
sh /etc/rc and press return. Then enter passwd yourusername and hit return. Now you will have to enter a new password twice. What you type won't appear on screen, but it is working. Once you have done this, type reboot and hit return.Similarly to the Install Disc method,this will not reset your Keychain password. You will have to do this separately.
More Hidden Settings for Google Notifier
Google Notifier is a menu bar item that alerts you when new mail arrives in your Gmail inbox. Back in February I wrote a tip on Google Notifier's hidden features that showed you how to access two hidden settings. Recently, someone at Mac OS X Hints found a third hidden setting in addition to the ones I mentioned in my tip.
![]()
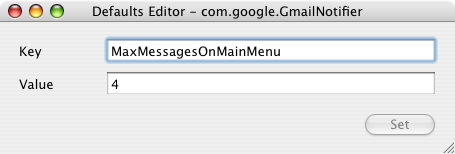
All of these settings can be accessed through Google Notifier. Bring down the notifier menu and hold Command and Option while clicking on Preferences. This brings up a hidden settings editor where you can easily edit the notifier preferences file. The three settings are as follows:
1. Change the number of unread messages displayed.
By default, the menu shows the last four unread messages received (or the last three received and an additional "View More" submenu). To change this, enter "MaxMessagesOnMainMenu" in the key field and enter the number of messages you want on the main menu in the value field.
2. Filter messages by label.
If you only want the notifier to fetch mail with a certain label, you can create a filter. To do this, enter "Label" in the key field and enter the name of the label you want to receive in the value field. To receive all mail, leave this field blank.
3. Use a secure connection.
This is the new tip, submitted by an anonymous poster to Mac OS X Hints. It seems that Google Notifier normally transfers your account details and email in the clear so that other people can potentially read it. If you want to use a secure connection instead, enter "SecureAlways" in the key field and "1" in the value field. To reverse this, repeat the process but enter "0" instead of "1" in the value field.
For all of these settings you will need to quit and reload Google Notifier for the changes to take effect.
Quickly Jump to Address Bar in Safari
Hey... Is there anyway to keep the URL address highlighted when I start Safari? It would be so much easier rather than having to always keep clicking the address bar when I want to switch sites as soon as I run Safari... Thank you so much!
When you start Safari or open a new Safari window, normally the address bar is highlighted. This means that you can start typing an address straight away. However, if you have Safari set to automatically display your home page when opening a new window, the address bar is not highlighted.
For example, if you have Google as your home page, when you load up Safari or open a new window the Google home page will load and the search box will be highlighted instead of the address bar. If you type an address and press enter, it will Google search the address rather than just going to it.
So how do you solve this? Well the obvious answer is to stop Safari loading up your home page in new windows. You can do this from the Preferences located in the Safari menu. Under the General tab, set the "New windows open with:" menu to Empty Page.
![]()
![]()
But what do you do if you want to keep the automatic loading of your home page, or if you want to quickly jump to the address bar when you are already viewing a web page? The answer lies with keyboard shortcuts. As you only use the keyboard when typing in a web address, you don't want to have to move your hands to the mouse and click on the address bar before typing. Instead of doing this, simply hit Command-L before typing the address. You will notice that the address bar automatically highlights, ready for you to type away. The command is actually located in the File menu, as "Open Location..." and conveniently the same keyboard shortcut works in Firefox.
If you don't have any Safari windows open, Command-L will open up an empty window and highlight the address bar. This is similar to the function of Command-N for a new window, but Command-L has the added benefit of opening an empty window, even if you have Safari set to automatically open your home page.
As a bonus tip, hit Command-Option-F to quickly jump to the Google search box in the top right.
5 Ways to Speed up GarageBand
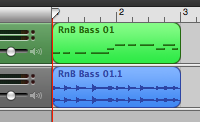
1. Turn Software Instrument Loops into Real Instrument Loops. If you didn't know, Software Instrument Loops are green and have dots on the track while Real Instrument Loops are blue and have audio waves on the track. The Software Instrument Loops are more customisable as you can change the instrument that plays them and the notes that they play. The Real Instrument Loops are harder to change as they are just recordings of an instrument playing.
Software Instrument Loops take a much higher toll on your CPU. If you are using a G3 or G4 you might find that GarageBand crashes when you try to play a song with lots of software instruments. Using Real Instruments instead of Software Instruments will help you avoid crashes and make you Mac run faster, especially during playback. To convert, hold the Option key when dragging Software Instrument Loops to the timeline. This will turn the loops into Real Instruments.
2. Optimise for Faster Response. In the Preferences (in the GarageBand menu) click on the MIDI/Audio tab and set the Optimisation to what you find more important. A large buffer size will allow you to have a large number of simultaneous tracks, while a small buffer will give a shorter loading time for playback. This doesn't always give great improvements, as results depend on individual system specifications.
5. Reduce the number of Tracks. While you might not want to delete tracks from your song, you can combine them. Once you have a number of tracks the way you want them in the final song, choose Export to iTunes from the File menu. Delete the tracks in your GarageBand project (you might want to save before you do this). Locate the file you just exported and drag it onto the timeline. This will create a single new track to replace the ones you just deleted. This process also has the benefit of converting the Software Instrument Loops to a recording.
Borderless Quicktime Movies
The thing I found more interesting than the skins though is that you can use the same idea to create a borderless Quicktime movie. What's even better is that you can make borderless movies with the regular Quicktime that comes with your Mac, unlike skins that require the extra features Quicktime Pro ($30 from the Apple Store).
Murphy Mac has a great screencast about creating Quicktime skins, but luckily it is a lot easier to create a borderless movie. It involves creating an image file and a text file to go with your movie, and then combining all three files into one borderless movie.
The first step is to find the dimensions of your movie. Double-click it to open it in Quicktime and press Command-I or choose "Show Movie Info" from the Window menu. The Movie Info window will show you the "Normal Size" of the movie in pixels. Make a note of this size.
![]()
Next, you will need to create a solid back image that is the same size as your movie. There are lots of ways of doing this, but here's a method that should be available to everyone. Download this image to your hard drive by clicking one the link and then choosing Save As from the File menu. Basically its a really big black rectangle.

The next step is to load up TextEdit and type the following lines:
<?xml version="1.0"?><?quicktime type="application/x-qtskin"?><skin><movie src="movie-name.mov"/><contentregion src="black.png"/><dragregion src="black.png"/></skin>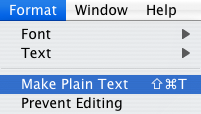
Obviously it is a bit annoying to have three separate files to achieve this. The good news is that you can combine them into one file, but the bad news is that it requires Quicktime Pro ($30).
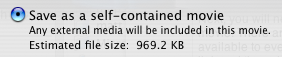
If you have Quicktime Pro, you can do this by choosing Save As from the File menu with the borderless movie open. Choose a file name and make sure you save it as a "self-contained movie", not a reference movie. The resulting file will still work fine if you delete the other files or move them about, meaning you can send it in emails or over the internet.
Now why would you want to do this I hear you ask? Honestly, there's no big reason apart from your movie will take up a bit less space and look a whole load cooler!
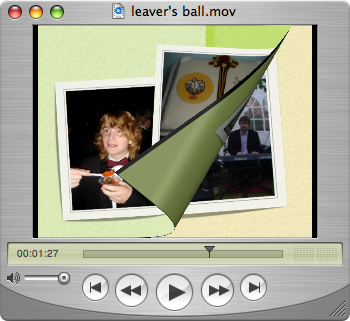
Export an iPhoto book to movie

Once your book is completed, you can view the slideshow by clicking the play button at the bottom. This will bring up the slideshow options. Make sure the random order check box is unchecked (you don't want your pages appearing in a random order) and choose the amount of time you want each page to appear for. To make the movie more book-like you will probably want to use the "page peel" transition, going left. You might also want to add some background music from your iTunes library.

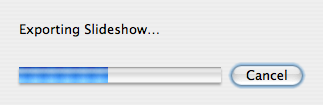
Instead of going to the slideshow, you will now be prompted to choose a location to save your movie. Give it a name and click export. Now your photo book is saved as a Quicktime movie that you can watch and share.
One year of Mac OS X Tips
The very first tip, on how to Auto-Tab Bookmarks was posted on the 22 June, 2006. Since then I have added 128 articles, giving an average of 2 or 3 tips posted each week.
Here are the top 10 posts in terms of the number of page views they receive. These are the best tips to check out if you are a new reader.
1. Top 15 Terminal Commands for Hidden Mac OS X Settings
2. Hidden File
3. Address Book Tips
4. Peek inside Mac OS X Packages
5. Another Way to Force Quit
6. Multiple Music Libraries in iTunes 7
7. Set a Screen Saver as the Desktop Background
8. Tips for Deleting Stubborn Files
9. The Ultimate Customize Toolbar Shortcut
10. Get useful system stats in the Mac OS X login window
There is a considerable gap in page views between the top 4 and the rest of the tips, due to those tips being picked up on digg.
My favourite tips are not always the ones that end up being the most popular, however. Some other tips that were more enjoyable to write include Seven Simple Safari Shortcuts, Google Notifier's Hidden Features, Secret advanced editing mode in iPhoto and Make the Most of iPod Notes.
As always, for all 128 tips, check out the Tips Archive.
RSS subscription to the blog has been steadily growing, with some huge jumps recently. The daily subscriber count is now over 1000. Here's a graph showing the number of subscribers each day since September 2006.

For Mac OS X Tips updates in your News Reader, subscribe to the RSS feed.
The Ask a Question page is currently ensuring my inbox is always nice and full. Recently I have been considering adding a forum to the site. This is because many of the questions/answers aren't suitable for the main blog but would be very useful if they were publicly available. It would also mean I wouldn't get asked the same questions over and over again and other people would be able to submit tips more easily. Leave a comment below if you think this is a good or bad idea, or have any other suggestions for the site.
13 things you didn't know about Preview
If a number of images are open in Preview at the same time, you can view a full screen slideshow by choosing Slideshow from the View menu or by pressing Command-Shift-F. Once the Slideshow has started, press I or click the "Index page" button in the toolbar. This make a contact sheet of all the images, with exposé style animation. Shift-click for slow motion as usual.
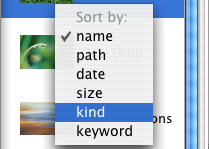
2. Sort Order in Sidebar
Normally images appear in alphabetical order in the sidebar (although PDFs appear in page order) but you can choose a different sort order by right-clicking on one of the thumbnails. This brings up a contextual menu with path, kind, size, date and keyword sort options. For your own custom order, just drag the images up and down.
3. Quickly Trash Images
While viewing an image in Preview, pressing Command-Delete will move it to the Trash, just as if you had selected its icon in the Finder. This is useful if you want to cycle through a collection of photos using the Up and Down arrows, and press Command-Delete to Trash the unwanted ones. You can also drag the thumbnail from the sidebar to the Trash.
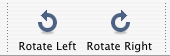
By default, the rotate buttons don't appear in the toolbar when viewing PDFs. To add them, Command-Option-click the Show/Hide toolbar button to bring up the Customise toolbar options. When you click rotate, it will rotate every page in the PDF document. If you Option-Click rotate, only the page you are currently viewing will be rotated.
5. Open a Folder of Images
Dragging a folder onto Preview's icon will cause it to open up every image in the folder. You will have to hold Command-Option while dragging onto the icon to force Preview to accept it. Be careful when doing this with a folder with lots of images in. If you do this with your Pictures folder for example, it will open your entire iPhoto Library. If you are adventurous, have a go at doing this with an application (they are just disguised folders anyway). Strangely, Preview can "open" itself.
6. Use the Scroll Tool with Images
When viewing PDF files, you can access the scroll tool through the View menu. This allows you to drag the images about with a hand rather than using the scroll bars. Unfortunately, this tool is greyed out when viewing anything but PDFs. To use the scroll tool with other formats, hold the Space bar before dragging an image. Additionally, if you Space-Command-click you will zoom in, and if you Space-Command-Option-click you will zoom out.
7. Slideshows Without the Toolbar
When viewing PDFs fullscreen using the slideshow option in the View menu (Command-Shift-F), the toolbar appears at the bottom whenever you move the mouse. To prevent this, double-click anywhere (but not on the toolbar). Now the toolbar will stay hidden until you next click. You can still get its functionality using keyboard shortcuts: Space will Play/Pause and the Left and Right arrows scroll through pages. Pressing A and F will toggle between actual size and fit to screen.
8. Change Annotation Font Size
The annotate tool is available when viewing PDFs. You can have a red oval or a yellow text box. The text is fixed to the System Font, which is Lucida Grande, size 13. To change the size, type
defaults write com.apple.Preview NSSystemFontSize -int 9 into the Terminal (in Applications/Utilities) and press return. The number at the end is the font size (replace with 13 to return to normal). You will need to quit and reopen Preview for changes to take effect.9. Change Zoom Level after Spotlight Search
When you click on the PDF in the Spotlight results, it opens up in Preview with the search term highlighted throughout the document. This is pretty useful, however the PDF is actually zoomed in 280 percent. This means you can read the word you searched for pretty easily, but you can't see anything else. To reduce this, start by quitting Preview if it is running and open up Terminal from the Utilities folder in the Applications folder. Type defaults write com.apple.Preview Preview -dict-add PVPDFSpotlightSelectionSize 10 and press return. The 10 at the end corresponds to a 100% zoom level. To return to normal, replace this with 28 (280% zoom). More information here.
10. Image Correction Tools
Preview offers a lightweight alternative to iPhoto's image correction tools. This is accessible from the Tools menu, and offers almost everything iPhoto does. Be warned through, there is no undo option for these changes, so the only way to go back is to revert to the last saved copy.
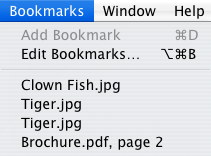
11. Bookmark Images and PDF pages
This feature was originally designed for long PDF files. If you want to save a certain page for reference or are half way through a long ebook and want a break, you can bookmark the page by pressing Command-D or by choosing Add Bookmark from the Bookmarks menu. Interestingly you can also bookmark images that you use often so you don't need to locate them first.
If you hold the Option key before dragging a selection, a small grey box will appear, telling the size of the selection in pixels. More information here.
13. Tag Images
In Preview you can tag images with keywords that are recognised by Photoshop and Spotlight. To do this, press Command-I and click on the Keywords tab. This "Document Info" window acts like an inspector palette, so you can easily scroll through your images without having to open it again.
Automate Trash Emptying
The one that empties items that have been in the trash for too long is a bit complicated and involves using the Terminal. The second one, however, is fairly simple and accessible to anyone who wants their trash to empty automatically.
It involves an AppleScript that you attach to the trash as a Folder Action. This script checks the size of the trash every time you add a file to it. If the size goes over a limit, it will deleted the item that has been in the trash the longest.
There are various versions of the script on the Mac OS X Hints page as many users added suggestions in the comments. If you are interested, take some time to read through the page to see how the script works. Adding all the suggestions and improvements, here is the final version of the script:
on adding folder items to this_folder after receiving added_items try -- Size limit of the Trash folder in MB set trash_limit to 2048 -- Check size & Touch all incoming items to update the modified date to now repeat with i from 1 to the count of added_items set a_file to item i of added_items -- Get incoming item size and check if it exceeds the max trash size set a_file_size to ((do shell script "du -sk " & quoted form of (POSIX path of a_file) & "| awk '{print $1}' ") / 1024) if a_file_size is greater than trash_limit then display dialog quote & (name of (info for a_file)) & quote & " is too big for the Trash. Would you like to delete it permanently?" buttons {"Yes", "No"} default button "No" set response to the button returned of the result if the response is "Yes" then -- Permanently delete set sh_script to "rm -Rf " & quoted form of (POSIX path of a_file) do shell script sh_script end if if the response is "No" then -- Rename and move to Desktop set sh_script to "cd ~/Desktop;mv " & quoted form of (POSIX path of a_file) & " " & quoted form of (POSIX path of a_file) do shell script sh_script display dialog quote & (name of (info for a_file)) & quote & " has been moved to the Desktop." end if end if if a_file_size is not greater than trash_limit then set sh_script to "touch " & quoted form of (POSIX path of a_file) do shell script sh_script end if end repeat -- Get the current Trash size in 1k clusters, then divide by 1024 to get megabytes set trash_size to do shell script "du -sk ~/.Trash/ | awk '{print $1}'" set trash_size to trash_size / 1024 -- Delete old items until we're under the limit repeat while trash_size is greater than trash_limit set trash_files to (list folder this_folder without invisibles) set oldest_file to {} -- Get the least recently deleted file in the Trash folder repeat with i from 1 to the count of trash_files set a_file to alias ((this_folder as text) & (item i of trash_files)) if i is equal to 1 then set oldest_file to a_file if the (modification date of (info for a_file)) comes before (modification date of (info for oldest_file)) then set oldest_file to a_file end repeat -- Delete the file and update the Trash icon set sh_script to "rm -Rf " & quoted form of (POSIX path of oldest_file) try do shell script sh_script on error display dialog "Permission denied on file " & quoted form of (POSIX path of oldest_file) & " would you like to try with administrator priviledges?" do shell script sh_script with administrator privileges end try -- And rinse! set trash_size to do shell script "du -sk ~/.Trash/ | awk '{print $1}'" set trash_size to trash_size / 1024 end repeat tell application "Finder" to update trash end try end adding folder items to
Select all the text and paste it into AppleScript Editor (in Applications/Utilities). Now you need to decide what size limit your trash will have. This is specified in megabytes on the 4th line of the script. It is currently set to 2048 (2GB). If you would like a different size, change this number. 512 for example, would mean that older items would be deleted to keep the total size under 512 MB.
![]()
Once you are done choose Save As from the File menu and go to the Library in your User folder. In here go to Scripts, then Folder Action Scripts. You will probably have to create these folders unless you have added folder actions in the past. Save the script here.
Now open up Folder Actions Setup (in Applications/AppleScript). If you click the plus button, you will be presented with a normal "Open" dialog. However there is the problem that the Trash is a hidden folder. It's actually located in your user folder with Documents, Music, Movies etc. To get to it, press Command-Shift-G. In the box that appears, type "~/.Trash" (without the quotes) and click Go then Open.
In the list that appears, choose the script that you just saved. Now you can start trashing things without ever having to worry about emptying the Trash again!
Be warned that this script permanently deletes files from your computer, without you specifically telling it to do so. If you change your mind and want to retrieve a file you put in the trash, you may find that it is already gone.
Customize Sound Sets in Microsoft Entourage
Is there a way to customize your own sounds for incoming emails in Entourage? In OS9, all you had to do was drop .snd files into the system folder and they were accesible from within Entourage. In OSX, it seems like all you can do is assign the standard sound sets. (like the 'new mail' sound etc..)
Microsoft Entourage's Sound Sets are stored in the Microsoft User Data folder located inside your Documents folder. To get there, navigate to: ~/Documents/Microsoft User Data/Entourage Sounds sets. In here should be one file, the default sound set that comes with Microsoft Office.
It's not quite as simple as just dropping audio files here though. You need to have special "Microsoft Entourage Sounds" files. Luckily there's a load of them you can download at Sound Off. My personal favourite is HAL alerts sound set.
Once you have downloaded a sound set you will need to double-click it to decompress it. You may need Stuffit Expander for this. You then need to drag the sounds file to the Entourage Sounds sets folder.
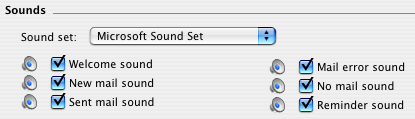
Now open up entourage and go to the Preferences (in the Entourage menu). In the Notification section you can choose your new sound set from the pop-up menu. To test each sound, click the little speaker icon next to each check box.
It is also possible to use own audio files or the Mac OS X alert sounds as Entourage alerts. It's just not quite as easy and you can only make it play when you receive new mail. Essentially you have to create a mail rule that will run an Applescript that will tell another application to play the sound file.

The first step is to download Play Sound, a really simple sound player for Mac OS X. After downloading this, install it by double-clicking on the disk image and dragging Play Sound to your Applications folder.
Next, open up Script Editor (in Applications/AppleScript) and paste the following script:
set soundAlias to "Macintosh HD:Applications:Microsoft Office 2004:Office:Sounds:Take Off" as alias
tell application "Play Sound"
play (soundAlias as alias)
end tell
Running this script will play a sound file. To choose your own sound file, you will need to change the first line of the script.
Macintosh HD:Applications:Microsoft Office 2004:Office:Sounds:Take Off tells it to play the "Take Off" file in the "Sounds" folder in the "Office" folder etc. If you wanted it to play a file in your Music folder you would put something like Macintosh HD:Users:matt:Music:sound.mp3. If you wanted it to play one of the Mac OS X alert sounds, you would put something like Macintosh HD:System:Library:Sounds:Sosumi.aiff.Once you have chosen your sound file, select Save As from the File menu, and save the script in the "Entourage Script Menu Items" folder in the "Microsoft User Data" folder in your Documents.

Even though you can't use mail rules to play a nice "Welcome" sound like the sound sets do, you can make one play manually. Any sound script you add to the "Entourage Script Menu Items" folder can be accessed from the script menu next to the help menu at the top of the screen. Just click up there or assign a keyboard shortcut to play it whenever you open up Entourage!
Recovering Lost Users
In general, there seems to be two reasons why a user account and their home folder can disappear. The first is simply that you have (accidentally) deleted the user. Any administrator account has the ability to do this from the System Preferences.
The second way occurs when upgrading or installing Mac OS X from the install disks. If you inadvertently chose an "Archive and Install" installation, all users are deleted unless you choose to preserve them.
Luckily, in both of the above cases, Mac OS X keeps a copy of the user folder in case you want to get it back.
Recovering Deleted User Folders
In the Accounts section of System Preferences you can delete a user by selecting them and clicking the minus button. You are presented with two options - to keep a copy of the user folder (the normal way) or to delete immediately. Unfortunately, if you chose to delete an account immediately, it is almost impossible to retrieve it.

However, it is more likely that you kept a copy (the option with the big blue "OK" button). This copy is kept in the Users folder under "Deleted Users". You must be logged into an administrator account to have access to this folder. Look in here for the name of the deleted user you want to recover, and double click it. This will mount a disk image on the desktop that essentially the deleted user folder. Hold option and drag this disk image from the desktop to the Users folder in your Hard Drive. Now you have restored the user folder, but you still need to create an account for it. Skip down to "Recreating the Account" to do this.
Users lost during an Archive and Install
When you perform an archive and install without preserving users, your user folders are archived away along with the rest of the existing system files for your Mac. A new folder called "Previous Systems" is created in Macintosh HD that contains all the users from before the archive and install. If you have done an archive and install multiple times, you will have a number of previous systems. Choose the one that contains all the users you wish to restore. In here is a users folder containing each of the deleted user folders. Drag the ones you wish to restore to the users folder in Macintosh HD. Now you have restored the user folders, but you still need to create accounts to be associated with them.
Recreating the Account
If you just want to retrieve certain files from the deleted user, you don't need to go through the hassle of creating a new user. From any administrator account you can open up the deleted user's disk image or Previous Systems folder and copy specific files from it.
Boost Quicktime Volume
However, with some files, you might find that the audio is too quiet to hear. If you have turned up the volume to full and your Mac's speakers still aren't playing it loud enough, there is a simple way to get an extra volume boost.
If you hold the Shift key before clicking one the Quicktime volume control the slider has more range than normal. This also works when viewing Quicktime movies embedded in a web page.

If you have opened up the file in Quicktime, you can get the same results by choosing "Show A/V Controls" from the Window menu (Command-K). In the A/V controls there is a slider that goes higher than the maximum volume on the slider in the Quicktime window.
Print the Clipboard without Pasting into an Application
After selecting all text with Command-A, is there away to print it from memory to the printer without pasting it to an application? If I'm on a website I don't want to have to paste it into TextEdit to print it.
The best way to achieve this is using an AppleScript written by Chris from Macs in Chemistry.
You can download the script by clicking here. Double-click the downloaded file to un-zip it. You will now have a file called "Print Clipboard.scpt". Now go to the Library folder inside your user folder. Look in here for a folder called "Scripts". If it isn't there, create it by choosing New Folder from the file menu. Copy the "Print Clipboard.scpt" file to this folder by dragging it across.
Now Navigate to Macintosh HD/Applications/AppleScript and open up AppleScript Utility. Near the bottom of the window that appears, check the box that says "Show Script Menu in Menu Bar" (if it isn't already checked). A menu will appear near the right hand side of the menu at the top with an icon that looks like a script. If you open this menu you will notice the Print Clipboard Option at the bottom.
To see if it works, go to Safari (or your normal web browser) and select some text. Press Command-C to copy it. Now instead of pasting it into TextEdit, just go to the Script menu and choose the Print Clipboard script. If all is well, a dialog will appear confirming you want to print.
You must have a default printer set for the script to work. If you are having trouble, go to the Print and Fax section of System Preferences. If the "Selected Printer in Print Dialog" is set to "Last Printer Used", change it to the specific name of the printer you want to print with.
If you are feeling really adventurous you can even try editing the script. If you go to the Scripts menu and Option-click on "Print Clipboard" it will open up the script in Script Editor. Now you can make changes.
For example, if you want to remove the dialog that confirms what you are printing, put "--" (without the quotes) before the start of the 4th line. It would look like this:--display dialog the_clip buttons {"Cancel", "Print"} def...
Disable Volume Change Feedback
You can turn this sound off from the Sound section of System Preferences, but this is a bit time consuming to do every time you want to quietly change the volume.
![]()
Luckily there is a keyboard shortcut to silence the volume changing beep on a case by case basis. If you hold the Shift key while changing the volume, you will get no audio feedback, meaning you won't bother anyone with the clicking sound.
You can also get this to work the other way round. If you turn off the feedback in the Sound section of System Preferences, the clicking sound will only play if you hold down shift before changing the volume.
(This is vaguely related to a previous tip - holding option before pressing the volume change keys will open up the Sound System Preferences.)
Address Book Tips
Add Contacts to your Safari Bookmarks
If lots of your contacts have their own web sites, you might be interested to know that you can automatically add these to your Safari bookmarks bar. Open up Safari go to the Preferences (in the Safari Menu). In here click the Bookmarks tab and check the box that says “Include Address Book” in the Bookmarks Bar. Now a new folder will appear at the far left of your Bookmarks bar. In here will be the web sites of all you contacts who have a home page set in their Address Book entry.
Address Book integrates quite well into iChat, the Mac OS X instant messenger. If a person in your Address Book is online and using iChat, a little green dot will appear next to their picture. Clicking on the dot will open up iChat, where you can start a new conversation with the person.
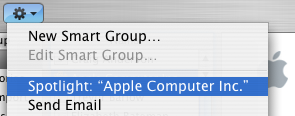
Put your Contacts in the Spotlight
In Address Book, select which contact you want to search, right-click on their name and choose “Spotlight [name]”. The spotlight window will pop up, and show documents, photos, iCal events, mail messages and iChats related to this person. This is one of my favourite features of Spotlight — it allows you to use it as a personal organiser and links together Address Book, iCal, Mail and iChat.
If you don't have Address Book open, you don't need to bother opening it up to Spotlight search someone. Simply type their name into Spotlight for the same results.
Moreover, Spotlight remembers files that people have sent you. When searching for one of your contacts, Spotlight will list any files they sent as attachments to you, providing you received them in Mail.
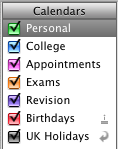
Highlight Groups
If you hold down the Option key while you are viewing a contact, all the groups that they are in are highlighted in a lovely yellow.
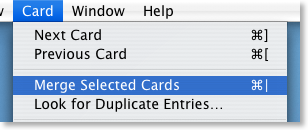
Merge two contacts
If somehow you end up with two entries in your address book for the same person, you can easily merge the two. Select the two entries by clicking on one in the list and then Command-clicking on the other. Now click on the Card menu and choose “Merge Selected Cards”. If you have a huge contact list and you suspect some duplicate entries, you can also choose “Look for Duplicate entries” from the Card menu.
Large Type
If you want to read a person's phone number off the screen while dialing it across the room, you can make it display in large numbers across the screen. To do this, click on the number and choose “Large Type” from the pop-up menu.
Address Book Sharing
If you want to share your address book (for example with your family or secretary) you can do so via MobileMe, Yahoo!, Google or an exchange account. In Address Book just go to the Preferences and click on the Accounts tab. Be careful with the Google and Yahoo synchronisation though, you might end up accidentally adding everyone you ever sent an email to into your address book.
Using vCards
In reality, most people don't have .Mac, so the standard way to share contacts is using vCards. A vCard is a file containing a contact's information that you can attach to an email and send to whoever you want. Luckily, vCards work really well with Address Book.
To create a vCard for a specific contact, select them from the list and right-click (Control-click) on their name. From the pop-up menu choose "Export vCard...".
To create a vCard that contains the information for all the people in a certain group, select the group you want from the list, right-click on it and choose "Export Group vCard...".
If you receive a vCard from someone else as an email attachment, you can add it to your address book in a couple of ways. If you received it in Mac OS X's Mail application, simply drag it from the email message across to Address Book. If not, save it to your Hard Drive and then choose Import vCards (Command-O) from the File Menu in Address Book.
Make Your Own Card

Restrict Private Information
If you don't want to share all of your contact information with everyone you send your vCard to, you can choose to keep certain parts private. Go to the Address Book Preferences and check "Enable Private Me Card". Now when you edit your own card, you can use the check boxes to choose which information is exported as your vCard.
Printing Envelopes
You can print an envelope addressed to a contact by choosing Print from the File menu with the chosen person selected. In the print dialog you might have to click the blue disclosure triangle to show all the settings, and choose Envelopes from the Style drop-down menu.
A Few Questions
Iain writes:
I cannot delete a couple of folder shortcuts from my sidebar - Finder just says "the volume for XXX can not be found" - any ideas ?
You will need to delete the Finder's Sidebar preferences file. Go to your user folder and navigate to Library/Preferences and drag
com.apple.sidebarlist.plist to the desktop. Control-Option-Click on the Finder icon in the Dock and choose relaunch. If the problem is fixed, you can trash the file on the desktop. If not, you might want to put it back. Be warned though, deleting this file will remove all your other shortcuts from the sidebar as well so you will have to add them all again.Stopping Filemaker Pro
Brian writes:
I am having trouble with my mac. Every file I try to open defauts to filemaker pro. Is there a way to stop this? It happens with Excel files, Cad files, Etc....
Start by loading up NetInfo Manager, which is in the Utilities folder inside the Applications folder. Select Users from the middle column and then your user name from the right hand column. Look in the bottom pane for the uid, which is probably something like 501.
Now quit NetInfo Manager and any other running applications. Navigate to Macintosh HD/Library/Caches and trash the following two files:
com.apple.LaunchServices-0140.csstorecom.apple.LaunchServices-01XXX.csstorewhere XXX is the uid. You will need to enter your administrator password to do this. Now restart your Mac and check if the problem is fixed.
If not, go to your user folder, navigate to Library/Preferences and delete the
com.apple.LaunchServices.plist file. Repeat the above steps by deleting the two files from the Caches folder and restarting again.iPod Disk Use
Valentine writes:
How do I use my iPod for both storage and music?
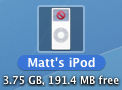
Plug in your iPod and open up iTunes. In the iPod section there is a check box near the bottom that says "Enable disk use". Check this box. A warning will appear that says you have to eject your iPod before removing it from now on.
Your iPod should appear on the desktop as an icon. Double click it and it opens up like a normal folder. You can drag files over to it just any other drive.
Reduce Preview's PDF zoom after Spotlight
When you click on the PDF in the Spotlight results, it opens up in Preview with the search term highlighted throughout the document. This is pretty useful, however the PDF is actually zoomed in 280 percent. This means you can read the word you searched for pretty easily, but you can't see anything else.
![]()
Luckily, by changing one line in the Preview preferences, you can change the zoom level to something less extreme. The easiest way to do this is using the Terminal.
First, quit Preview if it is running and open up Terminal from the Utilities folder in the Applications folder. Type the following line and press return:
defaults write com.apple.Preview Preview -dict-add PVPDFSpotlightSelectionSize 10The 10 at the end corresponds to a 100% zoom level. By default, this number is set to 28, or 280% zoom. If you want some zoom, but not quite as much, try a number like 15 for 150% zoom.
If you don't want to use the Terminal, or you are curious to see what the command actually does, you can open up the preference file in Property List Editor (which you will only have if you have installed the Developer Tools from the Mac OS X install Disk). Go to your user folder and navigate to Library/Preferences and open up com.apple.Preview.plist using Property List Editor.
![]()
Use the expansion Triangles to navigate to Root/Preview/PVPDFSpotlightSelectionSize. Here you can see the number is 28 (or 10 if you have already changed it in the Terminal).
Drag Chunks of Text onto Dock Icons
Doing this with different applications will produce different results. If the application will accept the text, it will darken when you hold the selection over it. Note that some applications will only accept the text if it is in a certain format (a web address for example). Here are the results with a few common applications. If you know of any more, add them in the comments.
1. Safari - If you drop a web address (i.e. something that starts with http://) on Safari, it will load up that address. If you drag any other bit of text, it will perform a Google Search on it. This is mainly useful if the text is from a non-cocoa app that doesn't have the "Search in Google" item in the right-click context menu.
2. Firefox - If dropped text is a web address, Firefox will load it. This is helpful if you want to view a site in a browser other than your default browser.
3. Mail - A new message will load up with the dropped text as the main message body. Annoyingly the text is placed in the body even if it is an email address.
4. TextEdit - As expected, this loads a new document containing the dropped text.
5. Skype - If the dropped text is a phone number, Skype will call it. This will also work with nicknames in your contact list.
6. Script Editor - A new script window will open up containing the dropped text. Script Editor will then attempt to compile it.
7. iTunes - If you drop a podcast address onto iTunes, it will subscribe to it. If the address isn't a podcast, iTunes will attempt to do it anyway (and fail).
8. Acquisition - Starts a new search with the dropped text.
9. Newsfire - Adds a new feed with the text as the address. (Why not try it out with http://feeds.feedburner.com/macosxtipsfeed )
10. Stickies - This will make a new Stickies note containing the text open up.
11. Dictionary - This will show you the definition of the dropped word. If you drop a selection of words, Dictionary will display the definition of the first. (In cocoa apps, it's probably quicker to use this keyboard shortcut).
Most of these also work if you drag the text to the desktop to create a text clipping first, and then drag it to the Dock icon.
Read new email on your iPod
Alternatively, click this link to automatically open up Script Editor with the script ready typed. Wherever it says <
If you are confident editing the script, you can set it to create the folder on your iPod instead of on the Desktop (This wasn't done in the original because everyone's iPod has a different name and you have to have the iPod connected to run the script). If you want to leave it as it is, all you have to do is plug in your iPod and copy across the folder from the desktop.
To make things even more automatic, you could set up an iCal alarm that runs the script every morning before you leave the house.
Make the Most of iPod Notes
Creating Your Notes
![]()
The easiest tool to use to create plain text files is TextEdit. Open it up and press Command-Shift-T or choose Make Plain Text from the Format menu. Once you are done writing your note, choose Save As from the File menu. You'll want to save it in the Notes folder inside your iPod.
Warning: Now you have enabled disk use for your iPod, you will need to eject it before you unplug it. Drag it to the trash or right-click and choose eject.
Each notes file is limited to 4KB by the iPod and if yours is too long, the end will be cut off. To avoid this, Daniel Duris has created an online tool to divide up long eBooks into 4KB sections. At the end of each section is a link to the next one, making it as simple as turning the pages of a book.
Format Notes with HTML
These links are interesting because they show that iPod notes have basic HTML support. You can use this to create links between your notes, just like the links you see on web pages. There are a few HTML tags that are supported by the iPod.
will create a link break, and to choose the title at the top of the iPod screen, put it between
Here's an example:
<title>Chapter 1</title>Once upon a time there was a man named John.<br>He lived in a bright yellow house.<br><br><a href="chapter2.txt">Next Chapter</a>When viewing these notes on your iPod, you can select links using the scroll wheel. If there is more than one link, the active one will have a blue underline. Using the scroll wheel will allow you to activate different ones.
Link to Songs and Videos
These links aren't just limited to notes. You can link to any song, video, album, artist or playlist on the iPod. For example, to link to the song "Song 2" using the text "Play Music" you would type
<a href="song=Song 2">Play Music</a>.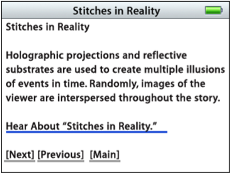
Linking to a video works in much the same way as with a song.<a href="video=Song 2">Link to Song 2 Music Video</A>
To link to groups of songs, you have to use a slightly different tag. Here are a couple of self-explanatory examples:<a href="ipod:music?genre=rock">Link to rock music</A> <a href="ipod:music?artist=Radiohead">Link to Radiohead</A>
You can even combine these to create the equivalent of Smart Playlists:<a href="ipod:music?genre=rock&artist=U2">Combo</A>
Set Notes Preferences
There are a few settings you can change involving the notes on your iPod. The first is a "Notes Only" mode, which was mainly designed for iPods being used as tour guides or in museums. This means that when your iPod loads up you are shown the Notes folder, and can't navigate out of it. You can only get to songs (or a audio tour) via links in your notes.
To enable this mode, create notes file called Preferences (without the .txt extension) and put the following line in it:<meta name="NotesOnly" content="true">
The second setting you can change is the title of the Notes folder. By default it is just called Notes, but if you are using the Notes Only feature, you might want to call it something like "Museum Tour". To do this, add the following line to the Preferences file:<title>Museum Tour</title>
The final setting is to do with linking to songs. Normally when you choose a song from a link in a note, the Now Playing screen appears. To set you iPod to continue displaying the note instead, add the following line to the Preferences file:<meta name=“NowPlaying” content=false>
Applescript your Calendar Colours
A more interesting way to solve this problem is by using randomly generated colours. To do this, we'll need to write a quick, easy AppleScript.
If you are using Mac OS X 10.3 or later, simply click this link to automatically open up Script Editor with a window containing the script you need.
If you are using an older version of Mac OS X, load up Script Editor (from /Applications/Applescript) and paste the following script into the window that appears:
tell application "iCal"
set calnum to (count every calendar)
repeat with currentnum from 1 to calnum
set calcolour to (the color of every calendar)
set red to random number 65535
set green to random number 65535
set blue to random number 65535
repeat until calcolour does not contain {{red, green, blue}}
end repeat
set red to random number 65535
set green to random number 65535
set blue to random number 65535
set the color of calendar currentnum to {red, green, blue}
end repeat
end tell
Now all you need to do is click Compile (the hammer icon) and then click Run. iCal will load up and each of your calendars will be assigned a new colour. It doesn't work perfectly - sometimes two colours will be very similar. However it is much more fun than going through each calendar individually and this is a great example of just how powerful AppleScript can be.
Set a Background Colour in TextEdit
In TextEdit, go to the Format menu and choose Show Fonts. In the Font palette that appears, you will notice four buttons in the top left - 3 with a T on them and one with a small page icon. If you can't see these icons, your font palette might be too small. Drag the handle in the bottom right to resize it.
The button we want is the fourth one along. It should be a small page icon with a white box next to it. Clicking it brings up the colors palette which you can use to select a new background colour.
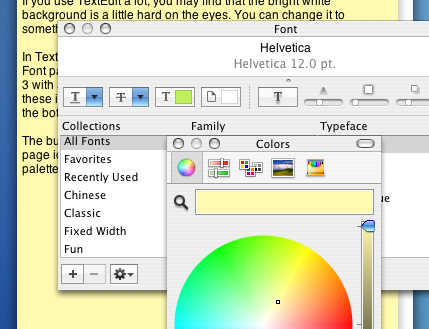
You are best off using the colour pickers that allow you to drag around to select a nice subtle colour. The preset colours (like in the crayon picker) are far too bright for a background.
Also note that any background colour that you set will be printed, so you will have to change it back to white before printing to avoid wasting ink.
Speed Up Dialog Boxes
The sliding animation may be pretty, but it can waste a fair amount of time if you are opening and closing sheets all day. You can speed this up and make your Mac feel much snappier by using a simple Terminal command to reduce the amount of time taken to display the animation.
Launch the Terminal (located in Application/Utilities) and type the following command:
defaults write NSGlobalDomain NSWindowResizeTime 0.001The number at the end is the length of the animation in seconds. With it set to 0.001, sheets appear pretty much instantly. The default is 0.2, so type the command with 0.2 at the end to return your sheet animation to normal.
For fun you can try higher values. This allows you to see just how detailed the animation is. Type the command with 2 at the end and load up TextEdit. Resize the window to as small as possible before selecting Save As from the File menu. You'll see the sheet jump up out of the window then gently fall into place.
Get Custom Audio or Visual Alerts
Whenever Mac OS X wants to get your attention, it plays an alert sound. For example it does this when a dialog box appears, when you receive an email and as an iCal alarm. Your Mac comes with a nice set of alert sounds, but after a while they may get a bit boring.
You can add your own alert sounds by placing audio files in a certain folder. Before you do that however, you will need to convert your sound file to the AIFF format using iTunes. Open up iTunes and choose Preferences from the iTunes menu. In the Advanced section, click on the Importing tab and choose AIFF encoder from the pop-up menu. Click OK.
![]()
If the audio file you want to use is in iTunes, select it and then click on the Advanced menu. In here choose Convert selection to AIFF. If you audio file is somewhere else, hold Option while clicking on the Advanced menu and choose Convert to AIFF. This will bring up a dialog that will allow you to navigate to your audio file. Once the file is done converting, go back to the preferences and change the "Import Using" pop-up menu back to AAC.
Now we have to get this file to show up in the Alerts list in System Preferences, Mail and iCal. Open up your user folder, look in the Library for a folder called Sounds and drag the sound here from iTunes. Your new alert should now be in the list in the Sounds section of System Preferences.
Make your alerts visual
An alternative to the audio alert is a visual alert, which is basically a screen flash. You can turn this on in the Universal Access section of System Preferences, under the Hearing tab. This will flash the screen as well as playing an alert sound. If you want to get rid of the sound and just have the flash, go to the Sounds section of System Preferences and move the Alert Volume Slider all the way to the left.
![]()
Annoyingly, this will also mute the feedback you get when the volume is changed and the interface sound effects (like when you move something to the trash). If you're fine with this then use the method above. However if you still want these other sound effects, there is a better (but more complicated) solution.
Mac OS X will also flash the screen if for some reason it is unable to play the selected audio alert. To make this happen, open up TextEdit and press Command-Shift-T to convert the document to plain text. Save this empty file as Flash.aiff in the sounds folder inside your Library. If a dialog asks you which extension to use, choose .aiff.
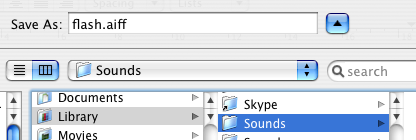
Now if you look in your alerts list in System Preferences there will be an alert called Flash that does exactly that - flash the screen. This is because Flash.aiff isn't really a sound file. When your Mac tries to play it and can't, it flashes the screen instead to make sure you still see an alert.
Create a Drives Menu in the Dock
In the Dock you can use the section to the right of the divider to store folders. Many people choose to put their user folder or Hard Drive here for easy access. One of the greatest benefits is that you can right click (Control click) on the icon to get a handy pop-up menu containing the contents of the folder. From here you can navigate through to any file contained within.
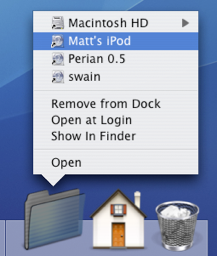
This works great, apart from with the Volumes folder. If you don't already know, the Volumes folder contains your Hard Drive, CDs, DVDs, Disk Images, iPods, iDisks and any other mounted media devices. To get to this folder, choose "Go To Folder" from the Go menu and enter /Volumes. You'll find that if you put this folder in the Dock you can still right-click to view the pop-up menu, however you can't navigate into any of the drives apart from your startup disk (Probably Macintosh HD).
The work around for this involves creating a folder action using AppleScript to make a self-updating Dock pop-up menu. Start by opening up Script Editor (located in Application/AppleScript). Paste the following script into the window that appears:
property scriptfolder : ((path to documents folder) as string) & "Drives" on run tell application "Finder" if not (exists alias scriptfolder) then make folder at folder ((path to documents folder) as string) with properties {name:"Drives"} end if end tell Update() end run on adding folder items to thisfolder after receiving addeditems Update() end adding folder items to on removing folder items from thisfolder after losing theseitems Update() end removing folder items from on Update() tell application "Finder" set theFolder to folder script_folder delete every item of theFolder set theDisks to disks repeat with i in theDisks make new alias at theFolder to i end repeat end tell end UpdateClick Compile (the Hammer icon) and then click Run. The first time you run this script it will create a folder named "Drives" in your Documents folder and put an alias to every drive in it. You can drag this to your Dock and you will have a Drive pop-up menu that allows you to navigate through all of your mounted media. However, the list in the menu only updates when the script is run. This is where Folder Actions come in to make the script run every time a new drive is mounted or a drive is removed.
Save the script to your desktop and then go to your user folder and navigate to Library/Scripts/Folder Action Scripts/. You may need to create these folders if they don't already exist. Drag your script from your desktop over to here. Now we have to attach it to the Volumes folder.
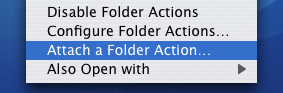
As described earlier, to get to the Volumes folder choose "Go To Folder" from the Go menu and enter /Volumes. Right click (Control Click) on the icon and choose "Enable Folder Actions" (If folder actions are already enabled this will say disable - don't click it!). Then right click again and choose "Attach a Folder Action". Choose the script you saved earlier.
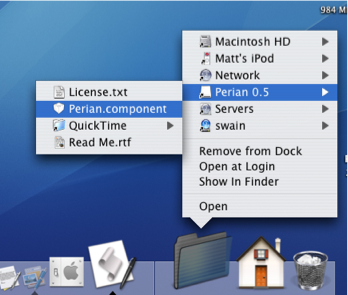
If you haven't already dragged the "Drives" folder from your Documents folder to the Dock, do so, and then you're done. Note that every time the list updates it moves the old list to the Trash, so if you insert and remove CDs, external Hard Drives, iPods etc. often, the Trash will get quite full. You might also want to change the icon of the Drives folder to something a bit nicer than the standard folder icon.
Ask a Question
The Ask a Question page that I recently added to the site has been surprisingly popular. Here's a few of the latest questions. If you have a question or tip about Mac OS X use the corresponding link in the sidebar to send it to me.
Dan writes:
My one year old daughter attacked my wife's iBook, and has somehow changed the settings so that the computer has gone 'negative' — everything looks like a photographic negative — desktop background, icons, the dock, everything. Does anyone know how to get this back to normal?
The "negative" effect is a feature of the Universal Access preferences. To quickly reverse it, press Control-Option-Command-8. You can change all the settings for this in the System Preferences, under the Universal Access pane. For more information on this, check out this previous tip on Universal Access.
Ignacio writes:
Hello, I accidentally erased the Ical application, I would like to know how to install it again.
The iCal application is included on the Mac OS X install disks that came with your Mac. However, technically you would have to reinstall the entire operating system to get it back.
A shareware application called Pacifist ( http://www.charlessoft.com/ ) allows you to open up the installer files and just install a single application. This should work for iCal or any other application included with Mac OS X.
Sean writes:
I have a delightful neighbour who's 90 years old who uses the net daily. She is sight impaired. I need to find a method of increasing the width of the scrollbars and their arrows to a size she can use. She recently switched from a PC to the Mac. She loves the Mac. It was easy to set the scrollbar size on XP. How can this be done on the Mac? Her Mac is a beige desktop G3 with lots of memory and OS X 10.2.8.
The only tools for the sight impaired that come with Mac OS X are the settings in the Universal Access pane of the System Preferences (in the Apple menu). There is an option here for zooming that zooms in on the cursor when you press a keyboard shortcut. However, this isn't exactly what you want and it involves learning a load of keyboard shortcuts.
Another option is to change the screen resolution. Go to the Displays pane in the System Preferences and choose a lower number from the list of resolutions. The drawback of this method is that everything gets bigger, and there is less room for viewing things like large photos.
I understand that neither of these are perfect solutions, but they may be worth a try.
Peek inside Mac OS X Packages
Packages are great because they allow the developer to store all the important related files inside the application. They are also great because they make it very easy to tinker with the way applications work.
To view or edit a package's contents, Control-click (or Right-click) on the application and select Show Package Contents from the context menu. This will bring up a finder window containing a folder named Contents. Inside here is the actual package contents.
The following are a few examples of what you can do inside Mac OS X packages.
Warning: It is a good idea to keep a backup of any file you modify. To do this, just Option-drag the file to copy it to a safe place before making any changes to the original.
1. Change Unexpectedly Quit message
With some tinkering it is possible to customize Mac OS X alert messages and dialog box text. For a bit of fun, you can change the message that appears when an application crashes to something more humorous.
Open up your hard drive and navigate to /System/Library/CoreServices. Find the Crash Reporter package and open it by Control-clicking (or right clicking) and choosing Show Package Contents.
In the window that appears, navigate to Contents/Resources/English.lproj and find Localizable.strings. Copy it to your Desktop and open it up in TextEdit. Near the bottom of the file you will see the line -
/* Unexpectedly quit dialog */
In the lines that follow this it is fairly obvious how to change the message. The symbol "%@" will make the message display the crashed Application's name, and "\n" will make a line break. Save the file and then copy it back to the package to replace the old version. You will have to enter your administrator password.

2. Change an application's default icon
You probably know how to change an application's icon by opening up its Get Info window (Command-I), clicking on the icon and pasting a new one over it. You can use the Cut tool (Command-X) to remove this icon and return to the default. To change this default icon, you have to delve into the package. The icon file is stored in the Resources folder within the package contents, and normally has the same name as the application with the .icns extension. You can replace this file with any other icon file, whether it is downloaded from the Internet or taken from another application.
If you dislike the way the iCal icon always displays the date as July 17 when it isn't open, there is an alternative icon inside the iCal package. If you look inside the Resources folder you will find two icons - App.icns and App-empty.icns. To change which one iCal uses, simply rename App.icns something like AppJul17.icns and make a duplicate of App-empty.icns named App.icns.
Some people also dislike the iTunes 7 icon. This Mac OS X Hints article describes how to change it back to the one used in iTunes 6.
3. Open help files in a Web browser
Anyone who has ever used the Mac OS X help browser will admit that it is a little on the slow side. Annoyingly, it also lacks a Save command, meaning you have to go through the slow process of loading it up and finding what you want every time. Luckily, the help pages are just HTML files stored away inside the application's package. This means you can open them up in Safari, which is much quicker for browsing and allows you to save bookmarks and Save pages.
For example, to open up the iPhoto help, open up the iPhoto package in your Applications folder. Then navigate to the English.lproj folder inside the Resources folder. Here you'll find a folder called iPhoto Help with a file named iPhoto Help.htm inside. Double-click on this file to open it up in Safari.

Annoyingly, every now and again a link will open up in Help Viewer, but generally you can browse the help files from within Safari.
Things like Airport, Applescript, Bluetooth, iPod and Mac OS X itself don't have an Application package to store the help files in, so these are located in the Library folder. To find them, go to your Hard drive and look inside Library/Documentation/Help. Each of the .help files in here is a package.
4. Change Text Clipping Behaviour
5. Customize System Preferences
All the System Preferences panes are grouped into five categories - Personal, Hardware, Internet and Network, System and Other. It is quite easy to change these category names by going inside the System Preferences package, which is in the Applications folder. Inside it, navigate to the English.lproj folder inside the Resources folder. In here, find a file named NSPrefPaneGroups.strings and drag it to your desktop. Now open this file up in TextEdit and you'll see the following lines:
"personal" = "Personal";
"digitalHub" = "Digital Hub";
"hardware" = "Hardware";
"net" = "Internet & Network";
"system" = "System";
"addons" = "Other";
Don't change the words on the left, these are the ones used by System Preferences. You can change the words on the right. These are the ones displayed in the System Preferences window. Just make sure you don't delete any quotes or semicolons. Also, ignore the "Digital Hub" entry. This isn't used anymore and is probably just left over from a previous version of the operating system.
Now save the file and drag it back to the English.lproj folder from the Desktop. You will have to Authenticate this action with your administrator password.
6. Modify iCal alarm message
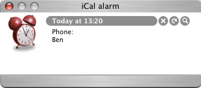
Merge Two iCal Calendars
If you start off with two separate calendars it is fairly easy to merge them into one if you later decide to. Luckily you don't need to go through every single event and change the details. You can do them all in one with the export command.
First choose the calendar you want to get rid of. Select it in the calendars list, and go to the File menu and choose Export. Choose any name and location. You aren't going to need this file for very long, so save it somewhere like the desktop so you can easily get to it.
Now you are going to re-import the events into the calendar you are merging them with. Go to the File menu and choose Import. Navigate to the file you saved earlier, and click Import again. In the dialog box that appears, choose the Calendar you want to merge the events into.
If everything went OK and all the events are in one calendar, you can safely delete the other one.
Ditch DVD menus
This is useful if you just have a single movie without chapters where the only option on the menu would be a rather pointless "Play Movie". It's also great for if you want to play a DVD in a kiosk and just have it loop over and over.
Start by launching iDVD from the Applications folder. Create a new project then click on the DVD map button, located right next to the Play button. In the map that appears, there is a box that says "Drag content here to automatically play when the disc is inserted". This area is normally used for the trailers and copyright messages, but you can just as easily drag your whole movie here.
Now the menu will only appear after the movie has finished. You can set an option here to play the movie again, or alternatively you can cut out the menu completely by setting the movie to loop.
Do this by clicking on your movie in the map view and choosing Loop Movie from the Advanced Menu. Burn your movie as usual. Now when you put the disc into a DVD player or your Mac, your movie will automatically play over and over again.
Preview Selection Secret
If you want to make a selection of a specific size, you normally just have to guess. By default Preview doesn't tell you the dimensions of the selection, but there is a way to make it.
If you hold down the Option key before making a selection on an image, a small grey box appears next to your cursor telling you the size of the selection in pixels.
This also works on already made selections. Hold down the Option key before dragging one of the dots around the edge of the selection box and the selection size will appear again.
When working with most image formats the select tool is the only one you have, so using it is simply a case of dragging across an image. If you are using a PDF file, make sure you are using the select tool by pressing Command-3 or by going to the Tools menu.
Photo Comparison in iPhoto
To use this photo comparison tool, you need to have iPhoto set to edit in the main window. Go to the iPhoto menu and choose Preferences. Set the drop down menu to edit photos in main window. Now go back to your photo library and decide on two photos to compare. Click the first one, and Command-click the second (i.e. select them both). Now double-click on one to enter the edit mode.
iPhoto will show your images side by side, ready for you to crop, enhance and retouch them. There are a few additional tricks to this as well. You can select more than two photos by just selecting more at the start (by Command-clicking). If you want to replace one of the photos you are comparing, click on it and then choose a different one from the thumbnail browser at the top of the window. If you want to add in a new photo to compare, Command-click on one of the thumbnails in the browser. To remove an image from the comparison, Command-click it in the thumbnail browser again.
A slightly different way of doing this is to edit in full screen mode rather than in the main window. You can do this by Right-clicking (Control-clicking) on you selected photos and choosing edit in full screen mode.
Create your own keyboard shortcuts
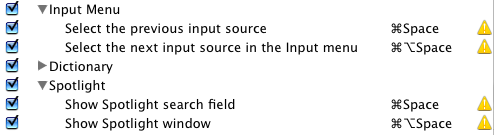
To do this, open up System Preferences and go to the Keyboard and Mouse pane. From the "Keyboard Shortcuts" tab you can view and edit all existing keyboard shortcuts for the system. To change any of them, double click on the current key combination then type your own. If the one you set clashes with any others, a warning icon will appear next to it. To disable a shortcut, uncheck the box next to it on the left.
Note that this list does not contain any application specific shortcuts. At the bottom there is a section for "Application Keyboard Shortcuts" but this is probably empty. The only ones that appear here are the shortcuts that you create. Click the small plus (+) button below the list to bring up a dialog box that allows you to choose an application and menu command and assign a keyboard shortcut to it.
The drop down menu contains all the applications in the applications folder, but if you want another one, choose other from the bottom of the list. Next enter the exact name of the menu item you want to create the shortcut for. This can be anything that appears in an application's menus, but don't forget to include the "..." at the end if the item has it (e.g. Customize Toolbar...").

The keyboard shortcut can use a combination of the Command, Control, Option and Shift keys, as well as any of the function keys (F1, F2 etc.). For some of the nested menu items it isn't obvious what to type. For example, to choose the menu item "Arrange by --> Kind" you have to type "By Kind".
After entering all the details, click add and your shortcut will be added to the bottom of the list under "Application shortcuts". You will have to quit and reopen the application for everything to start working. To do this for the Finder, Control-Option click on its Dock icon and choose Relaunch.
Using the Scroll Tool in Preview
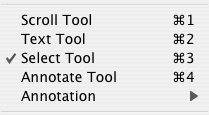
The trick to getting the scroll tool when viewing any image with Preview is to press and hold the Space bar. You will notice that the cursor changes to the hand and you can drag your image about. Once you have started dragging you can even let go of the space bar and it will still work, even though the cursor changes back to the cross of the select tool. This is similar behaviour to that of other image viewing and manipulation applications, however it is a bit more hidden in Preview.
5 Quick Podcast Tips
2. It's fairly obvious that you can delete single episodes from a podcast by simply selecting it and pressing delete. However, getting them back is a bit less straightforward. Option-Clicking the triangle next to the podcast title will bring up the full episode list, including any that you have removed in the past. Now you can click "Get" to download the episodes again.
4. Many podcasts have excessively long descriptions (well, too long to fit in the description column of the iTunes window). To bring up a window that contains the episode description and other details, click the small "i" icon on the right side of the description column.
5. If you come across a podcast on the Internet but you can't find it in the iTunes Podcast Directory, you can still subscribe to it in iTunes. Choose "Subscribe to Podcast..." from the Advanced menu and enter the podcast feed URL.
Stationery Pad option makes a template of any file
If you have any kind of workflow where you need to repeatedly modify some sort of a file template, checking this option in any file's Get Info window will tell its parent application to open a copy of it by default, ensuring that the original file remains unedited.
![]()
Surprisingly, very few people know about and use this useful option. To enable it, select a file and open up its Get info window by pressing Command-I. From here you can check the stationery pad option to set that file as a dafault template for its application. Now when you open that application, a copy of the file will load up and you can use it as a template. However, when you save the file it won't save over the Stationery Pad file.
For many applications the icon of the file will change slightly if you set it as a stationery pad. For example, some Microsoft Office files will change to look like a pad.
Encrypt and Hide your Private Files
Encryption
If you just want to protect a single iWork or PDF document, you can do this from within the specific iWork application or from within Preview. In Pages, Keynote and Numbers '09 you can choose “Require password to open” from the Document section of the Inspector window. In Preview, when choosing “Save As...” on a PDF there is a checkbox to encrypt.If you want to password anything else, you have to password protect an entire folder. The way this is done is using encrypted disk images. Once created these appear as a single file on your hard drive with a dmg extension. When you double-click on one, it will ask you for the password. If you enter the password correctly, it will mount a disk image on your desktop. So while unlocked, the disk image is just like a temporary folder on your desktop. You can copy files to it and delete files from it, and as soon as you eject it, the contents will be password protected again.
The files won't show up in Spotlight searches and it is almost impossible to decrypt the data without that password, even with data recovery tools.
To create an encrypted disk image, open up Disk Utility (located in Applications/Utilities), go to the File menu and choose New, Blank Disk Image. In the dialog box that appears choose a name for your disk image and where you want to save it. The size is a maximum that the disk image can hold, so the preset sizes for CDs and DVDs are useful for if you want to burn the contents when it gets full. Choose AES-128 encryption and sparse disk image from the Format drop down menu.
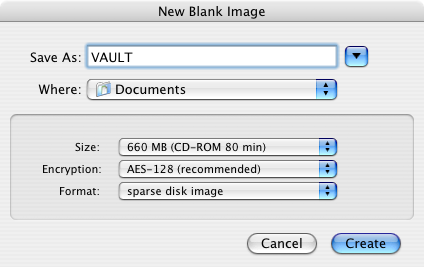
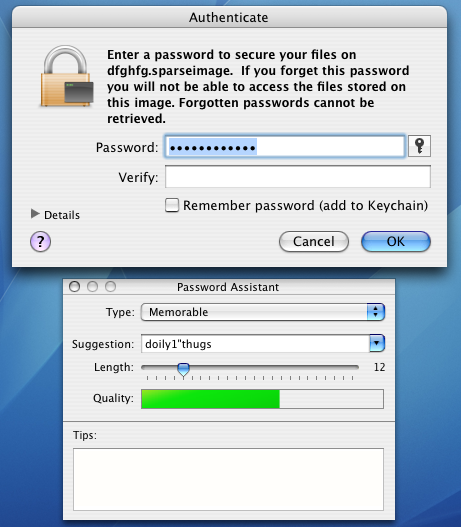
Hiding
For some people there is no need to encrypt data. For a quick, temporary solution you can just hide away your files on your Mac. This is much less secure and far from foolproof, but quite often it is as much as you need.Probably the best place to put your files is in the Library folder. The main benefits of this are that it isn't searched by Spotlight, and that there are hundreds of other files in there already. The Application Support folder in you Library is a good place, as there are all sorts of random files in there. You might also want to rename your file if it has a name that stands out ( super-secret-file.doc for example).
5 Quick iCal Tips

2. If you are really worried about missing an event, set more than one alarm for it. In the info panel for your event click on the word "alarm" and a menu will appear allowing you to add or remove alarms. You can even set alarms to go off after the event, for example if you need to drop someone off and then be reminded go pick them up an hour later.
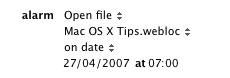
4. While iPhoto is great for printing pretty calendars, iCal offers a special customized print dialog that gives you much more flexibility in printing your calendars, albeit without the lovely photos. Check out this previous tip for printing To Do lists in iCal.
Multiple Music Libraries in iTunes 7
A dialog box will appear instead of the normal iTunes window, and from here you can choose an existing library or create a new one. Your existing library is in your user folder, under Music / iTunes / iTunes Library.
When you create a new iTunes library it doesn't just create this single library database file, it creates the entire folder, complete with a music folder and Album artwork folder.
This is quite useful for separating off a section of music. For example, you may want a separate library for your live music, your children's music or the music you don't want to copy to your iPod.
In an ideal world it would be possible to access all your music libraries from the sidebar in iTunes, but currently this isn't possible. Hopefully at some point it will be possible to change between your libraries without having to quit and load up iTunes again.
Make Selections to Copy Portions of Text Clippings
The text in the clipping looks normal. For example, the text highlight cursor will appear when you put your mouse over it. However, if you try and make a selection you will find it doesn't work. This means that text clippings are only really useful for drag and drop. Instead of dragging text from one application to the other, you can store it on your desktop for a while before dragging it to somewhere else.
The functionality has been improved somewhat in the past few major updates of Mac OS X. Since Mac OS X 10.3 it has been possible to copy a text clipping by choosing copy from the Edit menu (or by pressing Command-C) instead of only being able to drag them.
Since Mac OS X 10.4 it has been possible to select a portion of a text clipping, but it's a little trickier than it should be. Remember I said you couldn't make selections in text clippings? Well you can... sort of.
If you drag over a part of your text clipping obviously it doesn't look like a selection was made - nothing is highlighted. But when you copy and paste into another application (TextEdit for example) you will find that only the text you dragged over was copied, not the entire text clipping as you would expect.
Now there are a few problems with this. Normally the text clipping will retain the style of the original text, however now it won't. Also it is still pretty annoying having to guess if you have selected the right text.
Luckily, Mac OS X Hints has an article on how to make selected text in clippings highlight.
Basically you have to edit one word in a file within the Finder application. To do this, open your Hard Drive and navigate to System / Library / CoreServices / Finder.
Right-click (or Control-Click) on the Finder and choose "Show Package Contents". Now you have to navigate to Contents / Resources / English.lproj. If you are using a different language, you will need to choose that one instead. Inside your language folder, right-click ClipWindow.nib and choose "Show Package Contents".
Here there are three files. Keep this window open because you will need it later. Copy objects.xin to your desktop and open it up in TextEdit. In this file you need to change one word. Look for this line:
<boolean name="noSelection">TRUE</boolean>You can do this using Command-F to search for it or just look about 23 lines down. Change the TRUE to FALSE so it looks like this:
<boolean name="noSelection">FALSE</boolean>Save and close the file, and drag it back to the ClipWindow.nib folder to replace the original file. You may be prompted to enter your administrator password to do this if you are not an admin. It is probably a good idea to make a backup of this file before you replace it, just in case everything goes pear shaped.
Finally, you will need to relaunch the Finder for changes to take effect. The easiest way to do this is to hold down Control and Option and then click on the Finder icon in the Dock. Choose Relaunch from the list.
Now you have wonderfully improved text clippings!
Hidden Exposé Features
To enable the blob, enter the following command into the Terminal (Applications/Utilities) and hit return.
defaults write com.apple.dock wvous-floater -bool trueNow you need to relaunch the Dock, which contains the Exposé program. This can be done from Activity Monitor (also in Applications/Utilities) but it is much easier to just type the following into the Terminal and press return.
killall DockNow a blue blob should appear on your screen. Notice that it hovers above all other windows, and you can drag it about. It is semi-transparent until you put your mouse over it, when it becomes fully opaque. Now there are a few things you can do with this blob. Just clicking it will do the equivalent of hitting F10 - it will activate Exposé for all windows in the current application. Option-clicking is the same as F9, Exposé for all open windows. You can add in shift (Shift-Click or Shift-Option-Click) to make everything happen in slow motion, just the same as if you were using the F9 and F10 keys.


To remove the blob, repeat the above command but with false at the end.
defaults write com.apple.dock wvous-floater -bool falseAs before you will need to relaunch the Dock for the changes to take effect.
killall Dockmethodshop.com has a great tutorial on how to customise the blob to be a different image. This isn't too tricky, and basically involves looking inside the Dock application and replacing two images. Mac OS X Hints has a great idea of a prank to play using the blob. By changing it to look like the Hard Drive icon you can really confuse someone.

defaults write com.apple.dock wvous-showcorners -bool trueYou will need to type
killall Dock for changes to take effect and repeat the command with false at the end to reverse it.This final undocumented feature is part of the show desktop function that you start by pressing F11. Instead of moving all the windows off the sides of the screen, Exposé will now put all of your open windows into a small box that can be moved around the screen.
defaults write com.apple.dock wvous-olddesktop -bool falseThis is arguably the most interesting hidden feature for Exposé, however, be warned that it has some bugs. After using the show desktop function, the front window can freeze. Mostly this can be fixed by pressing F9 (the show all function). Of course you have to do the usual
killall Dock command to make the changes happen and type the command again with true at the end to reverse it.Spotlight Tips
By default, you can access Spotlight by using the keyboard shortcut Command-Space. You can also bring up the Spotlight window by pressing Command-Option-Space. Both of these shortcuts are customisable from the Spotlight pane in the System Preferences. If the chosen combination clashes with another one on your computer a warning symbol will appear next to it. To fix this, click on the warning triangle to go to the Keyboard and Mouse pane that allows you to view all keyboard shortcuts and see which ones are the same.

In all Cocoa apps (Safari, Mail, TextEdit etc.) you can quickly search for selected text in Spotlight. The first way of doing this is to Right-click (Control-click) on a word to bring up the context menu. The first option in the list is "Search in Spotlight". If you want to search multiple words, you will need to select them before bringing up the menu. You can also achieve the same effect by selecting the text and pressing Command-Shift-F (or by going to the Services menu and choosing Spotlight).
There are two ways of putting your contacts in the spotlight. The simplest method is to just type the person's name into Spotlight. The alternative option is to do it via Address Book. Select which contact you want to search, and from the Action Menu (looks like a cog, located in the top left) choose "Spotlight [name]". The spotlight window will pop up, and show documents, photos, iCal events, mail messages and iChats related to this person. This is one of my favourite features of Spotlight - it allows you to use it as a personal organiser and links together Address Book, iCal, Mail and iChat.
Moreover, Spotlight remembers files that people have sent you. When searching for one of your contacts, Spotlight will list any files they sent as attachments to you, providing you received them in Mail.
To immediately choose the "Top Hit" press Command-Return. This shortcut makes Spotlight a bit better as an application launcher. If you press Command-Return on any other item it will bring up the enclosing folder in the Finder (i.e. Show in Finder). The same thing happens if you Command-click any item.
Spotlight indexes far more than you might expect. In iPhoto, keywords and photo titles are indexed, and in iChat your chat transcripts are as well. In terms of third party applications, Delicious Library indexes your movies and books, Microsoft Office indexes the author, title and description of your documents and Newsfire indexes the titles and contents of feed items.
On the Apple Spotlight downloads page there are loads of plugins to enhance your Spotlight searches. Some add Spotlight functionality to unsupported applications, while others allow access to internet search engines from Spotlight.
You can perform Spotlight searches from the Terminal. the mdfind command will perform a spotlight search with many flexible options. However you don't have to use the Terminal to access these advanced options. Mac Geekery has an article describing how to execute raw Spotlight queries from the Finder http://www.macgeekery.com/tips/how_to_execute_raw_spotlight_queries_in_the_finder
In the Spotlight window there is an info icon next to each search result. Clicking this will give you loads of useful information about that result. It's like choosing "Get info..." on a file in the Finder, only you can do it on iCal events, fonts, music, emails and contacts.
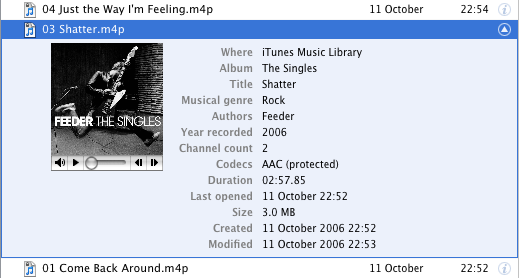
There are loads of keyboard shortcuts for manipulating the Spotlight menu. Most of these correspond to the normal behaviour in other Mac OS X menus. Use the Up and Down keys scroll up and down the menu. Command-Down will move to the first item in the next category, Command-Up Arrow will move to the first item in the previous category. Control-Up or the Page up key will move you to the first item in the menu, and Control-Down or Page down will take you to the last item in the menu. Command-Left and Command-Right will skip to the start or end of the search field, while Tab will select all text in the search field and Escape will clear it. If you press Escape with the search field empty, the Spotlight menu will close.
You can narrow you searches by specifying a kind. For example, to search for "Hello" but only in your music files, you would type "Hello kind:music". This can be done for almost any type of file - applications, movies, images, contacts and mail.
Using the same method as above, you can choose for Spotlight to only display files opened in a certain date range. For example, you would use "date:yesterday" to specify only files opened yesterday. Choosing a future date will display upcoming iCal events and to do items.
From the Spotlight pane in System Preferences you can enable, disable and rearrange categories. In the Privacy tab you can disable searching of specific locations.
To improve your Spotlight searches you can assign Spotlight Comments to files in the Get Info window. Access this by selecting your file in the Finder and pressing Command-I. Now you can set comments such as "urgent" or "temp" to make that file appear when those keywords are searched in Spotlight.
Playing with Half Minimized Windows
They mentioned the killall Dock thing... if you hold shift and collapse a window it goes slowly into the dock. if you do a killall Dock command in the terminal while it's collapsing, the window freezes in it's squished state, while still allowing you to scroll in it and click links (although the links will be in their original location).
SleepingInsomniac | Homepage | 03.21.07 - 4:42 am | #
This is great fun, and also a little weird. As mentioned, you will need to press Shift while clicking minimize to slow things down and give you enough time to run the command. Have Terminal open with "killall Dock" ready typed so you just have to press enter. When the Dock relaunches, your currently minimizing window gets stuck half way, but is still treated like a normal window. Drag it around, scroll up and down, browse web pages. It's not perfect however - as SleepingInsomniac notes, the links on web pages are still where they were before you minimized, making things a bit confusing.
Check out the image below to get an idea of what it looks like.
To get your windows back to normal you just need to close (Command-W) and reopen them.
Thanks to SleepingInsomniac for this!
Top 15 Terminal Commands for Hidden Mac OS X Settings
Update: This article is very old. Most of the Terminal Commands still work, but consider checking out our top Terminal commands for Leopard and Snow Leopard. Our Terminal Tips category also has loads of other ways help you get the most out of your Mac.
There are a huge amount of hidden settings for Mac OS X and its applications that aren't accessible from preferences dialog boxes or the System Preferences. Applications such as Tinkertool and Mac Pilot allow you to access some of these, but the real flexibility is from the Terminal. From here it is possible to edit any preferences file for any application on your Mac.You'll find the Terminal in the Utilities folder within the Applications folder. To carry out any of the following commands you will need to copy/paste or type in the line of text then hit enter. For the most part, applications will need restarting before changes take place. For most applications you can just quit and open them again, but for the Finder and the Dock it is easiest to just type “killall Finder” or “killall Dock” into Terminal after the command.
To reverse any of them, just repeat the command with NO at the end instead of YES, or vice versa.
Feel free to add any of your favourites in the comments.
1. Make hidden applications' dock icons translucent.
defaults write com.apple.Dock showhidden -bool YES![]()
defaults write com.apple.iTunes invertStoreLinks -bool YES3. This allows you to drag widgets out of Dashboard onto the desktop. Requires the dock to be relaunched to take effect, so type "killall Dock" and press enter. Now, if you click and hold onto a widget in the dashboard and press F12 to return to the desktop, the widget won't disappear with the rest.
defaults write com.apple.dashboard devmode YES
defaults write com.apple.mail PreferPlainText -bool YES5. Set expanded save dialogs as default (showing column/list view of folders rather than a drop down menu). Replace TRUE with FALSE to reverse.
defaults write -g NSNavPanelExpandedStateForSaveMode -bool YES6. Display the currently chosen screen saver to be shown as the desktop background. Press Control-C or Command-. to stop. More details here.
/System/Library/Frameworks/ScreenSaver.framework/Resources/ ScreenSaverEngine.app/Contents/MacOS/ScreenSaverEngine -background7. Display useful system stats in the login window. More details here.
defaults write /Library/Preferences/com.apple.loginwindow AdminHostInfo SystemVersion Replace "SystemVersion" with one of the following for different stats:
SystemBuildSerialNumberIPAddressDSStatusTimeHostName
8. To remove accounts from the login window type this command with the short name of each account you wish to remove. More details here.
sudo defaults write /Library/Preferences/com.apple.loginwindow HiddenUsersList -array-add shortname1 shortname2 shortname39. Skip disk image verification. Potentially risky, use with disk images from trusted sources.
defaults write com.apple.frameworks.diskimages skip-verify -bool YES10. Put double scroll arrows at both ends of scroll bar. Use Appearance pane in system preferences to reset.
defaults write "Apple Global Domain" AppleScrollBarVariant DoubleBoth![]()
defaults write com.apple.CrashReporter DialogType none12. Set the history limit in Safari to a certain number of items and and/or a certain age.
defaults write com.apple.Safari WebKitHistoryItemLimit 2000defaults write com.apple.Safari WebKitHistoryAgeInDaysLimit 3013. Show hidden files in the Finder.
defaults write com.apple.finder AppleShowAllFiles -bool YES14. Enable the debug menu in Safari.
defaults write com.apple.safari IncludeDebugMenu -bool YES15. Deactivate Dashboard. Requires the dock to be relaunched to take effect, so type "killall Dock" and press enter.
defaults write com.apple.dashboard mcx-disabled -bool YESThe Ultimate Customize Toolbar Shortcut
If you want to customize the items in your toolbar (and there’s nothing wrong with that), just Command-Option-click the little white pill-shaped button at the top right of your window’s title bar, and the Customize Toolbar dialog will appear, right there in your window. Now you can just drag-and-drop icons onto the toolbar.
As well as dragging the customize items to your toolbar, you can also now drag files or folders as well. However, if you are only adding files to the toolbar you can just hold Command-Option while dragging them there - you don't need to bring up the customize dialog box.
From the customize dialog that appears you can choose from a number of items (shown below) and change the view options - icon, text or both.
The added benefit of Command-Control clicking this button is that it works in every application that allows you to customize the Toolbar. Note that these other applications don't allow you to drag your own files, folders, applications etc. to the toolbar. You can only choose items from the dialog box.
Another Way to Force Quit
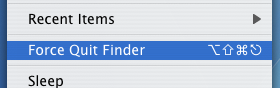
However robg, the man in charge over at Mac OS X Hints notes that this tip is pretty useless - if an application is stuck so much that you want to force quit it, it is unlikely to respond to menu clicks. To access force quit through the Apple menu you often have to switch to a working application before clicking it. The keyboard combination (Command-Option-Escape) still works no matter what the frontmost application is, but at first appearances adding in the shift seems to do nothing.
This is where the Mac OS X Hints community step in through a discussion in the comments. Turns out you can use the shift in the keyboard combination, but you have to hold it for a few seconds. Hold Command-Option-Shift-Escape for about 2 seconds and the current application will force quit without the hassle of the dialog box. Neat!
You can also force quit using the dock as noted before here on Mac OS X Tips. Right-Click (Control-Click) an application's icon in the dock and if it is not responding there will be a Force Quit option in the contextual menu. If the application appears to be fine, you will need to hold Option to change 'Quit" to "Force Quit". Note that with the Finder you need to hold Option before you Right Click to make "Relaunch" appear.
10 Tips for Mastering Finder Windows
1. Normally you just double click to open an item, but if you hold option while doing it the current window will close as the new one opens.
2. Spring loaded folders allow you to easily drag a file wherever you want. If you drag the file onto a folder icon and hold it there for a while, the folder will spring open, allowing you to drag the file onto a folder within a folder. You can do this as many times in a row you want, and when you let go of the file all the windows that have sprung open will close again. Hold the Space bar while doing this to get rid of the delay before a folder springs open.
3. Look in the Finder Preferences (located in the Finder Menu) for more window options. For example you can change the delay for spring loaded folders, set the default location for a new finder window (Command-N) and set folders to always open in a new window.
4. You can change the view of your Finder windows by pressing Command-Option-T. This shows and hides the toolbar and sidebar. The contents of both of these are customisable by dragging files and folders to them (Hold Command and Option if dragging to the toolbar) or by choosing Customise toolbar from the View Menu. You can also resize the sidebar and turn it into icons without names.
5. To close every single Finder window, hold option while clicking the red X in the corner. Alternatively press Command-Option-W.
6. In list view (choose from the View menu or icons in the window toolbar) you can peek into folders using the expansion triangles. Option clicking one of these triangles will expand the folder along with any folders it contains. Option clicking again will collapse all these folders again.
7. In column view it is sometimes easier to navigate through the file structure using the arrow keys. In the other views this is still possible, but to go inside the selected folder press Command-Down. In list view Command-Right will expand the currently selected folder. This can be used with multiple folders selected to look inside them all at the same time.
8. You can do many tricks to resize column widths to the right size in column view.

10. Another tip gives details on browsing a website by command clicking on the title bar in Safari. This works even better in the Finder. Command Clicking on the title bar gives you the path to the current location, allowing you to jump to any of the enclosing folders.
11. You can use the Go menu to quickly navigate to common places such as Home, Applications and your 10 most recent folders. Most of these places have keyboard shortcuts associated with them.
Slim Down iPhoto
If you have decided that you don't want your originals any more, getting rid of them can reduce the amount of hard drive space that your photo library takes up. There are two ways of doing this - using a few terminal commands, or using a free application called iPhoto Diet.
The terminal commands are from this MacRumors forum and come with a brief explanation of what they do. To run them, paste the following into the terminal:
mkdir ~/.Trash/iPhoto-Originals
cd ~/"Pictures/iPhoto Library/Modified/"
find . -type f -exec mv "../Originals/{}" ~/.Trash/iPhoto-Originals/ \;
This gives you a folder in the trash so you can check all the right photos are there before emptying it permanently. A summary of everything in the MacRumors forum has been made by Adriaan Tijsseling on his blog.
iPhoto Diet is a free application by Martin Fuhrer that does the same thing, but with more options and a nice user interface. This may take a little more time than the terminal commands, but it is much more user friendly and gives greater flexibility. It allows you to reduce you photo library size in the following ways:
• eliminate duplicate photos created internally by iPhoto or imported by yourself
• remove iPhoto's backups of rotated or modified photos
• strip the thumbnail icons of your photos
• remove thumbnail photos that have become mixed up with your high resolution photos
• identify photos which have not been added to albums
• weed out unnecessary folders and files from the library
• and more!
Download Links, installation instructions and an FAQ are available from Martin Fuhrer's site.
AddressBookToCSV: Your Address Book in Gmail
Why not just upload your email addresses from Address Book to gmail. Using AddressBookToCSV you can do just that. It will export your Address Book to a format read by the gmail internet application so that no matter where you are, you can have you addresses!
This tip was written by MacTipper, a great blog with loads of tips for Mac OS X. Check it out.
Get more iPod storage details in iTunes graph

It gives you the details in terms of the iPods storage capacity, that is, in bytes. However, you can also use the graph to display a count of how many songs, photos and videos your iPod contains or how long it would take to listen to all the songs and watch all the videos.
Change to this mode by clicking on the graph itself. Clicking once will cycle to the number count, clicking again will change it to the time count, and clicking one final time will change it back to the storage capacity.


Set half star ratings in iTunes
The way it works is that ratings are stored as a number between 1 and 100 as increments of 20. For example, 1 star is 20, 2 stars is 40 and so on. Using a little bit of trickery you can set the rating at 10, 30, 50, 70 or 90 giving a half star rating between two of the normal ones. Note that setting the rating to something like 31 just breaks the whole thing and your rating will just show up as one star.
![]()
To set a half star rating, just open up script editor (search spotlight or go to Applications/Applescript) and paste the following line:tell application "itunes" to set rating of current track to 30
The number at the end can be changed to one of the following:
10 gives ½
30 gives *½
50 gives **½
70 gives ***½
90 gives ****½
To make the change, click "Run" at the top of the window. To get rid of the half star rating just click on a normal rating in iTunes, or run the script again with 20, 40, 60 or 80 instead.
This method is slightly inconvenient if you have to load up script editor every time you want to rate a song, so luckily iTunes has built-in script support. Doug Adams has even made a whole site dedicated to providing scripts for it - Doug's AppleScripts for iTunes. From there you can download Add-Substract A Half Star which is a script like the one above, but compiled into an application. Save this file in
Users-->[username]-->Library-->iTunes-->Scripts

If the scripts folder doesn't exist, you will need to create it.
Quit and re-open iTunes if it is already open, then in the menubar next to the Window menu there will be a little script icon. From there you can choose to add or subtract a half star from the rating of the current song.

On his site, Doug also explains how you can assign a keyboard shortcut to the script.
DigitalColor Meter Tips
You can get the color details in many different ways, the most common being RGB values. In web design it is useful to have the RGB as an 8-bit Hex value, and in the Mac OS X color picker you can type in the actual 8-bit RGB values.
Using the DigitalColor meter is pretty straightforward - Move the cursor over the pixel you want to sample, and read off the values. There are some extra tools to help you do this however.
You can change the size of the area sampled by sliding the "Aperture Size" slider. On the far left it looks at each single pixel, but to the right it averages multiple pixels to give the overall effect.
When you are using the mouse to choose the color from an area of the screen, you obviously can't go up to the menus at the top to choose any options. Therefore everything has to be done with keyboard shortcuts. (The options are still located up in the menubar, so you can check what shortcut does what if you forget). They are as follows:
- Command-X : Lock Horizontal Position
- Command-Y : Lock Vertical Position
- Command-L : Lock Position
- Command-Shift-H ; Hold Color
Once you have chosen the colour you want, you can use the following shortcuts to copy it:
- Command-C : Copies the Image in large box on the left
- Command-Shift-C : Copies the RGB values as text
- Command-Option-C : Copies the solid color as an image
It is also possible to save the image as a TIFF file by pressing Command-S.
Calculator Modes
Secret advanced editing mode in iPhoto
![]()
First off, you need to check your settings are right. Load up iPhoto and go to the Preferences located in the iPhoto menu. You can only access the advanced editing mode if you have iPhoto set for image editing. Also, if you have iPhoto set to edit in a separate window, the advanced editing mode will be reset every time you enter edit mode. Choosing "Edit in Main Window" will make the advanced editing mode stay active until you quit iPhoto.
As usual, you need to double-click any image to enter edit mode. Choose the tool that you need (either retouch or red eye) by clicking on the icon at the bottom. Once this is selected, press Control-Caps Lock-9 at the same time, then release them. At first nothing will happen, but you are now in advanced editing mode. Pressing tab will cycle through the different advanced features, which will be shown by the cursor changing shape.
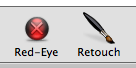
If you chose red eye, pressing tab once will switch the small cross hairs cursor to a large oval. Now, pressing the [ and ] keyes will allow you to resize the area of red eye correction. Pressing shift while clicking to apply the red eye correction will result in a lighter fill than with the normal tool.
If you chose retouch, pressing tab once will change the cursor to a circle with a number below it. This shows the size of the retouch tool. To resize it, press the [ and ] keys as with the red eye tool. To change the strength of the retouch, press Shift-[ and Shift-] and the number will change to show this. If you press tab a second time, the retouch tool changes into the lighten tool, which just lightens the area under the circle. As with the other tools, press [ and ] to resize it. Pressing tab again will bring you back to the normal retouch tool.
Quitting and re-launching iPhoto will return you to the normal editing mode, so you need to redo the Control-Caps Lock-9 keyboard shortcut if you want to enter the advanced mode again.
Printing To Do lists in iCal
Tips for Deleting Stubborn Files
Method 1 - Secure Empty Trash
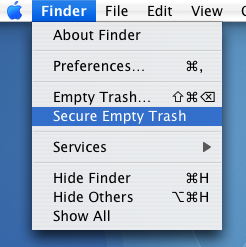
Method 2 - Third Party Applications
There are many applications available that allow you to force the trash to empty. One that is completely dedicated to it is Super Empty Trash, a free application with the sole purpose of helping you empty your trash. There are a few alternatives that perform many other tasks as well, such as OnyX (free).
Method 3 - Using the Terminal
This method requires a bit of care, as making a mistake in the Terminal can result in things going horribly wrong. To delete a file using this method, first open up the Terminal, located in the Applications/Utilities folder. Type in "rm -f " without the quotation marks, and with the space after the f. Then find the file that wont delete, and drag it to the Terminal window, and the path to that item should appear. Double check that this is the thing you want to delete, then press enter. If the item that won't delete is a folder rather than a file, type "rm -rf " instead.
If this still doesn't work, the next stage is to use "sudo rm -f " instead. This is a little more dangerous as you can accidentally delete lots more vital files. Carry out the steps as above, and this time you will be prompted to enter an administrator password.
Method 4 - Creating a temporary user account
This method is a little time consuming, but it is great if you don't want to use the Terminal. Start by going to the Accounts preference pane in the System Preferences and creating a new user account. It doesn't matter what details you give it, just remember the password. Next, move the troublesome file from your trash to the Shared folder, located in the Users folder. Log out of your account and log into the newly created one. From here, move the file into this users trash. Then log back out, and go back to your normal user account. Return to the Accounts pane in the System Preferences and delete the temporary account by selecting it from the list and hitting the delete key. Select Delete Immediately from the dialog box that appears, and the user account will gone, along with the stubborn file.
Customising the Terminal
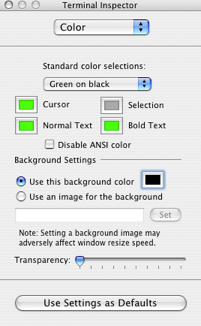
There are some predefined colour schemes, such as the popular green on black, or you can make your own. It is also possible to set an image as the background, and choose the transparency of the window.
It is also possible to create colour schemes using different methods, such as the one outlined in this Macworld Article.
To set a colour scheme as the default, click the button at the bottom of the Terminal Inspector.
But what if you want multiple colour schemes, or you want to send one to someone else? Luckily you can save these settings simply by saving the terminal window.
Choose all your colours and settings as above, then click the File menu and choose Save As. Navigate to Library/Application Support/Terminal. If you don't have a Terminal folder in Application Support, create one. Save the file here with a name like "colour-scheme1.term".
Now, a Terminal window with the saved settings can be opened by choosing File --> Library --> colour-scheme1. To save one of these files as the default, go to the Terminal preferences and select "Open a saved .term file when Terminal starts" then select your chosen file.

Here are a few ready made colour schemes for you to download.
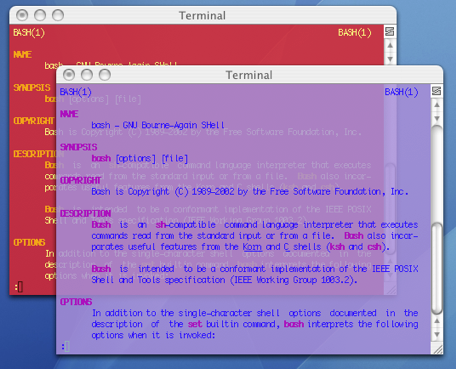
As an extra quirk, you can make Terminal choose a random colour scheme using a handy applescript created by Daniel Jalkut. It can create some pretty horrible combinations, but it does contain and algorithm to make sure the contrast of the text on the background is high enough.
Mail URLs in Brackets
![]()
An easy way to avoid this is to put your URL in
![]()
Automate your Mac
The first thing to do is to make your Mac turn on by itself. You can set it to do this in the Energy Saver preference pane in System Preferences. Just load it up and click "schedule" and choose a time to start up (and/or shutdown) and on which days you want this. This will also wake up your Mac if it is asleep, but this might not work if you have a password enabled screensaver.
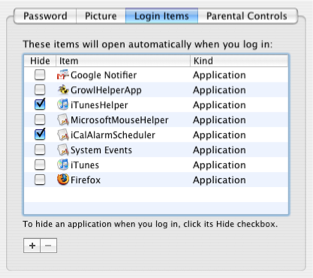
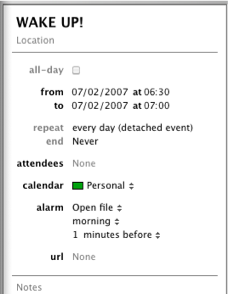
As far a scheduling specific applications goes, you have to use applescripts or automator actions for most of them. If you aren't completely super lazy, it is pretty straightforward to create a workflow in automator that opens up a list of websites, or starts an iTunes playlist going. To get this worklow to be carried out at a certain time, create an event in iCal and set an alarm. As the alarm action, set it to open up the automator file.
However, in some applications you can get the same results without making workflows or scripts. For example, in Firefox you can set multiple websites as your homepage, and all of these will open up when you start Firefox. There are two ways to do this. The first is to create a folder of bookmarks with all the sites you want to load on startup. After creating this folder, go to the Firefox preferences and click "use bookmark" to select the folder. The alternative way is to type in each address into the homepage field with a | (pipe) in between. Be sure to set Firefox to load your homepage on startup using the dropdown menu.
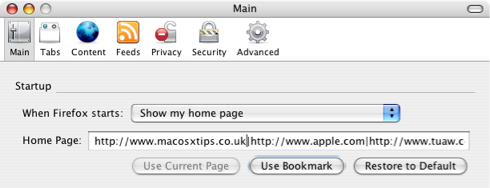
Finally, some applications have built in scheduling capabilities. Microsoft Entourage has tools to set Send and receive schedules that check for email at certain times and Apple's Backup has its own scheduling feature to carry out automatic backups however frequently you want.
You can use all of these features to automate your Mac and make sure that you never have to carry out a tedious task again.
Open at Login Shortcut
Google Notifier's Hidden Features
![]()
One of the greatest benefits of this piece of software is its simplicity - just put in your Google ID and password and everything works. At times this makes the notifier look somewhat limited, however this couldn't be further from the truth.
The first hidden feature is to customise the number of messages shown in the notifier menu. By default, the menu shows the last four unread messages received (or the last three received and an additional "View More" submenu). To change this, pull down the notifier menu and hold Command and Option while clicking on preferences. This brings up a hidden settings editor where you can easily edit the notifier preferences file.
In the "Key" field, enter "MaxMessagesOnMainMenu" and in the "Value" field enter the number of messages you want on the main menu. Click Set, and then quit and reload Google Notifier. Now when you click on the notifier menu bar item, you will see the number of messages that you set. To return to the default setting, repeat the prcoess, putting 4 in the value field instead of the number you entered last time.

The second trick can be done in much the same way. If you only want the notifier to fetch mail with a certain label, you can create a filter. As before, click on the notifier menu and Command-Option-Click on preferences. This time, in the key field enter "Label" and in the value field enter the name of the label you want to receive. To receive all mail, leave this field blank. And again as before, quit and reload the notifier for changes to take effect.
When you set these preferences, you are actually editing Google Notifier's preference file (Library/Preferences/com.google.GmailNotifier). If you want, you can load up this file with Property List Editor or TextEdit and changes things yourself (be careful!) or you can achieve the same effect using the Terminal (Applications/Utilities). For example the previous trick could be done by typing the following into the Terminal:
defaults write com.google.GmailNotifier Label -string “YOURLABELHERE”Finally you can extend Google notifier using plugins. I found the following on the Official Google Blog:
The Gmail Notifier supports plugins written in AppleScript, or full-blown Cocoa Bundles in Objective-C. Details about the Objective-C plugin API can be found inside the Gmail Notifier application bundle in the required header file, GGPluginProtocol.h (control+click Gmail Notifier.app -> Show Package Contents -> Contents -> Headers).
AppleScript plugins are written by simply implementing a handler like:
on NewMessagesReceived(messages, fullCount)
-- Your code goes here...
end NewMessagesReceived
To install, simply copy the script (plugin) to Library/Application Support/Gmail Notifier (create the directory if it doesn't exist), and restart the Gmail Notifier. An example of a great plugin for the Gmail Notifier for MacOS X is the Gmail+Growl plugin, which sends Growl notifications when new mail arrives.
Get useful system stats in the Mac OS X login window
Since this version, you can click on the name of your mac to show different statistics about your machine. Each time you click, it will cycle through different bits of information that are particularly useful when troubleshooting problems.
The order of the statistics are as follows:
One click: Your OS X version number (e.g. Version 10.4.7)
Two clicks: Your OS X build number (e.g. Build 7M271)
Three clicks: Your mac's serial number (e.g. WN1511LHKNW)
Four clicks: Your mac's IP address (e.g. 196.254.0.1)
Five clicks: The status of any networked account
Six clicks: The date and time (e.g. Saturday, January 20 2007 4:02:31 AM GMT)
Seven clicks: Back to where you started, the name of your computer.
So you click a few times and set the information line to your favourite thing, but next time you log in, it has changed back to the name of your mac. To change the bit of information that appears first, you need to do a bit of tinkering in the Terminal (Applications/Utilities). Open Terminal and type the following command:
defaults write /Library/Preferences/com.apple.loginwindow AdminHostInfo info_nameDepending on which piece of information you want displayed, replace info_name with one of the following:
SystemVersion
SystemBuild
SerialNumber
IPAddress
DSStatus
Time
After doing this, hit return, and the next time you view your login window the information you chose will be displayed.