Borderless Quicktime Movies
02 July 2007 - Filed in: QuickTime
Recently I read on Murphy Mac about how to create your own Quicktime skin. This is basically a border to go around your movie to replace the normal Quicktime window.
The thing I found more interesting than the skins though is that you can use the same idea to create a borderless Quicktime movie. What's even better is that you can make borderless movies with the regular Quicktime that comes with your Mac, unlike skins that require the extra features Quicktime Pro ($30 from the Apple Store).
Murphy Mac has a great screencast about creating Quicktime skins, but luckily it is a lot easier to create a borderless movie. It involves creating an image file and a text file to go with your movie, and then combining all three files into one borderless movie.
The first step is to find the dimensions of your movie. Double-click it to open it in Quicktime and press Command-I or choose "Show Movie Info" from the Window menu. The Movie Info window will show you the "Normal Size" of the movie in pixels. Make a note of this size.
 Now you will need to crop it down to the size of your movie. Double-click on it to open it up in Preview. Here you can make a selection by holding the Option key and dragging a rectangle. Notice that a small box appears, telling you the size of the selection. You can keep adjusting the selection until you get it the same size as your movie. When you are done, Press Command-K or choose Crop from the Tools menu. Choose Save As from the File menu and save it in the same folder as your movie. Give it a name like "black.png".
The next step is to load up TextEdit and type the following lines:
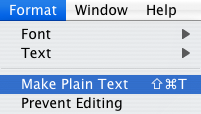 Replace "movie-name.mov" with the actual name of your movie. Press Command-Shift-T or choose "Make Plain Text" from the Format menu and then choose Save As from the File menu. Here's the strange part - put the file name as "borderless.mov". Yes, that's a .mov file extension on a text file instead of .txt. Save it in the same folder as the black image file and the movie file. Now when you double-click on borderless.mov, it will load up as a borderless movie! Simply hit the space bar to play and pause.
Obviously it is a bit annoying to have three separate files to achieve this. The good news is that you can combine them into one file, but the bad news is that it requires Quicktime Pro ($30).
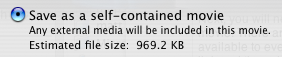
If you have Quicktime Pro, you can do this by choosing Save As from the File menu with the borderless movie open. Choose a file name and make sure you save it as a "self-contained movie", not a reference movie. The resulting file will still work fine if you delete the other files or move them about, meaning you can send it in emails or over the internet.
Murphy Mac has a great screencast about creating Quicktime skins, but luckily it is a lot easier to create a borderless movie. It involves creating an image file and a text file to go with your movie, and then combining all three files into one borderless movie.
The first step is to find the dimensions of your movie. Double-click it to open it in Quicktime and press Command-I or choose "Show Movie Info" from the Window menu. The Movie Info window will show you the "Normal Size" of the movie in pixels. Make a note of this size.
![]()
Next, you will need to create a solid back image that is the same size as your movie. There are lots of ways of doing this, but here's a method that should be available to everyone. Download this image to your hard drive by clicking one the link and then choosing Save As from the File menu. Basically its a really big black rectangle.
The next step is to load up TextEdit and type the following lines:
<?xml version="1.0"?><?quicktime type="application/x-qtskin"?><skin><movie src="movie-name.mov"/><contentregion src="black.png"/><dragregion src="black.png"/></skin>Obviously it is a bit annoying to have three separate files to achieve this. The good news is that you can combine them into one file, but the bad news is that it requires Quicktime Pro ($30).
If you have Quicktime Pro, you can do this by choosing Save As from the File menu with the borderless movie open. Choose a file name and make sure you save it as a "self-contained movie", not a reference movie. The resulting file will still work fine if you delete the other files or move them about, meaning you can send it in emails or over the internet.
Now why would you want to do this I hear you ask? Honestly, there's no big reason apart from your movie will take up a bit less space and look a whole load cooler!
blog comments powered by Disqus