Use Email Aliases to Avoid Spam
The greatest benefit of these aliases is their ability to protect your main address from spam. For example, you can use an alias to sign up to websites, forums and newsletters. If the alias becomes flooded with junk mail, it is easy to just delete it and create a new one.
Mail 2.0 (bundled with Mac OS X) provides a simple way to manage your email aliases. In Mail, click on the Mail menu and chooses preferences (Command-,). In the Accounts tab select your .Mac account and click on "Edit Email Aliases." This will open up the .Mac Webmail preferences (You may be prompted for your .Mac password). Scroll down to the bottom where you can add email aliases and change their colours.
After you save the settings here, messages sent to the aliases will be forwarded to your .Mac inbox. Moreover, when composing messages in Mail, you have the ability to send messages from these aliases by selecting the relevant alias from the drop down menu.
Hide Accounts in the Login Window
If you are running Tiger, hiding user accounts that you rarely use is simple. Firstly, go to the Accounts pane in System Preferences, and find the "short name" of each user you want to hide. Once you have these, open up Terminal (Applications/Utilities) and enter the following:
sudo defaults write /Library/Preferences/com.apple.loginwindow HiddenUsersList -array-add shortname1 shortname2 shortname3Obviously shortname1 2 and 3 will be replaced with the short names of the user accounts you wish to hide. You can hide as many as you like, just separate each with a space.
To make a hidden name appear again, type the command with no names in it, therefore resetting the list of hidden users.
sudo defaults write /Library/Preferences/com.apple.loginwindow HiddenUsersList -array-addNotice that doing this adds an extra option to your login window - "Other..." When you select this, you will be presented with text boxes to enter a username and password.
If you aren't running OS X 10.4, another option is to completely get rid of this list of users. Go to the Accounts pane in System Preferences, and click on Login Options. There you will find an option to display the login window as name and password fields. This isn't as pretty, but saves time if you have lots of users, and is also more secure.
Set a Screen Saver as the Desktop Background
- Make sure you have a cool screen saver set (macresearch suggests the RSS visualizer)
- Open Terminal (found in Applications/Utilities)
- Type the following:
/System/Library/Frameworks/ScreenSaver.framework/Resources/ScreenSaverEngine.app/Contents/MacOS/ScreenSaverEngine -background - Look at your Desktop.
- To stop the whole thing and return your desktop to normal press Control-C (or Command-.)
There are a few things to look out for with this: Depending on which screen saver you are running and what mac you are running it on, this make take up a large CPU load. Also, your normal background will be shown when pressing F9 or F10 to activate exposé. Finally, if your screen saver starts (from a hot corner or by inactivity for a certain time) it will cancel the screen saver on your desktop.
Rectangular Selections
To do this type of selection, hold down the Option (alt) Key while the cursor is over a block of text in a cocoa application. Notice that the mouse arrow changes to a cross.
With the Option Key still held, click and drag to make a selection without the text up to the end of the line being automatically selected when you drag down over multiple lines.
If you want to do something particularly neat, once you have made a selection hold down the Command Key as well as the Option Key, which will allow you to make another selection somewhere else in the document, whilst keeping the first block of text still selected.
This works just about everywhere you are able to edit text, including Microsoft Word (although the cursor doesn't change to a cross) and text boxes in Safari. As you would expect, it works in TextEdit, Mail, and all the other usual Cocoa Apps.
Move Outlook Contacts to Address Book
There are 7 methods mentioned:
1. If you have access to a PC, use a windows program called OutPort
2. Do it via Netscape Communicator
3. Use a program called ABFiller, which is very simple a straightforward
4. Converting to vCards if you have Outlook 2003
5. A more complex trick, using terminal to customise things
6. Importing CSV files to Address Book
7. Importing via Thunderbird
Altogether, these tips should allow you to import contacts into address book in just about every situation.
Seven Simple Safari Shortcuts
1. Use Tabs
This feature is arguably one of Safari's most useful, but, surprisingly, it isn't turned on by default. Tabbed browsing allows you to cut clutter by opening multiple web pages in one window. A tabs bar appears below your bookmarks bar, allowing you to switch between different web pages in the same window. To enable this, Go to Safari --> Preferences, and click on Tabs. Then choose "Enable Tabbed Browsing." Now Safari has a whole world of new abilities. Command-Clicking a link or bookmark will open it in a new tab. You can use your keyboard to quickly cycle between tabs. Even dragging links onto a tab or the tab bar will open it in a different tab. Command-W will just close the tab you are on, and Command-Option-W will close all tabs but the one you are on.2. Visit www.pimpmysafari.com/
This site has all the great plug-ins, bookmarklets and applescripts that allow you to enhance Safari. It promotes three plug-ins as the essentials: Saft, Pithhelmet and SafariStand, saying "If you only install three, make it these". Note that although much of the stuff on Pimp my Safari is free, some is shareware, which means you will have to pay to access all the features.3. Use Snapback
The Snapback button is not very well known, but is extremely powerful. Imagine you are at a page you really like, but then you stumble off, browsing the web. Snapback allows you to instantly jump back to your original page. It works in three ways:Firstly, when doing a google search, the results page is set as the snapback page. You can click a link in the results, navigate though a few more pages, and then hit the Snapback button to return to the search results. The snapback button for google searches is located in the google search field in the top right of each window.
Secondly, when you type a URL into the address bar, choose a bookmark or click an item in your history, it will be set as the snapback page. The snapback button to jump to this page is located at the far right of the address bar.
Finally, you can override the automatic snapback setting, and press Command-Option-K to set a page for snapback. This can also be accessed through the History menu, choosing "Mark Page for SnapBack."
Note that Snapback is a temporary thing. The page assigned for trackback will only last until you do one of the above things.
4. Autofill Passwords
Safari's autofill feature can do anything from remembering passwords to automatically filling your your name and address from your Address Book Entry. To make Safari automatically remember a password for you, enter it yourself, and click "yes" when safari offers to remember it for you. If you have already selected "Never for this Web Site" in the past, check out this tip for if you have changed your mind. You can manage all of your passwords in Keychain Access (Applications/Utilities). The way keychain access works is that all of your passwords are accessible by using just one password, by default, your login password. As a result, most web site passwords will just appear automatically on a web page, as the "login" keychain is unlocked when you log into Mac OS X. Use the search field to find the web site you want the password for, and double click its entry. Under Attributes, click show password, when you will be prompted for your login password.5. Combine RSS feeds
One of the great things about using Safari as an RSS reader is the ability to make a folder of RSS feeds from related news sites (for example, all the mac tips sites I visit regularly) and setting it to Auto-tab. Then, when you click on the folder, Safari will combine all the RSS feeds and give you a list of the latest news from all the sites in the folder.6. Make web Receipts
The PDF Services button in the Print dialog can be used throughout Mac OS X, but it is especially useful in Safari. This is because of the shortcut to the web receipts folder. You know those important pages, like your bank statement and the receipt from buying something online, that recommend you to print the page. Well Web receipts is an easier alternative. Press Command-P as if you were going to print the page, but then click on PDF and select "Save to Web Receipts Folder..." This will create a PDF of the page in Documents/Web Receipts, a handy place to store all your important information should you need it. Also, Branin Johnson sent in this tip regarding Web Receipts with the same name getting overwritten.7. Use pop-up blocker
A really obvious one, and a popular one. With the pop-up blocker enabled (Go to the Safari menu, and select "Block Pop-up windows") you can almost forget that pop-ups exist. However be wary that although most pop-ups are annoying adverts, some contain useful information. If you come across a web site that doesn't seem to be working properly, or you think you might be missing some information, temporarily turn of the pop-up blocker and check to see there isn't a useful pop-up window.Super-fast Printing in OS X
However, right now I have just read this tip on the Apple Pro tips site, explaining how to print even more quickly. It can be done by Right-Clicking (Control-Clicking) on the file, and choosing Print from the contextual menu. This won't allow you any of that drag 'n' drop goodness that the other method gave, but it definitely is quicker, especially if you have a two button mouse. What's more, it doesn't require you to set anything up.
The one drawback of this method I can see is how multiple printers are handled. If you have more than one printer, say a colour inject and a b/w laser, you might prefer the desktop printer method, which allows you to drag you file onto the printer of your choice. I don't have multiple printers so I can't confirm this, but I imagine that the contextual menu will just print from your default printer.
Mac OS X keyboard shortcuts
Browsing a Site with the Title Bar
You could always click the back button over and over again, but this is a fairly laborious method. Clicking and holding the back button will give you a list of all thepages you have been too, but only by title.
If you Command-Click on the title of the page in the title bar of the Safari window, a list will pop up with all the pages above your current location in the file hierarchy. If, for example, you are on http://www.apple.com/findouthow/mac/, Command-Clicking on the title bar will display:
http://www.apple.com/findouthow/mac/
http://www.apple.com/findouthow/
http://www.apple.com/
This gives you a quick way to navigate back to a main page of a site.
Full Keyboard Access
Under the "Full Keyboard Access" section at the bottom, choosing "All controls" will allow you to focus on things like pop-up menus and buttons too.
Now, when a dialog box opens up, there will be a faint halo around one of the buttons, which you can move by pressing the tab key. Pressing the space bar will select whatever has the focus. The up and down arrow keys now navigate menus, and right and left arrows for folders and subfolders.
Drag and Drop Bookmarks
This is a much quicker way to fill your bookmark folders than using the Bookmarks menu, and also has a few other useful features. For example you can drag a URL into an unused place in the tab bar, it will open it in a new tab. If you drag a URL onto an already open tab, it will load the page in that tab.
URLs can be dragged from your files, links in web pages and from the location bar at the top of every safari window.
If you want to file your bookmarks away somewhere that isn't in the bookmarks bar, a quick way to do it is to click the bookmarks icon at the far left of the bookmarks bar (or press Command-Option-B) while you are viewing the page you wish to save. Then, when the bookmarks page is open, the URL will stay in the location bar at the top. You are now able to drag and drop that into any folder you wish.
Essential Tips for Podcast Lovers
This contains everything a podcast junkie needs: Tips on finding and playing podcasts, managing your subscriptions and sharing them.
If you are still not with this newfangled podcasting stuff, take a look at the Podcasting FAQ.
Stop screen burn
Commonly referred to as screen burn, this used to be a major problem with CRTs that displayed the same image for a long while, and it got "burnt" into the screen so that it was permanently displayed.
Many people think that LCD displays are unable to get screen burn, but actually they can. Manufacturers call these faint remnants of an image "persistence". However it is quite easily solved, as detailed in the Apple article.
To avoid screen burn, set the energy saver preferences to turn off the display when not in use. To try and remove persistence, create a slideshow screensaver with one white photo, and display it until the persistence is gone.
Send SMS messages from iChat
Then enter the mobile phone number, which requires the country code. For example, type +1 followed by the number. I am unsure whether numbers from outside the USA are supported. Once this is entered, chat away.
After sending the SMS, you will receive a confirmation that it was sent.
Translucent Icons for Hidden Applications
I know a lot of people who use only use the minimize function to hide windows that they aren’t currently using. I really don’t like this, as it’s not really usable via the keyboard, and it doesn’t work well with the Command-Tab application switcher. Instead, I use the hide function by pressing Command-H to hide active application. That is, all the windows of the program will become invisible and allow you to see the application underneath, or the desktop. This can also be achieved by choosing hide from the menu with the name of the application. To show the windows again, just click the application icon in the Dock, or switch back to the application by using the Command-Tab switcher.
One drawback of this method is that there is no way to tell that an application is hidden by looking at the dock. Unlike when you minimize, the windows don’t appear on the right-hand side of the Dock. The application icon also remains fully visible, unchanged from when the application was in view. With lots of applications open, it gets quite hard to tell which applications are hidden and which aren't.
By modifying a hidden setting, you can make the Dock show which applications are hidden by displaying them as a semi-transparent icon. To do this, open up the Terminal (located in Applications/Utilities), paste in the the following line and press Return.
defaults write com.apple.Dock showhidden -bool YESFor this change to take place, you have to relaunch the Dock. There are a few ways of doing this, but seeing as we are already in the Terminal, the quickest way is to just type `killall Terminal` followed by Return.
To cancel this change, and return the icons to normal, repeat the above command in the terminal, but replace YES with NO.
Cancel a shut down command
This isn't a perfect solution and won't always work, but it is definitely worth trying if you suddenly remember you have to do one last thing before you shut down. The best conditions for this seem to be when you have lots of open applications and when the shut down seems to be taking quite a while.
From the article:
Have you ever told your machine to shut down, and then remembered that you had one last thing you wanted to do—send an email, check the weather forecast, or pay a bill online, for instance? Once the shut down process has started, it seems you’re out of luck—there’s no obvious way to cancel a shut down command.
However, there are two things you can do that will prevent your machine from shutting down. Either one should work, assuming you have enough open applications that the shut down process is taking a bit of time.
Drag 'n' Drop Printing
The settings to do this are in the Printer setup Utility, which is accessible through System Preferences. Load up System preferences (from the Dock or in the Apple Menu) and choose Print and Fax. Once this preference pane has loaded, click the Printer Setup button, which will load up a Printer Info dialog. Now press Command-L to show the printer list.
Your printer(s) will be listed here. Select the printer you want to use, Go to the Printers menu and choose "Create Desktop Printer..." This will bring up a dialog asking where you want to save it. An ideal place is the desktop, which allows easy access, or a folder containing all your printers if you have more than one.
Clicking save will create an icon for your printer in the loaction you have chosen. To print a file, just drag and drop it onto the icon. Many documents will just instantly print, however others will launch the application and open up the Print dialog for you.
Note: Some stages of this process can be very slow if you are using shared printers. Be aware you could be waiting with a spinning beachball for a while if your network is a little slow.
Web Receipts PDF Services
The Save to Web Receipts option in the print dialog box overwrites other documents with the same website name. There is an easy way around it however, there is an automator action controlling this function.
Save PDF to Web Receipts Folder.workflow is located in the /Library/PDF Services folder of the root of the hard drive. I added two lines to this file that would append the date and time to the filename. Now, pdf files of websites with the same site title, will have unique files in the web receipts folder.
You can easily modify all of the scripts in that folder to add additional functionality to your print dialog boxes.
Here's the modified file: http://www.braninjohnson.com/downloads/Save PDF to Web Receipts Folder.workflow.zip
The automator workflows are stored in the Library at the root level of your hard drive, not in your individual user library. As a result, this will change the way the web receipts function works for all users on your mac, and will require a administrator password to change. As usual I recommend creating a backup copy of the old file before you replace it with anything, just incase everything goes pear-shaped.
Top iCal Tips
The list of tips includes ways of getting the most out of iCal, organising multiple calendars and scheduling a "dash," a way to prevent procrastination.
Use the Sidebar like the Dock
You can customise this sidebar by adding icons to it, such as commonly used applications and folders. For example, if you use iMovie a lot, open your applications folder, find iMovie and drag it to a position in the sidebar. Notice how the other icons shrink and slide away to make room for the new icon.
You can use this icon just how you would use it in the dock: Click on it to open the application, drag a file over it to open it in the application, and just drag it out of the sidebar to watch it vanish in a puff of smoke.
Reveal in Finder
Less obviously, Command-Clicking on an icon in the Dock will do just the same. But it doesn't end there. Command clicking has a similar effect when clicking icons in other places.
For instance, in the title bar of any cocoa app, you will see the name and icon of the open file. Command-Clicking on the icon brings up a list of all the enclosing folders.
Another example that could save you hours of wasted time, is command clicking spotlight results. This one is especially useful, as the other option (clicking on show all, finding the result, right-clicking and selecting show in finder) takes a long while in comparison.
Universal Access
While the preference pane is useful for browsing through the features, all parts of it are accessible through keyboard shortcuts, which are a much quicker way of turning the features on and off.
Firstly, you can invert the display by pressing Control-Option-Command-8. This changes most windows from black writing on a white background, making your display look much more funky. Pressing the keyboard shortcut again will change your screen back to the way it was.
Secondly the zoom function can be enabled and disabled by pressing Command-Option-8. Once enabled, this allows you to press Command-Option-Dash(-) and Command Option-Equals(=, also has the + on it) to zoom in and out. These are the two keys next to the delete key, not the ones on the keypad to the right. I could see this being especially useful when giving a presentation or tutorial if you want to highlight a particular area of the screen.
Drag-n-drop with open/save dialogs
Instead of painfully clicking through each level, you can just drag the folder from the finder straight into the dialog box. The open/save dialog instantly changes to display the contents of the folder you just dropped on.
Obviously you can use all the usual tricks with this, like Command-Tab to switch over to the Finder and back again, and exposé to find the window you want, but there are also a few extra quirks. For example, dragging any file to the dialog will display the enclosing folder, and you can also drag the folder icon from a Finder window's title bar.
App Switching in Exposé
Once you have started exposé (by pressing either F9 or F10) you can cycle through your open applications by pressing the tab key. Each time you press it, the current application is hidden and the windows for the next one pop up.
As with most things in Mac OS X, the way to do things always turns out to be beautifully simple and what you would expect. As a result, pressing Shift-Tab cycles through the open applications in the opposite direction, just the same as if you were "tabbing" through anything on your mac.
Folder Actions
This is a feature of the Finder that very few people use, yet it is so powerful. Folder actions allow you to perform an action to any file that is dropped into the folder. What you can do is only limited by what you can script, or what scripts you can find.
Start by creating a new folder and checking that folder actions are enabled by right-clicking (control-clicking) and selecting “Folder Actions Setup”.
Next, choose a script from the list to attach, or press the plus (+) button to navigate to one of your own scripts. Also, make sure the “Enable Folder Actions” checkbox is checked.
Most of the example scripts involve image manipulation and converting from one file format to another. Selecting one of these format converting scripts will mean, for example, that all jpeg images dropped into the folder will be turned into tiff images.
However, as I mentioned at the start of this tip, this is only a taste of what you can do. Any applescript, automator workflow or shell script can be attached, and therefore the possibilities are endless!
iTunes Playlists
In the later versions of iTunes, just right-click (control-click) on the song and choose "Show in Playlist". This will bring up a list of all the playlists that contain that song. Neat.
To work the other way around, and with multiple playlists, you can create smart playlists to find songs that are in a number of playlists you specify. For instance, create a new smart playlist and set it to match all the conditions, which are something like; Playlist is 60s tunes, Playlist is Happy Mood, etc.
Font Scaling
Most cocoa applications have the ability to scale fonts mathematically. This means that you can resize a selection of text containing different sizes while keeping the relative sizing between fonts. It also means that if you want all the text on a page a little bit bigger, instead of selecting each size and changing it a bit bigger (the 12 point to 14 point, the 16 point to 18 point etc.), you can just do it relatively.
Select all the text in your document and open the Font panel ( Usually Format->Font->Show Fonts) and enter "*1.2" or another mathematical expression. The example given will multiply all font sizes by 1.2, but you can do anything, like "/2" to half the size, "*.0.75" to get 75% of the original size.
Also its worth pointing out you can also use addition and subtraction to change the point size, but that won't make the fonts scale relative to each other.
Run a widget without installing it
However, in some situations you don't want to move the widget. For instance if you are trying out a widget and don't know if you want to keep it, or you are developing a widget and are just testing it out. To stop the widget being installed, hold down Command and Option while double-clicking it. Instead of an install button, you are presented with Run, which, funnily enough, allows you to run the widget without installing it.
Clicking this opens the widget up in dashboard, but it isn't moved to the widgets folder, instead running it from wherever you downloaded it to.
As a result the widget won't be in your dashboard bar, so it is a nifty trick if you want to save scrolling through loads of widgets (especially if you are a dashboard addict). This also means that once you have closed the widget, its gone for good, and you can't open it up from within the dashboard. Of course its still sitting in your downloads folder, so a quick Command-Option-Double-Click will have it open and running again.
Finder Column View
By default, columns are relatively thin, and quite often file names get truncated and aren't always easy to read. This is solved by holding your mouse over each name and waiting for a yellow box to come up showing the full name. Instead of holding your mouse there for a long time, simply hold down the option key to get the yellow box to appear instantly. You can even let go of the option key while you move the mouse up and down a list of shortened filenames.
The best place to use this is in open/save dialog boxes, as that is where I find columns get squished the most.
Another option to use is to double-click the "handle" at the bottom of the column, which is usually dragged to resize it. This will automatically resize your column to fit the longest name in the folder, resulting in no shortened names. Moreover you can option drag the column handle to change the default column width, which the finder will remember next time you open a window.
Undo Preventing Safari Autofill
Once it has been clicked, Safari refuses to remember any passwords for that website, which can get to be a lot of hassle, especially if you visit the site daily. Luckily there is an easy fix for this, which lies in Keychain Access.
Firstly, open up Keychain Access (Applications/Utilities) and look for the site address in the "login" keychain. In the list you will see an entry that looks something like this:
www.examplesite.com (Passwords not saved)
Just delete that item from the login keychain, and then restart Safari. The next time you enter your unsername and password on that site, Safari will prompt you to save it.
Zero-Out Free Space
First open Disk Utility in /Applications->Utilities. Then select the hard drive partition on the left of the screen, select the erase tab, then click "Erase Free Space". Choose which option you want (the first option is usually enough) and click the "Erase Free Space" button. The process can take anywhere from an hour to quite a few hours depending on your hard drive size, and the amount of free space.
During the process a "You are running low on disk space" warning may pop up, just click OK on this and ignore it. That message is suppose to pop up. Disk Utility zeros out the free disk space by simply making a giant file that is nothing but zeros.
Warning: If you become impatient or worried and cancel the process when it is being done, you may have to restart and empty your trash in order to recover disk space. This will delete the giant file Disk Utility creates in order to zero the disk space. Despite what numerous forums claim, this process is very safe, and will not harm your data under normal circumstances.
Hidden Unix Games
ls /usr/share/emacs/21.2/lisp/playinto a terminal window (terminal is located in Applications/Utilities)
To play the games, open a new terminal window and type “emacs” and hit return. Once in emacs, press Esc then x to get to the prompt. Now you can type any of the files in the list to play them.
My favourites are:
snake, tetris and pong, the old classics.doctor, a shrink in your mac (he/she isnt that helpful, unless you threaten to commit suicide)life, one of the first screen savers.dunnet, an old text based game where you can explorezone, makes the text on your screen go crazyHave fun!
Create Zip Archives On The Fly
To create a zip archive for a folder, file, or a selection of folders or files, select them, right-click (or Control-Click) on one, and choose "Create Archive".
This will automatically archive your selection into a zip file, ideal for storing away, sending via email or to save space.
Taking Screenshots
To take a screen shot, hold down the following keyboard shortcuts.
- shift + command (the Apple key) + 3 for a shot of the entire screen.
- shift + command + 4 for a way of clicking and dragging around the area you want a shot of.
- shift + command + 4 then press space to be able to click on a window or other interface element (menubar, dock, icons etc.) to take a screen shot of that.
Easy enough. Each of these saves a file to your desktop named "Picture 1.jpg" (or a higher number if the file already exists).
If you want to take a screenshot using the Terminal (Macintosh HD/Applications/Utilities) here is how. Just type the commands in (except the quotes).
- "screencapture ~/Desktop/screen.jpg" Takes a full screen shot and save it to screen.jpg on your Desktop.
- "screencapture -iW ~/Desktop/screen.jpg" Same thing as #3 above, just click a window to take a screenshot. If you push space it will go into mouse selection mode (same thing as #2 above).
Grab (Macintosh HD/Applications/Utilities) can also be used to take screenshots. It provides an easy user interface, as well as a way of doing timed screen shots and changing the mouse pointer style (option located in the preferences).
Word Completion in Cocoa
There are a number of different ways of doing this however. In certain places it isn't possible to press escape, because it does something else (like clearing the Google search box in Safari). In these cases you can use Option-Escape, or just press F5. These two alternatives may take a little longer, but seem to work everywhere.
So now if you can't spell something, you don't have to attempt the whole word, just put in the first few letters and let the system spelling dictionary do the rest.
Kill Accidentally Opened Applications
Do you ever accidentally click the wrong icon when choosing an application from the dock? Normally this wastes valuable seconds waiting for the application to launch and then choose quit. However there is a nice shortcut.
As soon as you have clicked the wrong icon, right click on it, and select force quit. This will allow you to kill it before it slows down your system.
If you aren't quite as quick, and the application has started loading, sometimes the contextual menu will say quit instead of force quit. To get around this, hold the option key, and quit will change back to force quit.
Speed up iPhoto
Open up iPhoto and go to the Preferences. Choose Appearance. If you uncheck Outline and Drop shadow, then slide the background all the way to white, you should notice that iPhoto starts up a lot quicker. This mainly helps with iPhoto 5's performance, as iPhoto 6 is already much snappier.
If you still find iPhoto to be slow, try holding down the command and option keys while its starting up. A diolog box should load up, asking if you want to rebuild your photo library. This has the greatest effect if you have a very large photo libary.
One final tip is to press 0, 1 or 2 while in your library. This sets your photos to one of the 3 default sizes, which load a lot quicker than the custom sizes you get when dragging the slider.
Now your iPhoto library should scroll like butter!
Scheduled Startup and Shutdown
This is just about the only way to schedule things without buying other software or using iCal. Basically you can set your computer to come on in the morning on weekdays and go off in the evening for example.
I combine this with a locked screen saver. In the evening I start my "Big Clock" screensaver, then put my mac to sleep. In the morning it wakes up at a specified time, and loads the password dialog box. Then, when no password is typed in, it goes to the screen saver after 30 seconds. This means when I wake up in the morning I can look over and see the time in big bright letter next to me, without them on all night to wake me up.
You can also combine this with an applescript or automator actions to play music or load web pages every morning. After writing the script to do this, set a daily alarm in iCal that loads it every morning, but make sure to make it a minute later than the time your mac wakes up from sleep.
Stop Rippling in iMovie
To temporarily stop rippling from happening, hold down the Command key while doing an edit. This will stop all other clips from moving, so any gap you create in the timeline will appear as blank space.
If you want to extend a clip and trim the next one along, you can do this in one process by disabling rippling. Hold down the Command key and drag one clip over the next one along. Normally this would push the next clip along, but with rippling disabled, it overwrites that portion of the underlying clip.
Keyboard Shortcuts
On a laptop the use is printed on the keys - keyboard brightness, sound volume and display brightness. On a desktop however, the only keys that show you what they do are the volume settings. F14 and F15 control the display contrast, so pressing Option-F14 (or F15) will take you to the display preferences. Of course desktops don't have backlit keyboards, so you can't do that one.
Sleep, Restart and Shut Down also have their own keyboard shortcuts. To put your computer to sleep, press Option-Command-Eject. To Restart, press Control-Command-Eject. To Shut Down, press Control-Option-Command-Eject. These are obviously very complicated to make sure you don't accidently press them whilst doing something else.
Application and Window Switching
This isn't everything though. Continue to hold down the Command key after releasing tab, and the icons of all your applications appear across the middle of your screen. Press tab again whilst still holding Command and you can cycle through all open applications.
But there's more! Whilst still holding the command key, pressing Q will quit the hilghlighted application, and the list of open applications will remain active. Now you can use tab to move along the list and hitting Q will quit further applications.
Likewise this can be used with H to hide applications, and ~ to cycle through in the reverse direction.
Thats Application switching sorted, but a small development of this is a keyboard shortcut for window switching. This is less known about, and it involves pressing Command-~ (tilde) whilst in an application with multiple windows open. It doesn't bring up the screen display of open windows, but merely cycles through all open ones.
I find these shortcuts are sometimes a faster and easier alternative to the F9 and F10 of Exposé.
Icon Sidebars
Some people will choose to disable the sidebar completely by double-clicking on the divider turning off the toolbar completely (command-option-T) if they want to save space, but there is another option.
You can drag the divider bar until only the icon shows, there should be a point where the bar jumps into place. Now don't worry that you can't tell what the icons are, because putting your cursor over any of them brings up the name. If you still want a way to distinguish between them, try adding custom icons for each item.
Excel Tips
To insert the date as a time stamp (i.e. it won't change next time you change the document) press Control-Semicolon ( ; ). To insert the time, press Control-Shift-Semicolon. If you want a date and time that updates, type
into a cell.=NOW()
Here's a quick way of making pop-up menus: Enter the pop-up choices into a series of out of the way cells. For example Oranges, Apples, Lemons, Pears into K1 to K4. Click on the cell you want the pop-up menu in, and in the Data menus choose Validation. Click on the Settings tab and choose List from the Allow pop-up menu. In the Source box that appears, enter your data range For example,
and click OK.=J1:J4
To tidy things up, select cells J1 to J4 and choose a white text colour to make them invisible.
Cycle Between Tabs
In Safari and Firefox this is a piece of cake. Pressing Command-Shift-Left Arrow (or Right Arrow) in Safari will cycle through all your open tabs.
In Firefox its Command-1 through to Command-9, for the first nine tabs at least. Confusingly these are the same shortcuts Safari uses for the first nine bookmarks. If you have more than nine tabs open, Control-Page Up and Control-Page Down Will let you scroll through them.
Use your Mac in Slow Motion
If you want to see any application do something in slow motion, hold down the shift key and see if it works!
Do things in the background
For example, command-click a link in an email. Safari opens up in the background, without disturbing your reading, allowing you to go to the page later.
This also extends to moving, closing and resizing windows. If you can see a Finder window behind your iTunes library for example, command-clicking on close, minimize or holding command whilst moving or resizing performs the action without switching to the finder, instead staying within iTunes.
Easy Dictionary Access
It is possible to access the Mac OS X Dictionary and Thesaurus from any Cocoa application (Mail, TextEdit, Safari, etc.) using a simple keyboard shortcut.
To access the dictionary, place the mouse cursor over the word you want to look up., and press Command-Control-D. a small window pops up giving you a quick definition, and you can easily select thesaurus or Morefor more information on a word.
To look up multiple words you can just move the mouse whilst keeping command and control held down (you can release D).
Sync Junk Mail Training Data
Apple offers a great way to sync all of your data via .Mac, keeping your email messages, keychains and bookmarks up to date on all your computers. However it doesn't allow you to sync or back up your Junk mail filter training data. Moreover, this isn't stored on the IMAP server either, meaning it is very much stuck on one computer.
While you can't keep your junk filter training data syncing automatically, you can manually copy it from one mac to another.
Go to your user folder and navigate to Library -> Mail. Copy the LSMMap2 file to a backup or another mac. Before overwriting the existing LSMMap2 file on the second computer, you may wish to temporarily copy it to the desktop, just in case everything goes pear shaped (i.e. you copy the wrong one).
Quick add to address book
Some people make it a habit of adding everyone who mails them to their address book, something that happens automatically in services such as Gmail. In Mac OS X Mail this is possible through a simple keyboard shortcut.
When reading an email, press Command-Y to add the sender to your address book straight away. Mail will even add the persons name, as it appears in the From field. To add more details like a picture or address you will need to actually open up address book separately though.
Gmail in Mail.app
GMail allows you to use IMAP to access your email using the Mac Mail application. This means that your emails will be synced between your Mac and the GMail servers, so if you read, delete or move an email, the changes will be visible if you log in using another computer.
First you must enable IMAP access in the Gmail settings. Go to your Gmail inbox at http://www.gmail.com and click the Settings link in the top right. Go to the Forwarding and POP/IMAP tab, Enable IMAP, then click Save Changes.

Now switch to Mail and choose “Add Account” from the File menu. Type in your name, email address and email password, then click Create. Mail should do the rest of the work for you, and create your account.
If you want to modify an existing account, these are the settings to use:
Account Type: IMAP
Description: Gmail (or something similar)
Full Name: Your Name
Email Address: Your GMail address
Incoming Mail Server: imap.gmail.com
User Name: Your GMail address
Password: Your Gmail Password
Make sure Use Secure Sockets Layer (SSL) is checked.
For the outgoing mail server:
Server Name: smtp.gmail.com
User Name: Your GMail address
Password: Your Gmail Password
Make sure Use Secure Sockets Layer (SSL) is checked.
Hotmail in Mail.app
This article is old and out of date. There is an updated version here.
Whereas Gmail is fairly open and easy to implement into Mail.app, Hotmail is slightly more complicated if you don't have a Hotmail Plus account. Hotmail Plus offers access to your mail through Mail.app, and there is a workaround for standard Hotmail accounts, using FreePOPs.
If you have an MSN Hotmail Plus account, you can easily access your mail through Mac OS X Mail by installing the HTTP Mail Plugin.
Once installed, open mail and go to Preferences -> Accounts and create a new account with the following details:
Account Type: httpmail
Description: Hotmail (or something similar)
Email Address: example123@hotmail.com (your hotmail address)
Full Name: Your Name
Incoming Mail Server: hotmail.com
User Name: Your hotmail user name
Password: Your Hotmail Password
Outgoing Mail server: None
Close the window and Save the Account.
PDF Services
By now, most people know about the PDF button in the Print dialog box. It allows you to "print" web pages, receipts, recipes etc. to a PDF file, a useful way of archiving things.
This is useful, but the PDF services are even more extendable. You can create aliases to folders to go in the menu that appears when you click the button, allowing you to automatically archive items to specific folders without navigating through your entire file system.
First set up folders, possibly within your documents folder. For example have one for web receipts, one for recipes, one for important emails etc. Next, go to your library folder, located within your user folder, and create a new folder named "PDF Services" (if you don't already have one).
Now add an alias of each of the storage folders within this PDF services folder. This can be done quickly by holding command-option and dragging the folders to the PDF services folder.
Now if you select print in any application, clicking the PDF button will reveal options to save in each of your folders.
For the more adventurous users, try adding aliases of applications such as Mail or Preview, and see what happens!
Email Bookmarklet
Note: Safari now has this feature — just look in the File menu. For more features check out this Safari Extension.
One feature that Safari lacks is the option to email a web page to someone. This can easily be done by creating a bookmarklet to place in the bookmarks bar.
A bookmarklet is a small piece of Javascript that you can save as a bookmark and reuse. For the email page bookmarklet, enter the following into the address bar in Safari:
javascript:location.href='mailto:?SUBJECT='+document.title+'&BODY='+escape(location.href)
Now drag the globe icon at the start of the URL to the bookmarks bar, and name the bookmarklet "Mail this page" or something similar. When you click it, your email client will open with a new message containing the web address and the title of the web page. Now all you need to do is choose who to send it to.
Word Password Workaround
If you find yourself with a Microsoft Word document that is read-only password protected and you don't know the password, there is a work around to remove the protection, and allow you to edit the document again. Note that this only works on documents that you can open but can’t edit.
First open the document, and save it as a Rich Text Format (RTF) file. Close the file and then reopen it again in word. Go to the Tools menu and select Unprotect Document, and now the password is no longer required. Finally save the file as a word document again.
Hidden File
Heres an unexpected file hidden in the Mac OS X system files.
Go to the Finder's Go menu, and select Go to Folder. In the window that appears, type:
/System/Library/Frameworks/Python.framework/Versions/2.3/lib/python2.3/test/
and hit Go. In the window that opens, double-click on the audiotest.au file and voilà!
Multiple Desktop Images
In the System Preferences it is easy to make your desktop cycle through a series of images. Just open up System Preferences and click the desktop and screen saver section.
At the bottom of the desktop tab there is an option to change the picture for a given amount of time. With this selected, your desktop will cycle through the images in the iPhoto album or folder you have selected.
But what if you want a selection of photos that aren't in an album together, or want to use multiple albums? Open up iPhoto and click on any image. Clicking on the "desktop" button at the bottom will set this image as your desktop background. Select multiple images using shift-click (if they are in a row) or command-click (if they are separated by other photos), and click the desktop button. If you open up system preferences now, you can see that your desktop is set to cycle through these images.
An added quirk is that your screen saver is also set to make a slideshow of these pictures.
Remove the Dock
If you are are one of those people who hates the dock, you probably already know it is fairly easy to remove it for good. However when you do this you also lose other features such as Exposé, Command-Tab switcher and Dashboard. A much better solution is to move the dock to the top of the screen and then hide it - making it invisible, but still around.
The easy way to do this is to download a copy of Tinkertool (free) that allows you to modify lots of hidden preferences.
The more hardcore solution is to use the terminal. Before you start, make sure Dock hiding is off by going to the apple menu, choosing Dock then "Turn Hiding off" . Alternatively open up the dock section of system preferences and turn hiding off there, or control-click on the gap in the middle of the dock (or even press Command-Option-D).
Then launch the terminal (located in Applications/Utilities) and type
defaults write com.apple.Dock orientation -string top
and press enter. Nothing will happen at first, until you log out then in again or restart the dock process in Activity Monitor (also located in Applications/Utilities).
Once you do this you should see your Dock appear at the top of your screen, and all you need to do is turn hiding off again, and your Dock will be invisible, only activating if you hover over a very thin line below the menu bar.
Preview Multiple Fonts
If you work with lots of Fonts, sometimes you might want to preview them before installing.
Do this by double clicking on them in the finder or dragging them to the Font Book icon (in the Applications folder). Font book will open a new window for each one, with a large sample of the font. However these windows will cascade and overlap, so you can only see one at a time.
Using exposé (F10), you can spread out all the windows and preview all the fonts side by side. To install a font, click on its window to bring it to the front, then click install.
Clean up Web Formatting
Sometimes copying from websites or odd applications leaves your text with strange formatting, links and spacing when you paste it into word or TextEdit.
One way of clearing this up is using the Services menu, if your source application supports this. Start by selecting the text you want to copy. Then click on the menu in the top left that has the current application name, choose Services and then click Summarize. A new window will open and you will see a clean version of your text. Drag the slider to 100% so all your text is included, then copy to the clipboard and paste into your text editor.
An alternative method, for when you are pasting into TextEdit, or if your source application doesn't support the services menu, is use the make plain text option. Paste your text into TextEdit and choose Format -> Make Plain Text (Command-Shift-T). This should strip most of the formatting, and to be on the safe side you can summarize the text as well.
Finally, if you are pasting into an application that supports it, you can use the keyboard shortcut Command-Option-Shift-V or choose “Paste and Match Formatting” from the Edit menu.
Blocking Senders in Mail
Technically only your ISP can truly block messages from a specific sender, but you can get near enough using Apple's Mail app. This can be done by creating a rule that deletes messages from a particular sender.
Open Mail and go to the Preferences, located in the Mail menu, then click on the Rules section. Add a rule and give it a name (Blocked, Barred etc.) in the description field. Then use the pop-up menus to select all mail from an email address and set it to delete.
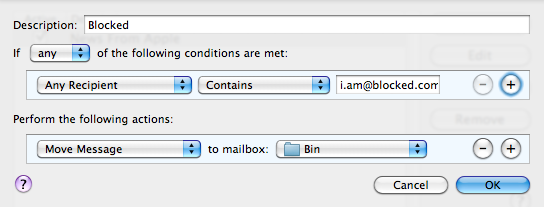
Alternatively make the rule move the message to another mailbox, so you can check though the emails just in case you ever change your mind.
Character Swap
In all cocoa applications (TextEdit, Mail etc.), two adjacent characters can be swaped by positioning the cursor between them and pressing Control-T.
This can be useful if you often end up typing "teh" and "becuase".
Multiple On-The-Go Playlists
To create an On-The-Go playlist on your iPod, navigate to a song, artist, album or genre then press and hold the centre button until you see the selector blink. Repeat this until you have chosen all the songs you wish to add to the playlist.
Next go to the playlists menu, and select On-The-Go, which should be at the bottom. You will see that there is a save option, select this and the playlist will be named Playlist 1. You can now create another On-The-Go playlist in the same fashion as before, but when saved, will be named Playlist 2.
Sort iPod Playlists
In iTunes and on your iPod it is impossible to sort your playlists other than alphabetically.
To sort your playlists you could just use punctuation marks, but a more interesting way of doing this is using hearts, stars and musical notes, which the iPod can also display.
Using the character palette, under International System Preferences and also accessible through the Input Menu, these symbols can be found in the Miscellaneous category of the Roman lettering. These don't just have to be for sorting your playlists, they can jazz them up too!
The iPod can't display more complex symbols, however this is actually even more useful. It leaves a blank space, but still sorts your playlists into the order of the symbols, meaning they are sorted in your own order, but without anything before them.
Auto-Tab Bookmarks
If you visit the same collection of website every day, this will save you making multiple trips to the bookmarks menu.
Launch Safari and make sure tabbed browsing is enabled. (In the Tabs section of Safari preferences make sure Enable Tabbed browsing in clicked)
Click on the bookmarks button and create a new folder, giving it a descriptive name. Copy/Move all your favourite bookmarks into it, and drag it to the bookmarks bar.
Then enable the "Auto-Click" option next to the folder. Now a small square will appear next to your bookmark folder instead of a downward arrow, and when you click it, each site will open in a separate tab.