Google Notifier's Hidden Features
![]()
One of the greatest benefits of this piece of software is its simplicity - just put in your Google ID and password and everything works. At times this makes the notifier look somewhat limited, however this couldn't be further from the truth.
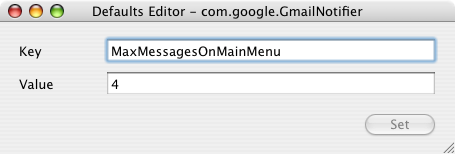
The first hidden feature is to customise the number of messages shown in the notifier menu. By default, the menu shows the last four unread messages received (or the last three received and an additional "View More" submenu). To change this, pull down the notifier menu and hold Command and Option while clicking on preferences. This brings up a hidden settings editor where you can easily edit the notifier preferences file.
In the "Key" field, enter "MaxMessagesOnMainMenu" and in the "Value" field enter the number of messages you want on the main menu. Click Set, and then quit and reload Google Notifier. Now when you click on the notifier menu bar item, you will see the number of messages that you set. To return to the default setting, repeat the prcoess, putting 4 in the value field instead of the number you entered last time.
The second trick can be done in much the same way. If you only want the notifier to fetch mail with a certain label, you can create a filter. As before, click on the notifier menu and Command-Option-Click on preferences. This time, in the key field enter "Label" and in the value field enter the name of the label you want to receive. To receive all mail, leave this field blank. And again as before, quit and reload the notifier for changes to take effect.
When you set these preferences, you are actually editing Google Notifier's preference file (Library/Preferences/com.google.GmailNotifier). If you want, you can load up this file with Property List Editor or TextEdit and changes things yourself (be careful!) or you can achieve the same effect using the Terminal (Applications/Utilities). For example the previous trick could be done by typing the following into the Terminal:
defaults write com.google.GmailNotifier Label -string “YOURLABELHERE”Finally you can extend Google notifier using plugins. I found the following on the Official Google Blog:
The Gmail Notifier supports plugins written in AppleScript, or full-blown Cocoa Bundles in Objective-C. Details about the Objective-C plugin API can be found inside the Gmail Notifier application bundle in the required header file, GGPluginProtocol.h (control+click Gmail Notifier.app -> Show Package Contents -> Contents -> Headers).
AppleScript plugins are written by simply implementing a handler like:
on NewMessagesReceived(messages, fullCount)
-- Your code goes here...
end NewMessagesReceived
To install, simply copy the script (plugin) to Library/Application Support/Gmail Notifier (create the directory if it doesn't exist), and restart the Gmail Notifier. An example of a great plugin for the Gmail Notifier for MacOS X is the Gmail+Growl plugin, which sends Growl notifications when new mail arrives.