Using Finder labels for tagging files and automating actions
Labels are a handy way to organise your files in the Finder by colour-coding their icons. Until OS X Mavericks is released later this year, they are a pretty good substitute for having a proper way to tag files in the Finder.
Adding a label to a file or folder is simple. Just right-click the icon and choose one of the coloured squares from the menu. Alternatively, you can select the icon by clicking on it, and choose the label from the File menu in the menubar.
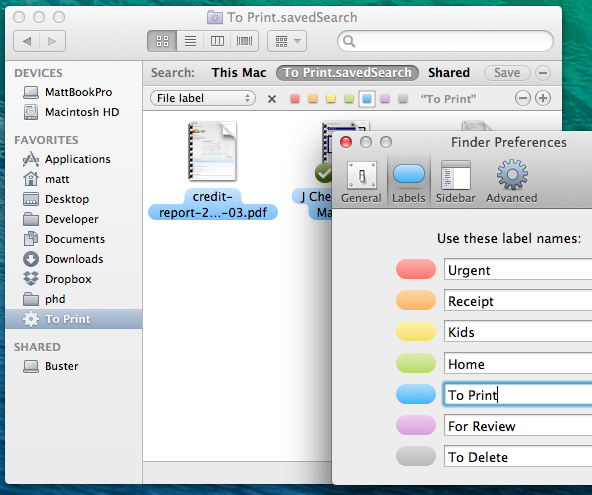
If you want to use labels a bit more like tags, it is possible to choose a custom name for each label colour in the Finder Preferences (under Finder in the menubar). Once you have done this, the only limitation compared to a real tagging system is that you are restricted to only having 7 different tags.
Using labels as tags can work really well in conjunction with Saved Searches (also known as Smart Folders).
Most people will have their documents organised into separate folders for each project, and will have separate folders for work and home files. But sometimes, for example, you might want to see all your receipts from all your different projects together, or all the files that you need to print. Instead of duplicating all your receipts into a separate “receipts” folder, you can just use labels along with a Saved Search that displays all the files with that label.
To set up the saved search, start by switching over to the Finder and choosing Find from the File menu (or type Command-F). Choose Other from the left hand drop-down menu, and choose File label from the list. Then just choose the desired label, and click the Save button to add the Saved Search to your sidebar.
Power users can take this idea even further using a tool like Hazel. Firstly, Hazel can automatically add labels to your files based on your own criteria. For example, automatically adding a red label to files that have been in the Downloads folder for more than a week, or adding a purple label to files that were downloaded from your bank website.
Secondly, Hazel can automatically perform actions when you assign a specific label to a file. For example, it could import MP3 files into iTunes if they you label them purple, or resize images to 800x600px and upload them to a server if they are labelled green, or run any AppleScript or shell script you want.
Bonus tip: You can quickly change the label of a file by dragging it into the section for a different label in the folder, as show in the screenshot below. For this to work, you must have your folder in Icon View, and have the folder Arranged by Label.
12 Tips for Finder in Mac OS X Lion

Looking through the list of new features in Lion, you might get the impression that Apple doesn’t want you to use the Finder anymore. Features like Launchpad, Versions and Resume all conform to the iOS philosophy of keeping plenty of distance between the user and the file system. As much as this might alarm expert users, it’s simply a natural acceptance of the fact that many users either doesn’t understand or doesn’t care about the file system. As John Siracusa writes (in his epic 19 page Lion review, which is well worth reading):
Fear of the file system practically defines novice users; it is usually the last and biggest hurdle in the journey from timid experimentation to basic technical competence. To put it another way, your dad can't find it if it's not in the Dock.
Even within Lion’s Finder, features like “All My Files” show all your documents and media in one place, with no information about what folders they are in. But even though the file system is a bit more hidden, it’s still there, and the Finder is still a powerful and useful tool for accessing it. In fact, I’d argue that the changes in Lion do little to hinder the expert user, while providing a huge improvement in usability for beginners. For experts and beginners alike, here are 10 tips to help you get to grips with everything that is new in Lion’s Finder.
Arrange by…
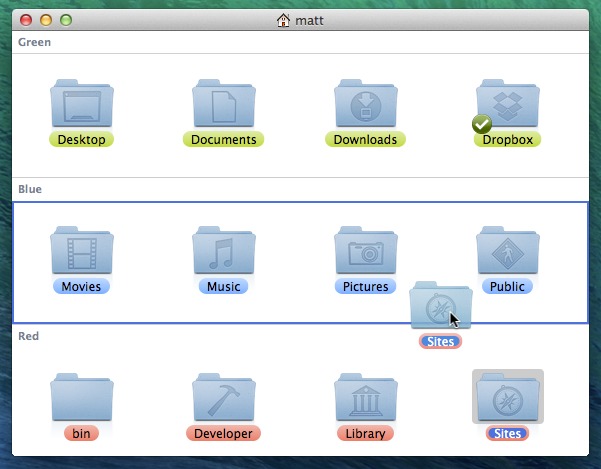
Lion introduces a cool new way to arrange your files when viewing them in the Finder. Either right-click on a window or go to the View menu and choose Arrange By to see all the available options. I personally find that arranging by Kind is the most useful, apart from in the Applications folder where a special Application Category option is available.
As you can see in the screenshot below, this groups your files according to the criteria you choose, and it works in all three view modes — icon, list and column. One of the most useful consequences of this is that it allows you to having all the folders positioned at the top of a list or column, a feature that has long been requested by Windows users.
All My Files
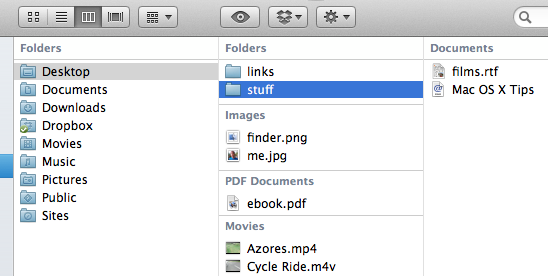
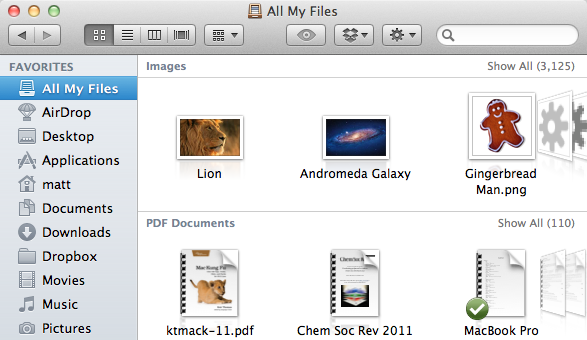
This is probably the most easily noticeable new feature in the Finder. Located at the top of the sidebar on every Finder window, All My Files provides an easy way to see all of your most recently used documents, regardless of where they are actually saved. They are organised by kind (e.g. images, PDFs, music) and each section has a fancy “coverflow” way of scrolling. You can get this type of display for any folder you want — simply use icon view, and then choose Arrange by Kind, as described above.
For those that are curious, All My Files is just a simple saved search, a feature that was actually introduced with Snow Leopard. You can still create your own custom saved searches in the usual way by performing a search in the search field in the top right of a Finder window and then clicking the Save button. In fact, if you were a keen user of the Today, Yesterday and All Images saved searches that appeared by default in Snow Leopard, you might want to re-create them.
If you don’t find All My Files that useful, it’s pretty straightforward to hide it away. The first thing you’ll want to do is remove it from the sidebar. Simply right-click on it and choose Remove from Sidebar. If you ever want it back, simply go to the Sidebar tab in the Finder Preferences and re-select it.
At first glance that’s all you need to do, but you’ll soon notice that every new Finder window now opens with All My Files displayed by default. To change this back to the Snow Leopard behaviour of showing your home folder, simply go to the Finder Preferences (located in the Finder menu) and change the New Finder windows show drop-down menu.
Sort by date added
Lion brings a useful new sort order for your files — date added. The one place this is especially useful is in the Downloads folder, where up until now it has been really tricky to sort files by the date they were downloaded. This option is available in icon, list and column view using the new Arrange by method described above, and also using the more traditional sorting in list view by clicking on the Date Added column heading.
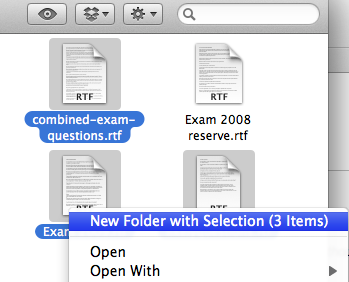
Group a selected files into a new folder
This feature appears to have been inspired by the method for creating new folders for apps on the iPhone and iPad. Whereas before you had to create a new folder, rename it, and then drag all the different files into it, now you can simply select the files, right-click and choose New Folder with Selection. All the items will be combined into a single folder, and the folder’s name will be highlighted, ready for you to type in whatever you want to call it.
You can streamline the process even more by using the keyboard shortcut, Command-Control-N. Now you can simply select the files, press Command-Control-N and type the name of the folder.
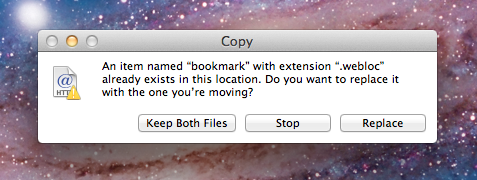
Keep Both Files
This is another little feature that will make you think, “Why wasn’t it always like that!” Up until now, if you moved or copied a file to a location that already had a file with the same name, you had two options: Replace or Cancel. Finally, after the best part of three decades of Mac development, Apple have finally realised that it might be useful to have an option to Keep Both Files.
Bring back missing sidebar items
While this has been a trend for a while now, in Lion more and more things are hidden or disabled by default to stop the UI getting cluttered with stuff that isn’t useful for the majority of users. One place where this will be obvious to more experienced users is in the Finder’s sidebar and on the desktop, where hard drives and connected volumes no longer appear.
Fortunately it’s no trouble at all to turn these back on. Simply go to the Finder Preferences (located in the Finder menu). Under the Sidebar tab you’ll find checkboxes for adding items back into the sidebar, and under the General tab you’ll find the same for the desktop.
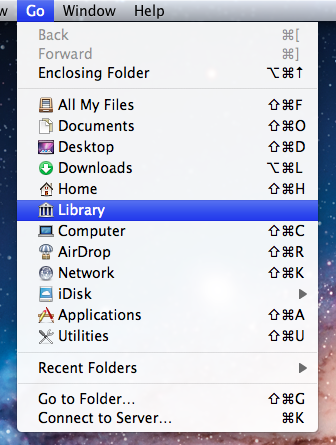
Access the Library folder
A lot of noise has been made about the fact that the Library folder inside your user home folder is now hidden by default in Lion. Even though you can’t just go to your home folder and click on it any more, there are still plenty of ways to access it. The easiest way that should be suitable for most people is to hold the Option key while clicking on the Go menu. This will make the Library folder appear in the middle of the list of places. If you want to permanently show the Library folder like in Snow Leopard, check out our article on every conceivable way of accessing the Library folder in Lion.
Copy and paste files
Before Lion, the only way to move files was to drag them to a new location, and hold down the Option key while dragging to copy them. Now, it is possible to copy files using the “Copy and Paste” keyboard shortcuts Command-C and Command-V. Users familiar with Windows might be annoyed that the “Cut and Paste” shortcuts Command-X and Command-V haven’t also been implemented for moving files instead of copying them. But don’t worry, this is possible. Just “copy” the file as usual using Command-C, but then use Command-Option-V when “pasting” to move the file instead of copying.
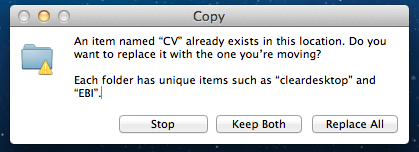
Merge folder contents instead of overwriting
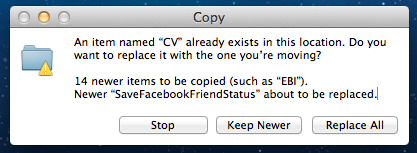
This feature works similarly “Keep both files” described above, but it’s specifically for when you try and move a folder into a location with a pre-existing folder of the same name. As well as the normal options of overwriting the whole folder or cancelling, you can now choose to merge the contents of the folders by clicking Keep both.
There are a couple of quirks to watch out for with this though. Annoyingly, it only seems to work when copying a folder, not when moving one. This means that you either have to hold down the Option key when dragging the folder, or use the copy and paste shortcuts described above. In addition, you have to watch out when merging folders containing files of the same name. If you do so, instead of the option to Keep both, you can now only choose to Keep newer, which means in each case where two files conflict, the file that was most recently modified will be chosen to overwrite the older one.
Bring back the status bar
When you first look at a Finder window in Lion, it looks different, cleaner, but it’s hard to put your finger on what exactly has changed. Probably the most significant difference is that the status bar along the bottom of each window is disabled by default. In general this is a good decision — it took up a lot of space to give very little information — but occasionally you will still want to quickly check how much disk space is available, or how many items are in the current folder.
While you can choose Show Status Bar from the View menu, I’d recommend a quicker method of simply pressing Command-/ to quickly toggle the status bar on and off every time you want to see it.
![]()
Search suggestions and tokens
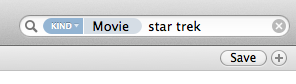
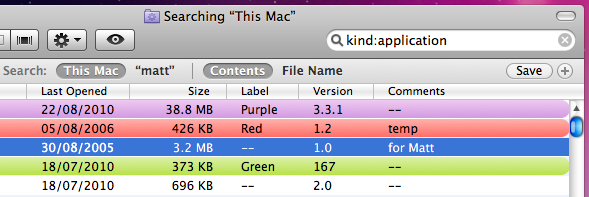
Finder’s search has been seriously revamped in Lion, offering some great new functionality. As always, the words you type into the search field in the top right of any Finder window are searched for everywhere — the contents of every document, the filename, the kind, as well as other specific meta data such as the album or artist for a song, or the name of a website a file was downloaded from. The changes in Lion make it much easier to filter your search to specific aspects of a file. As you type, suggestions will dynamically appear, asking you if you want to filter the results based on their kind, download source or the person who sent it to you.
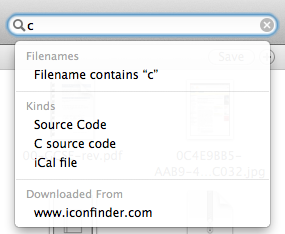
Choosing one of these suggestions creates a blue “search token” that instantly filters the search results. It’s also possible to combine multiple search tokens, and to combine search tokens with normal text queries that search everywhere. If you want to save some time, you can even type the tokens directly, for example using kind:Movie or from:Matt.
Duplicate Exactly
One way of discovering all the new things you can do in the Finder is to open up the menus (File, Edit, View etc.) and see what new things appear when you press the Option, Control and Shift keys.
One interesting change that is easy to miss is that Duplicate (Command-D) changes to Duplicate Exactly (Command-Option-Shift-D). So what exactly does it do? Surely the normal duplicate command is exact?
It turns out the difference is when duplicating files owned by different users (or root). The normal duplicate command will create a copy of the file owned by you, while Duplicate Exactly will make sure the duplicate is still owned by whoever owned the original file.
Similarly, when copying and pasting files, press Command-Shift-Option-V to Paste Exactly.
Resize windows like a pro in Lion
A great new feature in Lion is the ability to resize windows in a much more flexible way. Whereas Snow Leopard only allowed resizing a window using a “handle” in the bottom right corner of every window, in Lion placing your mouse near any edge of a window will result in a new “Resize” cursor indicating that you can resize the window from there.
If this wasn’t enough, there are a few other new resizing features that can make this even more useful.
Firstly, holding the Option key while resizing results in both sides of the window resizing equally. For example, if you have a full screen window and resize it by Option-dragging the left side in towards the centre, the right side will also move in by an equal amount. If you resize from a corner using this method, it essentially has the effect of anchoring the window by its centre rather than by the opposing corner as usual.
Secondly, holding the Shift key while resizing forces the window to keep the same proportions. This is similar to when you resize an image and want to avoid stretching it in one direction. If you double the width of a window, the height will be doubled as well.
Finally, you can use the Command key to resize windows in the background without moving them to the front. This has actually been around since before Lion, but it has become much more useful now you can resize windows from any edge.
Now, if you really want to be a pro, you can try using the modifier keys in combinations. You can also press and release Option and Shift at various points while you are already resizing to add and remove the constraints.
Bonus Tip: If you go to resize a window from an edge, but instead drag the mouse cursor in the wrong direction (i.e. drag up/down while resizing from the left/right edges) you can move the window around. This means you no longer have to only move windows using the title bar at the top.
Every conceivable way of accessing the Library folder in Lion
A lot of noise has been made about the fact that the Library folder inside your user home folder is now hidden by default in Lion. Even though you can’t just go to your home folder and click on it any more, there are still loads of other ways to access it. Here’s every single method we could think of to show the Library folder, either on a temporary or permanent basis.
What is the Library folder for?
First, a quick recap of what the library folder is and why you might want to access it. Mac OS X actually has three different Library folders:
- One located at the root of your hard drive
- One located in a folder called System at the root of your hard drive
- One located in every user’s home folder
The purpose of all three Libraries is to store files that are used by applications and the system that users generally doesn’t interact with directly. The System Library contains all the core parts of OS X that are needed for it to function — there are very few reasons to ever change anything in it. The other two Libraries are very similar, both containing things like fonts, saved preferences and Dashboard widgets. These are all things that you interact with through other applications, so it makes sense to file them out of the way in a Library folder.
The only difference between these two libraries is that things in the hard drive Library are for all users of the computer, while things in the user folder Library are just for that specific user. If you’ve ever had to enter your administrator password while installing an application, chances are it was putting something in the hard drive Library that needed to be accessible to all users of the Computer.
The Library in your user folder is the one that you are most likely to want to access at some point. If an application is playing up, deleting its preference file in the Preferences folder in this Library is a good troubleshooting step. If you ever have to manually install a plugin for any application, this is most likely where you will have to put it.
With this in mind, it might seem a little odd that Apple decided to hide this Library folder. However, it’s also the most obviously visible of the three libraries, and therefore the most susceptible to accidental changes and deletions that cause problems. Now it’s hidden, if you ever need to get to it, simply take your pick from following methods.
Option-click the Go menu
In the Finder, the Go menu offers lots of handy shortcuts to common places like your Documents and Applications folders. The Library folder doesn’t normally appear here, but if you hold down the Option key, it should pop up in the middle of the list. This is probably the best method for most people. It’s great if you only occasionally want to access the Library, as it stays hidden in your home folder but is still accessible fairly quickly.
Go to Folder…
While in the Finder, simply press Command-Shift-G to bring up the Go to Folder dialog. To access the Library, type in ~/Library and click Go. It is possible to type the path to any folder into this dialog. The ~ character is just a shortcut to your home folder. A more verbose alternative would be /Users/matt/Library.
Assign a keyboard shortcut (works in Finder only)
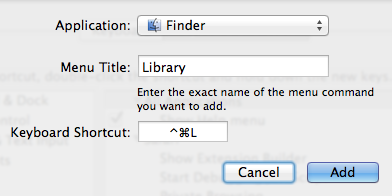
As long as an item appears in a menu somewhere, it’s fairly straightforward to add a keyboard shortcut for it. So as the Library appears in the Go menu, this isn’t too difficult. Simply open up System Preferences, and go to the Keyboard section. Click on the Keyboard Shortcuts tab, then select Application Shortcuts from the list and click the plus (+) button.
In the dialog that appears, choose Finder from the drop-down menu, type Library for the menu title and then choose whatever shortcut you want.
There are two small problems associated with this method: Firstly, for some reason this stops the Library from appearing in the Go menu, even when the Option key is pressed. Secondly, the shortcut will only work when Finder is the active application. To get around these problems, see the next method.
Assign a global keyboard shortcut (works in all apps)
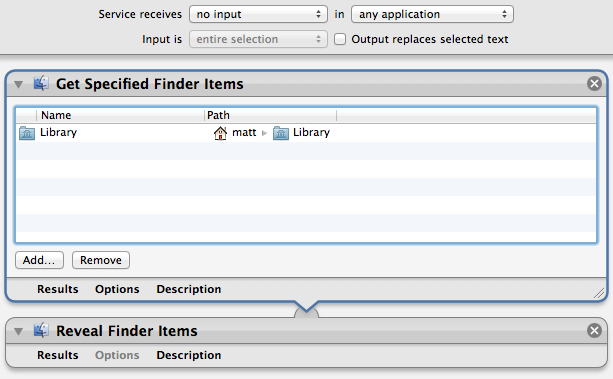
The easiest way to assign a global shortcut is by using an Automator Service. Start by opening up Automator (located in the Applications folder) and choosing the Service template. Drag the following two actions across from the library into the workflow area:
- Get Specified Finder Items
- Reveal Finder Items
Click the Add button in the Get Specified Finder Items action, and navigate to your home folder. Press Command-Shift-. (period) to show the hidden files, select the Library folder and click Add. Finally, change the drop-down menus at the top of the window to no input and any application, then Save the Service.
To add the keyboard shortcut, go to the Keyboard section of System Preferences as above, but instead choose Services from the list. Find your new Service, double click to the right of it and press your shortcut.
Access via the Terminal
If you are comfortable working in the Terminal, it’s still fine to navigate to the Library folder with cd ~/Library and then list its contents with ls.
Alternatively, you can use the Terminal as a way to open up the folder in the Finder. Simply type open ~/Library and press Return.
Add an alias to the Finder sidebar or toolbar
Once you have accessed the Library folder using one of the methods above, it’s easy to drag the folder into the sidebar or toolbar for easy access. This creates an alias to the Library folder that will permanently stay in the sidebar or toolbar until you remove it, while the Library folder remains hidden in your home folder.

Make it permanently visible
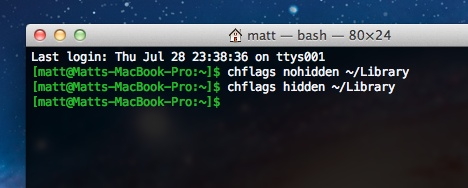
If you think all the above methods are just a waste of time and you want your Library back the way it was in Snow Leopard, it is possible to make it visible again. Open up Terminal (located in Applications/Utilities), paste in the following line and press Return:
chflags nohidden ~/Library
There’s no need to restart the Finder — the change should occur instantly. If you change your mind and want to hide the Library again, use the following command:
chflags hidden ~/Library
Make all hidden files visible
This is probably overkill if the Library folder is the only hidden item you want to access, but there is a simple Terminal command to make all hidden files visible in the Finder:
defaults write com.apple.finder AppleShowAllFiles YES
For more information on this command and how to set a keyboard shortcut to toggle hidden files, check out our article on how to quickly show and hide hidden files.
Quickly show and hide hidden files
In Mac OS X, files with names that start with a dot (.) are hidden. You may have noticed some of these before, for example when copying files from your Mac to a PC where they aren’t hidden. The most common one you might bump into is the .DS_Store file that Mac OS X puts in every folder (to save various view settings), but there are all sorts of other hidden files used by all sorts of applications.
These files are hidden by default for good reason — the average user almost never needs to change them, so keeping them visible would just cause useless clutter. But every now and again you may find that you need to view the hidden files, for example to browse the UNIX filesystem, to work with .htaccess files or to find a file that you accidentally (or purposefully) hid by naming it with a dot.
Using the Terminal
The easiest way to show hidden files is using the Terminal. Just open up Terminal (located in Applications/Utilities), paste in the following line and press Return.
defaults write com.apple.finder AppleShowAllFiles -bool YES
The Finder needs to be relaunched before the changes take effect, so type killall Finder and press Return. To hide the files again, use the following line instead.
defaults write com.apple.finder AppleShowAllFiles -bool NO
While this method is fine if you only want to change the visibility of hidden files occasionally, it is a bit cumbersome if you find yourself having to do it regularly. Read on for some quicker ways to access hidden files.
In open and save dialogs
In open and save dialog boxes, there is a handy keyboard shortcut to toggle the visibility of hidden files. While the dialog is open, just press Command-Shift-. (dot). Just press it again to hide the files again.
For some keyboard layouts, normally in ones where a comma is used as a decimal point, you may find that this shortcut is Command-Shift-, (comma) instead.
Setting up a keyboard shortcut
While Apple helpfully provided a keyboard shortcut for use in open and save dialogs, they didn’t do the same for normal Finder windows. Luckily, it’s not too tricky to set up a keyboard shortcut yourself.
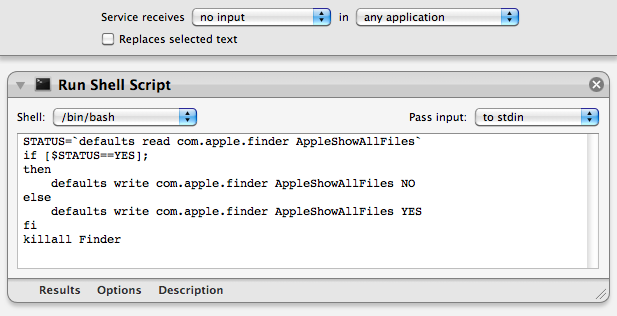
To start, open up Automator (in the Applications folder) and choose a Service template. From the library choose "Run Shell Script" and drag it across to the workflow area. In the text box paste the following command:
STATUS=`defaults read com.apple.finder AppleShowAllFiles`
if [ $STATUS == YES ];
then
    defaults write com.apple.finder AppleShowAllFiles NO
else
    defaults write com.apple.finder AppleShowAllFiles YES
fi
killall Finder
Finally, change the "text" drop-down menu to “no input” and then save you workflow as “Toggle Hidden Files”.
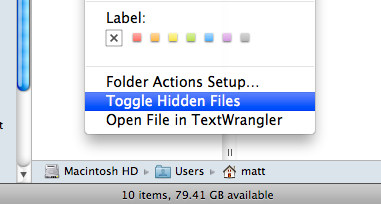
Now if you go to the Finder menu and look under Services, you should find a “Toggle Hidden Files” option. To add the keyboard shortcut, go to the Keyboard section of System Preferences and click the Keyboard shortcuts tab. Select Services from the list on the left, then scroll down to the bottom of the list on the right to find “Toggle Hidden Files”. Double-click on the area to the right of it, then press the keyboard shortcut you want. I used Command-Shift-. (dot).
Setting up a context menu item
To use a context menu instead of a keyboard shortcut you just need to follow the same instructions as above, but make some slight changes in Automator. Instead, change the “text’ drop-down menu to “Files and Folders” and the “any application” drop-down menu to “Finder”. Now when you right-click on a file or folder in the Finder, a new “Toggle Hidden Files” option should appear.
Add columns to Spotlight search results
A major complaint about Snow Leopard is that you cannot add the Size column to Spotlight search results window. This is the window that you get by choosing “Show All” in Spotlight or by pressing Command-F in the Finder. When you go to add columns to it by choosing “Show View Options” from the View menu, you’ll find that Size, Comments, Version and Label are all greyed out.
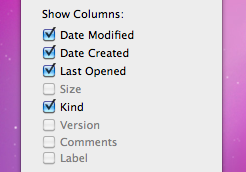
These options used to be available in previous versions of Mac OS X, so it’s unusual that they are now disabled. You might assume that Apple disabled these columns for a reason, so bear this in mind before following these instructions to enable them again.
If you have the developer tools installed, you can enable the columns again using the included Property List Editor. If you don’t already have the developer tools then it’s not worth installing them for such a small task. Instead, you can download and use TextWrangler (free) instead.
Using Property List Editor
If you are using Property List Editor, start by going to your user folder and then navigate to Library/Preferences. In the Preferences folder find the file named “com.apple.finder.plist.” Double-clicking on this file should open it up in Property List Editor. If not, just right-click on it and choose “Open With - Property List Editor.”
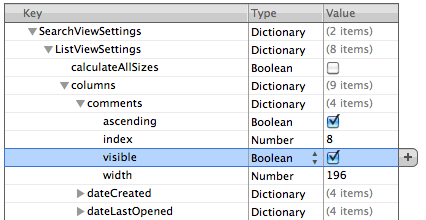
Once the file is open, scroll down the list to “SearchViewSettings.” Click the disclosure triangle next to it, and then do the same for “ListViewSettings” and then “columns.” Now you should see a list of all the available columns. Click the triangle next to the column you want to add, i.e. size, and then check the box next to “visible.”
Once you are done, save the file by pressing Command-S. Finally, you will need to restart the Finder for the changes to take effect. The easiest way to do this is top hold down the Control and Option keys, click on the Finder icon in the Dock and choose “Relaunch.”
Now just press Command-F to bring up a search window and you should have your extra columns enabled.
Using TextWrangler
With TextWrangler, the process is very similar, but just a tiny bit more complicated. Firstly, make sure you have downloaded and installed TextWrangler. Next, go to your user folder and then navigate to Library/Preferences. In the Preferences folder find the file named “com.apple.finder.plist.” Right-click on this file and choose “Open With - TextWrangler.” Once the file is open, you want to find the line that says
<key>SearchViewSettings</key>
Don’t bother scrolling through the file looking for it - for me it is on line 4973! Instead, just press Command-F and type “SearchViewSettings” into the find field. Once you have found the line, look about 8 lines below it. You should see something like this:
<key>comments</key>
<dict>
    <key>ascending</key>
    <true/>
    <key>index</key>
    <integer>8</integer>
    <key>visible</key>
    <false/>
    <key>width</key>
    <integer>196</integer>
</dict>
This should then be followed by a similar 11 lines for each of the other possible columns. Find the one you want to enable (Size, Comments, Version or Label) and look for this:
<key>visible</key>
<false/>
Replace this with:
<key>visible</key>
<true/>
and you’re done! Just save the file by pressing Command-S, then restart the Finder by holding down the Control and Option keys, clicking on the Finder icon in the Dock and choosing “Relaunch.”
Enter full screen Quick Look using the keyboard
Here’s a quick tip for Quick Look.
Ordinarily you enter Quick Look by selecting a file then hitting the space bar. If you want to view the preview in full screen, you can then click on the Full Screen button at the bottom of the Quick Look window.
A quick way to jump straight to full screen is to press Option-Space instead of Space with your chosen file selected. This will instantly bring up a full screen preview of the document. To exit, just hit the Escape key. Unfortunately this only works in Snow Leopard, but you can get the same effect in Leopard by pressing Command-Option-Y.
I find this is especially useful for quickly reading PDF documents, which are often too small in a normal Quick Look window. Also, if you select multiple images and then press Option-Space, you can quickly start a full screen slideshow.
Find out where a file came from
If you have a Downloads folder full of junk like I do, it can be useful to know where some files have come from. Luckily this information is displayed in the Get Info window. Just right-click on the file and choose "Get Info" or press Command-I.
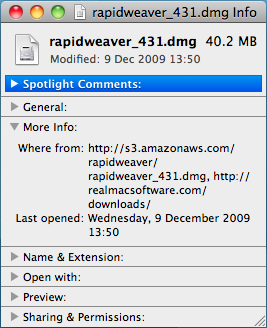
In the Get Info window, click the "More Info" disclosure triangle and some extra fields should appear. If you look in the list you should find one called "Where from."
If you downloaded the file using Safari, this field will show you the web address of the page you downloaded the file from. If you received the file via iChat or a Mail attachment, the name of the person who sent it to you should appear.
Sometimes two web addresses are shown if the page with the download link is on a separate site to where the file was actually stored. See the screenshot below for an example.
Automatically remove clutter from the desktop
John writes:
I was wondering if there was a way for the Mac to automatically clear the desktop and put all the items into the documents folder when shutting down. I'm setting up a computer which has a lot of users and clutter on the desktop is an issue. Thanks.
This is a great example of when AppleScript is really useful for automating simple tasks like moving files around. In fact, you can do it with a script that is only three lines long.
Start by opening up AppleScript Editor, located in the Utilities folder inside the Applications folder. If you don't have Snow Leopard, the latest version of Mac OS X, this might be called Script Editor and instead is located in the AppleScript folder in the Applications folder. In the window that appears, paste the following three lines:
tell application "Finder"
   move items of (path to desktop folder) to folder (path to documents folder)
end tell
If you click Run, you should see all the items on your desktop move into your Documents folder. Choose Save As from the File menu, give the script a name like cleardesktop and change the File Format to Application. Save it somewhere safe where someone won't accidentally delete it. I have a folder inside my Documents folder called Scripts where I keep all my AppleScripts. Other people choose to store their scripts in the Scripts folder in the Library folder, because Apple has already put some ready made ones in there.
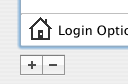
The next step is to make it run every time you shut down your Mac. This is pretty tricky to do, and involves using a lot of Terminal commands. Instead, a much easier way is to make the script run when you log in, which will essentially do the same thing. Just go to System Preferences, and click on the Accounts section. Choose your account from the list on the left, and then click on the Login Items tab. You can now either click the plus (+) button and locate your script, or just drag the script from a Finder window into the list.
Now, whenever you turn on your computer, all the clutter left over from the previous user will be automatically moved into the Documents folder.
The above script is just about as basic as you can get. Here’s an idea for a more complicated version. Instead of just dumping everything in your documents folder, it instead creates a folder in there with a name that includes todays date ( e.g. “Desktop 13/01/2010” ) and puts the items in this folder instead.
set foldername to ("Desktop " & short date string of (current date))
set docsfolder to (path to documents folder) as string

tell application "Finder"
   if not (exists folder (docsfolder & foldername)) then
       make new folder at docsfolder with properties {name:foldername}
   end if
    move items of (path to desktop folder) to folder (docsfolder & foldername)
end tell
Alternatively, the following script checks the file extension of all the files on the desktop, and sorts them into the Movies, Pictures, Applications and Documents folders depending on what they are. If you are feeling adventurous, you can modify the script to include your own folders and file extensions.
tell application "Finder"
   set desktopFolder to (path to desktop folder)
    set musicFolder to (path to music folder)
    set appsFolder to (path to applications folder)
    set picsFolder to (path to pictures folder)
    set moviesFolder to (path to movies folder)
    set docsfolder to (path to documents folder)

    set musicExt to {".mp3", ".aac"}
    set appsExt to {".dmg", ".sit", ".app"}
    set picsExt to {".jpg", ".gif", ".tif", ".png", ".psd"}
    set moviesExt to {".avi", ".mpg", ".mov", ".m4v"}
    set docsExt to {".pdf", ".txt", ".doc", ".xls", ".key", ".pages"}

    set allFiles to files of desktopFolder
    repeat with theFile in allFiles
       copy name of theFile as string to FileName

        repeat with ext in musicExt
           if FileName ends with ext then
               move theFile to musicFolder
           end if
       end repeat

        repeat with ext in appsExt
           if FileName ends with ext then
               move theFile to appsFolder
           end if
       end repeat

        repeat with ext in picsExt
           if FileName ends with ext then
               move theFile to picsFolder
           end if
       end repeat

        repeat with ext in docsExt
           if FileName ends with ext then
               move theFile to docsfolder
           end if
       end repeat

        repeat with ext in moviesExt
           if FileName ends with ext then
               move theFile to moviesFolder
           end if
       end repeat
   end repeat
end tell
Top 15 Terminal Commands for Hidden Settings in Snow Leopard
Every time Apple brings out a new version of OS X, we compile a list of our favourite Terminal commands for enabling hidden features and changing hidden settings (here are the lists for Tiger and Leopard).
For those who are new to Terminal Commands, here's a quick run down of how to use them. Don't worry, it's really easy. Start by opening up Terminal, located in the Utilities folder in the Applications folder. In the window that appears, paste in one of the lines provided below, and then hit Return. For the changes to take effect, you need to restart the application concerned. For applications like the Dock or Finder, it is easiest to just type killall Dock or killall Finder into the Terminal to restart them. To reverse the changes, you just need to change the last word of the command and run it again. If the last word is YES, change it to NO, change 1 to 0, and change TRUE to FALSE and vice versa for all.
1. Folder previews in Quick Look
This is my favourite hidden feature in Snow Leopard. When enabled, using Quick Look (hit the space bar) on a folder will show you a preview of the folder's contents inside a translucent folder icon. The previews of the files inside the folder also cycle through so you can see all of them. Just use the following command:
<code>defaults write com.apple.finder QLEnableXRayFolders 1</code>
You will need to restart the Finder, either by typing killall Finder into the Terminal or by Control-Option-clicking on the Finder in the Dock and choosing Relaunch.
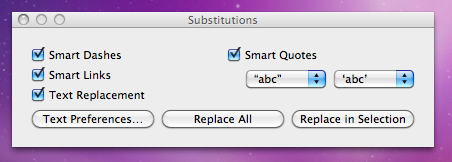
2. Globally enable Text Substitutions
You may have realised that the new text substitutions feature in Snow Leopard isn't enabled in all applications by default, most noticeably in Safari. To enable it , you need to right-click on a text box and choose Substitutions then Show Substitutions. To globally enable text substitutions, use the following three commands one at a time. The first one will enable substitutions, while the second will enable dash replacement and the third will enable spell checking.
defaults write -g WebAutomaticTextReplacementEnabled -bool true
defaults write -g WebAutomaticDashSubstitutionEnabled -bool true
defaults write -g WebContinuousSpellCheckingEnabled -bool true
If you decide there are some specific applications where you want to disable these again, you can do it in the normal way. As always you will need to restart each application for the changes to take effect.
3. Bring back AppleScript Studio palette
As of Snow Leopard, AppleScript Studio has be deprecated in favour of AppleScriptObjC. You can still work on AppleScript Studio projects, but you can't create new ones, and the AppleScript Studio palette in Interface Builder is gone. To bring it back, use the following command:
defaults write com.apple.InterfaceBuilder3 IBEnableAppleScriptStudioSupport -bool YES
4. Disable "focus follows mouse" in Terminal
In Leopard there was a Terminal command to make the Terminal's window focus change with mouse movement. If you had previously enabled this, you will find things don't work quite right in Snow Leopard when you use Command-Tab to switch between applications in different spaces. To fix this, you will need to disable the focus follows mouse behaviour using the following command:
defaults write com.apple.Terminal FocusFollowsMouse -string NO
5. Force Dictionary to only use one window
If you aren't a fan of using Command-Control-D to quickly look up definitions, you might use the "Look up in Dictionary" contextual menu item or Services menu item. In Snow Leopard, each word you look up using these methods opens in a new Dictionary window, which gets a bit annoying. To make each word you look up open in the same window, just use the following command:
defaults write com.apple.Dictionary ProhibitNewWindowForRequest -bool TRUE
6. Change the behaviour of the green zoom button in iTunes
With the release of iTunes 9, Apple messed around a bit with the behaviour of the green zoom button in iTunes. Things are back to normal as of iTunes 9.01, but briefly the green button maximised the window instead of switching to the mini-player. If you liked the temporary change, you can bring it back using the following command:
defaults write com.apple.iTunes zoom-to-window -bool YES
Of course, you can always get the alternative behaviour by holding the Option key and clicking in the green button.

7. Debug menu in Address Book
The debug menu has been available in Address Book for some time, but there are some new additions in Snow Leopard. If you don't already have it enabled, the command is:
defaults write com.apple.AddressBook ABShowDebugMenu -bool true
Restart Address Book, and then click Debug in the menu bar to see the new options. You can enable reflections under contacts pictures, get to the "People Picker Panel" and enable a debug panel called "Ye Olde Debug Settings”.
8. Autoplay movies in QuickTime X
One of the weird things about the new version of QuickTime is that it has no Preferences. Luckily you can still change things using the Terminal. To make a movie automatically start playing when you open it, use the following command:
defaults write com.apple.QuickTimePlayerX MGPlayMovieOnOpen 1
9. Keep QuickTime in full screen when switching applications
If you are watching a movie in full screen in QuickTime and you use Command-Tab to switch to another application then the movie will automatically exit full screen. To make it stay full screen in the background, use the following command:
defaults write com.apple.QuickTimePlayerX MGFullScreenExitOnAppSwitch 0
10. Disable Rounded corners in QuickTime
If the slightly rounded corners of movies in QuickTime bug you, use the following command to disable them:
defaults write com.apple.QuickTimePlayerX MGCinematicWindowDebugForceNoRoundedCorners 1
11. Always or Never show titlebar and Controller in QuickTime
The following two commands either permanently enable or disable the titlebar and controller that pop up when you mouse over a movie in QuickTime:
defaults write com.apple.QuickTimePlayerX MGUIVisibilityNeverAutoshow 1
defaults write com.apple.QuickTimePlayerX MGUIVisibilityNeverAutohide 1
12. Automatically show closed captioning and subtitles on opening
This turns on subtitles and closed captioning automatically when you open a movie that supports them.
defaults write com.apple.QuickTimePlayerX MGEnableCCAndSubtitlesOnOpen 1
13. Make list view stacks work like grid view Stacks
This command slightly changes the behaviour in Stacks in list view. Once enabled, they act more like grid view Stacks, but with a single list of files and icons on the left. The main difference is when "drilling-down" through folders within the Stack.
defaults write com.apple.dock use-new-list-stack -bool YES
You will need to restart the Dock for changes to take effect. The easiest way is to use killall Dock in the Terminal.
14. Enable mouseover highlight in stacks
If you want items in grid view stacks to highlight when you move the mouse over them, use the following command. It's slightly different from the equivalent in Leopard. Also, note that you can get the highlight behaviour in Snow Leopard without using this command by using the arrow keys to select items in a stack, or by clicking and holding on a stack before dragging the mouse up onto the grid.
defaults write com.apple.dock mouse-over-hilite-stack -boolean YES
You will need to restart the Dock for changes to take effect. The easiest way is to use killall Dock in the Terminal.
15. Set a precise screensaver password delay
A useful new feature of Snow Leopard is the ability to set how long your Mac is asleep or how long the screen saver is on before it requires a password to wake up again. You can access this from the Security section of System Preferences. However, you have to choose a time period from a drop-down menu, and you can't enter your own custom time period. To do this, use the following command. The number at the end is the time in seconds. For example 1800 is 30 minutes, which bizarrely isn't an option in the drop-down menu.
defaults -currentHost write com.apple.screensaver askForPasswordDelay -int 1800
Disable File Extension Warning
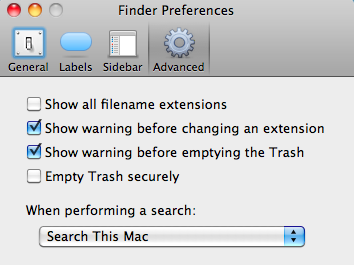
If you often find yourself changing file extensions, you might be tired of the annoying "Are you sure you want to change the extension..." dialog box. For example I often end up changing the extensions of text files from .txt to .html.
Luckily, you can disable this warning quite easily. Just go to the Finder Preferences (under the Finder menu in the top left) and click on the Advanced tab. In here, un-check the checkbox "Show warning before changing an extension".
Now whenever you change a file extension, you won't be presented with an "Are you sure" warning.
Create double-clickable dvdmedia movie bundles
When you rip a DVD to your Mac you end up with a VIDEO_TS folder, which can be dragged to DVD player icon to play the DVD (you might find some stubborn DVDs will only play in VLC though).
As the DVD media is a folder, obviously you can't double-click it to open it in DVD Player. Instead you have to do the cumbersome open-the-app-then-drag-and-drop-to-icon procedure.
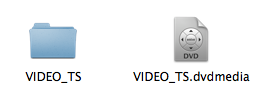
The way around this is to rename the folder with the .dvdmedia extension. This will turn the folder into a bundle, and add a nice DVD icon as well. Double-clicking this will automatically open it up in DVD player, but you can easily change this to another app like VLC for example. The easiest way is to choose Get Info on the bundle, choose the new app from the "Open with" section, and click the "Change All..." button. While you are in the Get Info window you might also want to click “Hide Extension” and rename the bundle to the name of the movie. You can also change the icon to the artwork for the movie which you can get from a site like Get Video Artwork.
One annoying side effect of this is that Front Row won't recognise dvdmedia bundles, whereas it will recognise VIDEO_TS folders. Of course, to get your movies to work well in the Finder, Quicktime iTunes, Front Row and iPhone all at the same time you might prefer to run them through a tool like HandBrake. This can also save you some space depending on how you encode them.
Batch rename multiple files
Often you might find you have a folder containing hundreds of files, and you want to rename them all, for example to create a numbered list. In the Finder this would take ages, but luckily you can use the Automator app that comes free with every make to save yourself time and effort.
Start by opening up the Automator app (in the Applications folder) and create a new workflow. Add the following actions by dragging them from the list on the left. First add “Get Specified Finder Items” followed by “Sort Finder Items” followed by “Rename Finder Items”. Your workflow should look something like the screenshot below. When you add the “Rename Finder Items” action, you will be asked if you want to create a copy of the files. Generally you won't want to do this, so click the "Don't Add” button.
Also, once added, the name of the “Rename Finder Items” action will change to “Add Date or Time to Finder Items” - don’t worry, this is normal. This is just the default setting, which you can change by choosing a different option from the first drop-down menu inside the action.
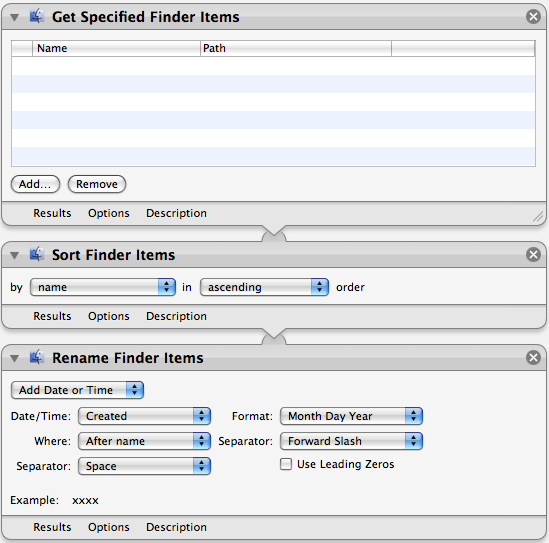
What the workflow does is pretty straightforward. When you click Run in the top right, it gets the files you have added to the list in the first action. You can add the files by clicking the Add button below the list before you run the workflow. The second action then sorts the files by name, size, kind, or whatever you specify. The final action takes this list of files and modifies their file names.
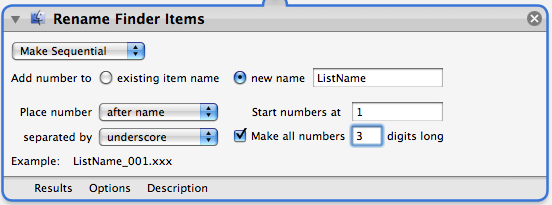
There are a huge amount of options in the “Rename Finder Items” action. The first drop-down menu allows you to choose between adding a date or time, adding text, changing uppercase/lowercase, making a sequential list or performing a find and replace for a string of text.
The second action, “Sort Finder Items” is really optional and only makes a difference if you have the renaming action set to “Make Sequential”. This takes the list in the order it is given and places sequential numbers before or after the file names depending on the files position in the list.
There are a couple of alternative actions that you can use instead of the first “Get Specified Finder Items”. One option is to use “Get Selected Finder Items” instead, which will perform the renaming on whatever files you currently have selected is in the Finder. Another is “Ask for Finder Items”, which will open up a dialog prompting you to choose the files each time you run the workflow. This is a good choice if you want to regularly perform the same renaming on different batches of files. You can then save the workflow as an application (File, Save As... and then choose Application from the File Format menu) that simply runs the workflow when you open it. This gives you a shortcut so you don’t have to open up Automator every time.
Change the default text for pretty much anything in OS X
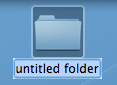
Change the default new folder name
First, navigate to Macintosh HD/System/Library/CoreServices. In here, locate the Finder application. Right-click (Control-click) on it, and choose "Show Package Contents" from the contextual menu. In the window that appears, navigate through to Contents/Resources/English.lproj. A quick way of navigating here (you might end up doing it a few times) is to use the "Go to Folder" option in the Go menu. In the box that appears, paste the following line:
/System/Library/CoreServices/Finder.app/Contents/Resources/English.lproj/Find the file named "Localizable.strings" and drag it to the Desktop to make a copy. We are going to edit this copy on the desktop, and then copy it back into the English.lproj folder to replace the original version. You might want to make an additional copy of the file as a backup, just in case anything goes wrong.
Open up the desktop version of the localizable.strings file using TextEdit. Scroll down to the line that starts with N2. it should say the following:
"N2" = "untitled folder";Now you can change the words "untitled folder" to anything you want. For something at the start of the alphabet, you could simply put "*untitled folder*".
Once you are done, save the file on the desktop and quit TextEdit. Finally, drag the file back to the English.lproj folder that you copied it from. Click Authenticate and type in your administrator password.
For changes to take place, you will have to relaunch the Finder, which can be done by holding down Control and Option, clicking the Finder icon in the Dock, and choosing Relaunch from the menu.
Suffixes for duplicates and aliases
These are done in exactly the same way as the new folder tip above. Only this time, change line N3 for aliases, or N4 for duplicates.In these cases, "^0" takes the place of the original file name. So, for a duplicate, the default is "^0 copy", meaning the duplicate of "file.doc" is "file copy.doc". As above, you can change this to anything you want. "copy of ^0" would mean the duplicate would work better with file extensions, giving "copy of file.doc". However, it wouldn't be next to the original file alphabetically.
Remember to relaunch the Finder when you are done.
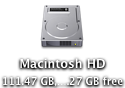
Shorten the Finder's 'Show Item Info' text
One of the features I like about Mac OS X is the "Show item info" check box located in the View Options of the Finder. This works for all windows in icon view, and is therefore especially useful on the desktop. However, one problem with it is the text for Hard Drives is too long, unless you make the text size really small.You can solve this problem by editing the same localizable.strings file as above. Carry out the steps exactly the same, but search for the line "IV9" = "^0 free";. The best way to change this is to get rid of the word free, just leaving "IV9" = "^0";. You can see the result below.
Remove default Genres in iTunes
iTunes comes with a long list of genres, some of which many people will never use. Occasionally this may become annoying, for example when using the autofill feature.To remove some of the genres, you have to edit the localizable.strings file within iTunes, rather than within the Finder. You can find this by going to iTunes in the applications folder, right-clicking and choosing "Show Package Contents". In here, navigate to Contents/Resources/Englihs.lproj where you will find the localizable.strings file. As before, you will have to copy it to your desktop before editing.
Open up the file in TextEdit. You'll find the list of genres under the line
/* ===== Genres ===== */. To remove a genre, don't bother deleting it, just in case you ever want it back. Simply "comment" out the line, by putting a /* at the start, and a */ at the end. For example, to remove Techno, you will simply replace the line with /* "9200.019" = "Techno"; */.As always, quit and reopen iTunes for changes to take effect.
Change the iTunes sidebar labels
The most obvious reason for wanting to do this is if you would prefer the labels to be lowercase. Using the same localizable.strings file as in the genre tip above, find the following lines:"135.011" = "LIBRARY";
"135.012" = "DEVICES";
"135.013" = "STORE";
"135.014" = "PLAYLISTS";
You can change these to anything you want, or simply remove the capitalization.
Change the Finder's sidebar labels
You can do exactly the same thing in the Finder's sidebar. The file you need to edit is localizableCore.strings, located in exactly the same place as the localizable.strings file inside the Finder application. The lines you want to change are the following:"SD5" = "DEVICES";
"SD6" = "SHARED";
"SD7" = "SEARCH FOR";
"SD8" = "PLACES";
Customize System Preferences
All the System Preferences panes are grouped into five categories - Personal, Hardware, Internet and Network, System and Other. It is quite easy to change these category names by going inside the System Preferences package, which is in the Applications folder. Inside it, navigate to the English.lproj folder inside the Resources folder. In here, find a file named NSPrefPaneGroups.strings and drag it to your desktop. Now open this file up in TextEdit and you'll see the following lines:"personal" = "Personal";
"digitalHub" = "Digital Hub";
"hardware" = "Hardware";
"net" = "Internet & Network";
"system" = "System";
"addons" = "Other";
Don't change the words on the left, these are the ones used by System Preferences. You can change the words on the right. These are the ones displayed in the System Preferences window. Just make sure you don't delete any quotes or semicolons. Also, ignore the "Digital Hub" entry. This isn't used anymore and is probably just left over from a previous version of the operating system.
Now save the file and drag it back to the English.lproj folder from the Desktop. You will have to Authenticate this action with your administrator password.
Dock Menu items
For a bit of fun (I can't see why else) you can change the items in the menus you get when right-clicking on icons in the Dock. The Dock application is located in /System/Library/CoreServices. Right-click on it and choose "Show Package Contents". In the window that appears, navigate to Contents/Resources/English.lproj where you will find DockMenus.strings. Copy this file to the desktop to edit it.Some of the lines you might want to edit are the "Application Not Responding" and "Force Quit" lines to something more reflective of the feeling you get when you see them.
Change Unexpectedly Quit message
With some tinkering it is possible to customize Mac OS X alert messages and dialog box text. For a bit of fun, you can change the message that appears when an application crashes to something more humorous.Open up your hard drive and navigate to /System/Library/CoreServices. Find the Crash Reporter package and open it by right-clicking and choosing Show Package Contents.
In the window that appears, navigate to Contents/Resources/English.lproj and find Localizable.strings. Copy it to your Desktop and open it up in TextEdit. Near the bottom of the file you will see the line -
/* Unexpectedly quit dialog */
In the lines that follow this it is fairly obvious how to change the message. The symbol "%@" will make the message display the crashed Application's name, and "\n" will make a line break. Save the file and then copy it back to the package to replace the old version. You will have to enter your administrator password.

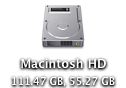
New features in Open and Save dialogs
![]()
In column view, there is a new contextual menu for changing the column widths. Simply right-click (or hold Control and click) on the handle at the bottom of each column, and the menu will appear. You can choose from Right Size this Column, Right Size All Columns Individually and Right Size All Columns Equally. Strangely, this menu is unique to Open and Save dialogs, and doesn't appear if you right-click the column handle in a normal Finder window. In that case, you have to use the old method.

There are also a couple of new keyboard shortcuts for Open and Save dialogs. Command-I will open up the Get Info window on the selected item, and Command-R will show the item in the Finder. However for some reason, these don't seem to work all the time in Save dialogs.
Make the Most of Quick Look
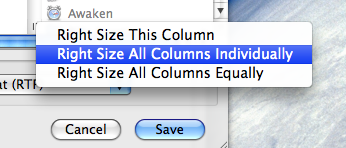
Index Sheet
If you select multiple files before activating Quick Look, you'll just be shown a preview of the first file. There are buttons to flick forward and backward through the different previews, but much more interesting is the Index Sheet button. Clicking this is just like using exposé, only with the previews rather than windows. The previews will shrink down to show you them all in a grid. Clicking on one of the thumbnails will expand that one.
Plugins
Quick Look works with most file formats straight away, but for those that don't work there are plugins available. There's a great list of them here. In my opinion, one of the most useful is Folder Viewer. This makes Quick Look list the contents of a folder, instead of just showing a huge folder icon.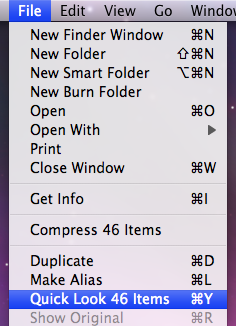
Other ways to activate Quick Look
There are many ways of activating Quick Look. The simplest and most well known is hitting the space bar, but there is also the official keyboard shortcut, Command-Y. If you would prefer to use the mouse to invoke Quick Look, you can add a button to the Finder toolbar that does just that. With a Finder window open, choose Customize Toolbar from the View menu and drag up the Quick Look button. Quick Look is also available in the File menu and in the Contextual menu that appears when you right-click on a file.Jump straight to slideshow mode
Some people have complained that the slideshow function in the Finder has disappeared in Leopard. Actually, it has just become a part of Quick Look. When using Quick Look on multiple images, there is a play button at the bottom to start a slideshow. However, there is an easier way to jump straight to slide show mode. Just add in the Option key to the activation methods listed above. Command-Option-Y will start a full screen slideshow, and if you hold Option when looking in the File menu you will see Quick Look has changed to Slideshow. If you have activated the toolbar icon for Quick Look, holding down option changes it to a play button that starts a slideshow when clicked.
Zooming
If you activate Quick Look on an image, there are a number of ways in which you can zoom. Hold down the Option key and you will notice that the cursor changes to a magnifying glass. Now, using the scroll wheel you can zoom in and out. Alternatively you can Option-click to zoom in. To zoom out, hold Option and Shift while clicking. For PDFs this method doesn't work for some reason. However, you can still zoom using the Command-- and Command-+ keyboard shortcuts.Keyboard navigation with Quick Look open
While you are previewing a file with Quick Look, you can still use the keyboard to navigate to other files. In column view this is easily done with the arrow keys. In the other views, use Command-DOWN and Command-UP to go into and out of folders.Examine Trashed Files
It is impossible to open files in the Trash without first moving them out onto the Desktop. So in the past, if you wanted to check through files before emptying the Trash, you had to get them all out first. Luckily, Quick Look works on items in the Trash, so you can quickly look through them to check if you are about to delete anything important.Use with Time Machine
Another great place to use Quick Look is with Time Machine. Once you've found a file you want to restore, verify it with Quick Look before clicking the restore button.Get to grips with the "Open With" menu
Firstly, if the application is in the Dock, you can simply drag the file onto its icon in the Dock. Alternatively you can open up the application first, and choose "Open" form the File Menu. A third method is to use the "Open With" menu. You will find this by right-clicking (Control-clicking) on the file and looking near the top of the contextual menu. Within the Open With submenu you will find every application that can open the file, as well as an "Other" option.
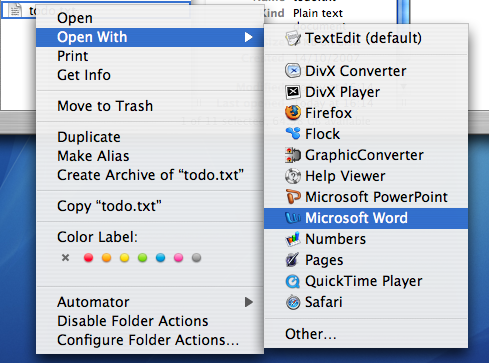
When you use the Open With menu, it is a "this time only" thing. Next time you double-click on the file, it will open with the default application again. To change the default application, bring up the menu as before, but hold down the Option key before choosing the application. The menu should change to "Always Open With".
When you use the Always Open With menu, it is a "this file only" thing. To apply a new default application to all files of that format, you can use the Get Info window located in the File Menu. In the Open With section, set the new application and click the "Change All" button.
To reset all of your files to open with the original default application, you need to delete a certain file. Go to your user folder, and navigate into the Library folder then into the Preferences folder. Find the com.apple.LaunchServices.plist file, and drag it to the Trash. Alternatively, drag it to the Desktop if you think you might change your mind and want to put it back later.
Over time, you may find that the Open With menu gets cluttered with duplicates, older versions or applications you thought you deleted long ago. To get rid of these, you need to use Terminal. Open up Terminal (from Applications/Utilities) and paste the following line:
/System/Library/Frameworks/ApplicationServices.framework/Frameworks/LaunchServices.framework/Support/lsregister -kill -r -domain local -domain system -domain userPress return and your Open With menu should have been cleaned up to only include the most current applications.
Automate Trash Emptying
The one that empties items that have been in the trash for too long is a bit complicated and involves using the Terminal. The second one, however, is fairly simple and accessible to anyone who wants their trash to empty automatically.
It involves an AppleScript that you attach to the trash as a Folder Action. This script checks the size of the trash every time you add a file to it. If the size goes over a limit, it will deleted the item that has been in the trash the longest.
There are various versions of the script on the Mac OS X Hints page as many users added suggestions in the comments. If you are interested, take some time to read through the page to see how the script works. Adding all the suggestions and improvements, here is the final version of the script:
on adding folder items to this_folder after receiving added_items
	try
		-- Size limit of the Trash folder in MB
		set trash_limit to 2048

		--  Check size & Touch all incoming items to update the modified date to now
		repeat with i from 1 to the count of added_items
			set a_file to item i of added_items

			-- Get incoming item size and check if it exceeds the max trash size
			set a_file_size to ((do shell script "du -sk " & quoted form of (POSIX path of a_file) & "| awk '{print $1}' ") / 1024)
			if a_file_size is greater than trash_limit then
				display dialog quote & (name of (info for a_file)) & quote & " is too big for the Trash. Would you like to delete it permanently?" buttons {"Yes", "No"} default button "No"
				set response to the button returned of the result
				if the response is "Yes" then
					-- Permanently delete
					set sh_script to "rm -Rf " & quoted form of (POSIX path of a_file)
					do shell script sh_script
				end if
				if the response is "No" then
					-- Rename and move to Desktop
					set sh_script to "cd ~/Desktop;mv " & quoted form of (POSIX path of a_file) & " " & quoted form of (POSIX path of a_file)
					do shell script sh_script
					display dialog quote & (name of (info for a_file)) & quote & " has been moved to the Desktop."
				end if
			end if
			if a_file_size is not greater than trash_limit then
				set sh_script to "touch " & quoted form of (POSIX path of a_file)
				do shell script sh_script
			end if
		end repeat

		-- Get the current Trash size in 1k clusters, then divide by 1024 to get megabytes
		set trash_size to do shell script "du -sk ~/.Trash/ | awk '{print $1}'"
		set trash_size to trash_size / 1024

		-- Delete old items until we're under the limit
		repeat while trash_size is greater than trash_limit
			set trash_files to (list folder this_folder without invisibles)
			set oldest_file to {}

			-- Get the least recently deleted file in the Trash folder
			repeat with i from 1 to the count of trash_files
				set a_file to alias ((this_folder as text) & (item i of trash_files))
				if i is equal to 1 then set oldest_file to a_file
				if the (modification date of (info for a_file)) comes before (modification date of (info for oldest_file)) then set oldest_file to a_file
			end repeat

			-- Delete the file and update the Trash icon
			set sh_script to "rm -Rf " & quoted form of (POSIX path of oldest_file)
			try
				do shell script sh_script
			on error
				display dialog "Permission denied on file " & quoted form of (POSIX path of oldest_file) & " would you like to try with administrator priviledges?"
				do shell script sh_script with administrator privileges
			end try

			-- And rinse!
			set trash_size to do shell script "du -sk ~/.Trash/ | awk '{print $1}'"
			set trash_size to trash_size / 1024
		end repeat
		tell application "Finder" to update trash
	end try
end adding folder items to
Select all the text and paste it into AppleScript Editor (in Applications/Utilities). Now you need to decide what size limit your trash will have. This is specified in megabytes on the 4th line of the script. It is currently set to 2048 (2GB). If you would like a different size, change this number. 512 for example, would mean that older items would be deleted to keep the total size under 512 MB.
![]()
Once you are done choose Save As from the File menu and go to the Library in your User folder. In here go to Scripts, then Folder Action Scripts. You will probably have to create these folders unless you have added folder actions in the past. Save the script here.
Now open up Folder Actions Setup (in Applications/AppleScript). If you click the plus button, you will be presented with a normal "Open" dialog. However there is the problem that the Trash is a hidden folder. It's actually located in your user folder with Documents, Music, Movies etc. To get to it, press Command-Shift-G. In the box that appears, type "~/.Trash" (without the quotes) and click Go then Open.
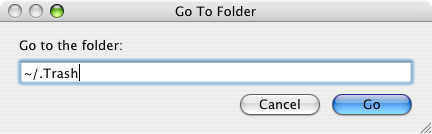
In the list that appears, choose the script that you just saved. Now you can start trashing things without ever having to worry about emptying the Trash again!
Be warned that this script permanently deletes files from your computer, without you specifically telling it to do so. If you change your mind and want to retrieve a file you put in the trash, you may find that it is already gone.
Recovering Lost Users
In general, there seems to be two reasons why a user account and their home folder can disappear. The first is simply that you have (accidentally) deleted the user. Any administrator account has the ability to do this from the System Preferences.
The second way occurs when upgrading or installing Mac OS X from the install disks. If you inadvertently chose an "Archive and Install" installation, all users are deleted unless you choose to preserve them.
Luckily, in both of the above cases, Mac OS X keeps a copy of the user folder in case you want to get it back.
Recovering Deleted User Folders
In the Accounts section of System Preferences you can delete a user by selecting them and clicking the minus button. You are presented with two options - to keep a copy of the user folder (the normal way) or to delete immediately. Unfortunately, if you chose to delete an account immediately, it is almost impossible to retrieve it.

However, it is more likely that you kept a copy (the option with the big blue "OK" button). This copy is kept in the Users folder under "Deleted Users". You must be logged into an administrator account to have access to this folder. Look in here for the name of the deleted user you want to recover, and double click it. This will mount a disk image on the desktop that essentially the deleted user folder. Hold option and drag this disk image from the desktop to the Users folder in your Hard Drive. Now you have restored the user folder, but you still need to create an account for it. Skip down to "Recreating the Account" to do this.
Users lost during an Archive and Install
When you perform an archive and install without preserving users, your user folders are archived away along with the rest of the existing system files for your Mac. A new folder called "Previous Systems" is created in Macintosh HD that contains all the users from before the archive and install. If you have done an archive and install multiple times, you will have a number of previous systems. Choose the one that contains all the users you wish to restore. In here is a users folder containing each of the deleted user folders. Drag the ones you wish to restore to the users folder in Macintosh HD. Now you have restored the user folders, but you still need to create accounts to be associated with them.
Recreating the Account
If you just want to retrieve certain files from the deleted user, you don't need to go through the hassle of creating a new user. From any administrator account you can open up the deleted user's disk image or Previous Systems folder and copy specific files from it.
Boost Quicktime Volume
However, with some files, you might find that the audio is too quiet to hear. If you have turned up the volume to full and your Mac's speakers still aren't playing it loud enough, there is a simple way to get an extra volume boost.
If you hold the Shift key before clicking one the Quicktime volume control the slider has more range than normal. This also works when viewing Quicktime movies embedded in a web page.

If you have opened up the file in Quicktime, you can get the same results by choosing "Show A/V Controls" from the Window menu (Command-K). In the A/V controls there is a slider that goes higher than the maximum volume on the slider in the Quicktime window.
Stationery Pad option makes a template of any file
If you have any kind of workflow where you need to repeatedly modify some sort of a file template, checking this option in any file's Get Info window will tell its parent application to open a copy of it by default, ensuring that the original file remains unedited.
![]()
Surprisingly, very few people know about and use this useful option. To enable it, select a file and open up its Get info window by pressing Command-I. From here you can check the stationery pad option to set that file as a dafault template for its application. Now when you open that application, a copy of the file will load up and you can use it as a template. However, when you save the file it won't save over the Stationery Pad file.
For many applications the icon of the file will change slightly if you set it as a stationery pad. For example, some Microsoft Office files will change to look like a pad.
Encrypt and Hide your Private Files
Encryption
If you just want to protect a single iWork or PDF document, you can do this from within the specific iWork application or from within Preview. In Pages, Keynote and Numbers '09 you can choose “Require password to open” from the Document section of the Inspector window. In Preview, when choosing “Save As...” on a PDF there is a checkbox to encrypt.If you want to password anything else, you have to password protect an entire folder. The way this is done is using encrypted disk images. Once created these appear as a single file on your hard drive with a dmg extension. When you double-click on one, it will ask you for the password. If you enter the password correctly, it will mount a disk image on your desktop. So while unlocked, the disk image is just like a temporary folder on your desktop. You can copy files to it and delete files from it, and as soon as you eject it, the contents will be password protected again.
The files won't show up in Spotlight searches and it is almost impossible to decrypt the data without that password, even with data recovery tools.
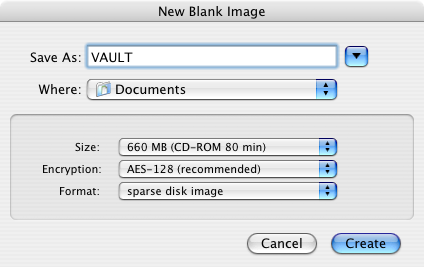
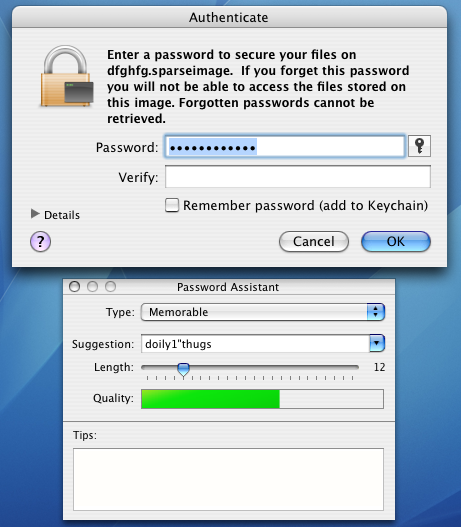
To create an encrypted disk image, open up Disk Utility (located in Applications/Utilities), go to the File menu and choose New, Blank Disk Image. In the dialog box that appears choose a name for your disk image and where you want to save it. The size is a maximum that the disk image can hold, so the preset sizes for CDs and DVDs are useful for if you want to burn the contents when it gets full. Choose AES-128 encryption and sparse disk image from the Format drop down menu.
Hiding
For some people there is no need to encrypt data. For a quick, temporary solution you can just hide away your files on your Mac. This is much less secure and far from foolproof, but quite often it is as much as you need.Probably the best place to put your files is in the Library folder. The main benefits of this are that it isn't searched by Spotlight, and that there are hundreds of other files in there already. The Application Support folder in you Library is a good place, as there are all sorts of random files in there. You might also want to rename your file if it has a name that stands out ( super-secret-file.doc for example).
Make Selections to Copy Portions of Text Clippings
The text in the clipping looks normal. For example, the text highlight cursor will appear when you put your mouse over it. However, if you try and make a selection you will find it doesn't work. This means that text clippings are only really useful for drag and drop. Instead of dragging text from one application to the other, you can store it on your desktop for a while before dragging it to somewhere else.
The functionality has been improved somewhat in the past few major updates of Mac OS X. Since Mac OS X 10.3 it has been possible to copy a text clipping by choosing copy from the Edit menu (or by pressing Command-C) instead of only being able to drag them.
Since Mac OS X 10.4 it has been possible to select a portion of a text clipping, but it's a little trickier than it should be. Remember I said you couldn't make selections in text clippings? Well you can... sort of.
If you drag over a part of your text clipping obviously it doesn't look like a selection was made - nothing is highlighted. But when you copy and paste into another application (TextEdit for example) you will find that only the text you dragged over was copied, not the entire text clipping as you would expect.
Now there are a few problems with this. Normally the text clipping will retain the style of the original text, however now it won't. Also it is still pretty annoying having to guess if you have selected the right text.
Luckily, Mac OS X Hints has an article on how to make selected text in clippings highlight.
Basically you have to edit one word in a file within the Finder application. To do this, open your Hard Drive and navigate to System / Library / CoreServices / Finder.
Right-click (or Control-Click) on the Finder and choose "Show Package Contents". Now you have to navigate to Contents / Resources / English.lproj. If you are using a different language, you will need to choose that one instead. Inside your language folder, right-click ClipWindow.nib and choose "Show Package Contents".
Here there are three files. Keep this window open because you will need it later. Copy objects.xin to your desktop and open it up in TextEdit. In this file you need to change one word. Look for this line:
<boolean name="noSelection">TRUE</boolean>You can do this using Command-F to search for it or just look about 23 lines down. Change the TRUE to FALSE so it looks like this:
<boolean name="noSelection">FALSE</boolean>Save and close the file, and drag it back to the ClipWindow.nib folder to replace the original file. You may be prompted to enter your administrator password to do this if you are not an admin. It is probably a good idea to make a backup of this file before you replace it, just in case everything goes pear shaped.
Finally, you will need to relaunch the Finder for changes to take effect. The easiest way to do this is to hold down Control and Option and then click on the Finder icon in the Dock. Choose Relaunch from the list.
Now you have wonderfully improved text clippings!
Top 15 Terminal Commands for Hidden Mac OS X Settings
Update: This article is very old. Most of the Terminal Commands still work, but consider checking out our top Terminal commands for Leopard and Snow Leopard. Our Terminal Tips category also has loads of other ways help you get the most out of your Mac.
There are a huge amount of hidden settings for Mac OS X and its applications that aren't accessible from preferences dialog boxes or the System Preferences. Applications such as Tinkertool and Mac Pilot allow you to access some of these, but the real flexibility is from the Terminal. From here it is possible to edit any preferences file for any application on your Mac.You'll find the Terminal in the Utilities folder within the Applications folder. To carry out any of the following commands you will need to copy/paste or type in the line of text then hit enter. For the most part, applications will need restarting before changes take place. For most applications you can just quit and open them again, but for the Finder and the Dock it is easiest to just type “killall Finder” or “killall Dock” into Terminal after the command.
To reverse any of them, just repeat the command with NO at the end instead of YES, or vice versa.
Feel free to add any of your favourites in the comments.
1. Make hidden applications' dock icons translucent.
defaults write com.apple.Dock showhidden -bool YES![]()
defaults write com.apple.iTunes invertStoreLinks -bool YES3. This allows you to drag widgets out of Dashboard onto the desktop. Requires the dock to be relaunched to take effect, so type "killall Dock" and press enter. Now, if you click and hold onto a widget in the dashboard and press F12 to return to the desktop, the widget won't disappear with the rest.
defaults write com.apple.dashboard devmode YES
defaults write com.apple.mail PreferPlainText -bool YES5. Set expanded save dialogs as default (showing column/list view of folders rather than a drop down menu). Replace TRUE with FALSE to reverse.
defaults write -g NSNavPanelExpandedStateForSaveMode -bool YES6. Display the currently chosen screen saver to be shown as the desktop background. Press Control-C or Command-. to stop. More details here.
/System/Library/Frameworks/ScreenSaver.framework/Resources/ ScreenSaverEngine.app/Contents/MacOS/ScreenSaverEngine -background7. Display useful system stats in the login window. More details here.
defaults write /Library/Preferences/com.apple.loginwindow AdminHostInfo SystemVersion Replace "SystemVersion" with one of the following for different stats:
SystemBuildSerialNumberIPAddressDSStatusTimeHostName
8. To remove accounts from the login window type this command with the short name of each account you wish to remove. More details here.
sudo defaults write /Library/Preferences/com.apple.loginwindow HiddenUsersList -array-add shortname1 shortname2 shortname39. Skip disk image verification. Potentially risky, use with disk images from trusted sources.
defaults write com.apple.frameworks.diskimages skip-verify -bool YES10. Put double scroll arrows at both ends of scroll bar. Use Appearance pane in system preferences to reset.
defaults write "Apple Global Domain" AppleScrollBarVariant DoubleBoth![]()
defaults write com.apple.CrashReporter DialogType none12. Set the history limit in Safari to a certain number of items and and/or a certain age.
defaults write com.apple.Safari WebKitHistoryItemLimit 2000defaults write com.apple.Safari WebKitHistoryAgeInDaysLimit 3013. Show hidden files in the Finder.
defaults write com.apple.finder AppleShowAllFiles -bool YES14. Enable the debug menu in Safari.
defaults write com.apple.safari IncludeDebugMenu -bool YES15. Deactivate Dashboard. Requires the dock to be relaunched to take effect, so type "killall Dock" and press enter.
defaults write com.apple.dashboard mcx-disabled -bool YESThe Ultimate Customize Toolbar Shortcut
If you want to customize the items in your toolbar (and there’s nothing wrong with that), just Command-Option-click the little white pill-shaped button at the top right of your window’s title bar, and the Customize Toolbar dialog will appear, right there in your window. Now you can just drag-and-drop icons onto the toolbar.
As well as dragging the customize items to your toolbar, you can also now drag files or folders as well. However, if you are only adding files to the toolbar you can just hold Command-Option while dragging them there - you don't need to bring up the customize dialog box.
From the customize dialog that appears you can choose from a number of items (shown below) and change the view options - icon, text or both.
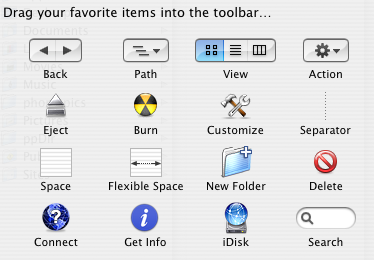
The added benefit of Command-Control clicking this button is that it works in every application that allows you to customize the Toolbar. Note that these other applications don't allow you to drag your own files, folders, applications etc. to the toolbar. You can only choose items from the dialog box.
10 Tips for Mastering Finder Windows
1. Normally you just double click to open an item, but if you hold option while doing it the current window will close as the new one opens.
2. Spring loaded folders allow you to easily drag a file wherever you want. If you drag the file onto a folder icon and hold it there for a while, the folder will spring open, allowing you to drag the file onto a folder within a folder. You can do this as many times in a row you want, and when you let go of the file all the windows that have sprung open will close again. Hold the Space bar while doing this to get rid of the delay before a folder springs open.
3. Look in the Finder Preferences (located in the Finder Menu) for more window options. For example you can change the delay for spring loaded folders, set the default location for a new finder window (Command-N) and set folders to always open in a new window.
4. You can change the view of your Finder windows by pressing Command-Option-T. This shows and hides the toolbar and sidebar. The contents of both of these are customisable by dragging files and folders to them (Hold Command and Option if dragging to the toolbar) or by choosing Customise toolbar from the View Menu. You can also resize the sidebar and turn it into icons without names.
5. To close every single Finder window, hold option while clicking the red X in the corner. Alternatively press Command-Option-W.
6. In list view (choose from the View menu or icons in the window toolbar) you can peek into folders using the expansion triangles. Option clicking one of these triangles will expand the folder along with any folders it contains. Option clicking again will collapse all these folders again.
7. In column view it is sometimes easier to navigate through the file structure using the arrow keys. In the other views this is still possible, but to go inside the selected folder press Command-Down. In list view Command-Right will expand the currently selected folder. This can be used with multiple folders selected to look inside them all at the same time.
8. You can do many tricks to resize column widths to the right size in column view.

10. Another tip gives details on browsing a website by command clicking on the title bar in Safari. This works even better in the Finder. Command Clicking on the title bar gives you the path to the current location, allowing you to jump to any of the enclosing folders.
11. You can use the Go menu to quickly navigate to common places such as Home, Applications and your 10 most recent folders. Most of these places have keyboard shortcuts associated with them.
Tips for Deleting Stubborn Files
Method 1 - Secure Empty Trash
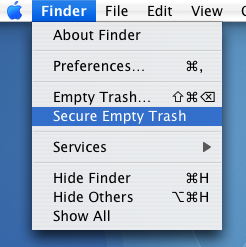
Method 2 - Third Party Applications
There are many applications available that allow you to force the trash to empty. One that is completely dedicated to it is Super Empty Trash, a free application with the sole purpose of helping you empty your trash. There are a few alternatives that perform many other tasks as well, such as OnyX (free).
Method 3 - Using the Terminal
This method requires a bit of care, as making a mistake in the Terminal can result in things going horribly wrong. To delete a file using this method, first open up the Terminal, located in the Applications/Utilities folder. Type in "rm -f " without the quotation marks, and with the space after the f. Then find the file that wont delete, and drag it to the Terminal window, and the path to that item should appear. Double check that this is the thing you want to delete, then press enter. If the item that won't delete is a folder rather than a file, type "rm -rf " instead.
If this still doesn't work, the next stage is to use "sudo rm -f " instead. This is a little more dangerous as you can accidentally delete lots more vital files. Carry out the steps as above, and this time you will be prompted to enter an administrator password.
Method 4 - Creating a temporary user account
This method is a little time consuming, but it is great if you don't want to use the Terminal. Start by going to the Accounts preference pane in the System Preferences and creating a new user account. It doesn't matter what details you give it, just remember the password. Next, move the troublesome file from your trash to the Shared folder, located in the Users folder. Log out of your account and log into the newly created one. From here, move the file into this users trash. Then log back out, and go back to your normal user account. Return to the Accounts pane in the System Preferences and delete the temporary account by selecting it from the list and hitting the delete key. Select Delete Immediately from the dialog box that appears, and the user account will gone, along with the stubborn file.
Use the Sidebar like the Dock
You can customise this sidebar by adding icons to it, such as commonly used applications and folders. For example, if you use iMovie a lot, open your applications folder, find iMovie and drag it to a position in the sidebar. Notice how the other icons shrink and slide away to make room for the new icon.
You can use this icon just how you would use it in the dock: Click on it to open the application, drag a file over it to open it in the application, and just drag it out of the sidebar to watch it vanish in a puff of smoke.
Drag-n-drop with open/save dialogs
Instead of painfully clicking through each level, you can just drag the folder from the finder straight into the dialog box. The open/save dialog instantly changes to display the contents of the folder you just dropped on.
Obviously you can use all the usual tricks with this, like Command-Tab to switch over to the Finder and back again, and exposé to find the window you want, but there are also a few extra quirks. For example, dragging any file to the dialog will display the enclosing folder, and you can also drag the folder icon from a Finder window's title bar.
Folder Actions
This is a feature of the Finder that very few people use, yet it is so powerful. Folder actions allow you to perform an action to any file that is dropped into the folder. What you can do is only limited by what you can script, or what scripts you can find.
Start by creating a new folder and checking that folder actions are enabled by right-clicking (control-clicking) and selecting “Folder Actions Setup”.
Next, choose a script from the list to attach, or press the plus (+) button to navigate to one of your own scripts. Also, make sure the “Enable Folder Actions” checkbox is checked.
Most of the example scripts involve image manipulation and converting from one file format to another. Selecting one of these format converting scripts will mean, for example, that all jpeg images dropped into the folder will be turned into tiff images.
However, as I mentioned at the start of this tip, this is only a taste of what you can do. Any applescript, automator workflow or shell script can be attached, and therefore the possibilities are endless!
Finder Column View
By default, columns are relatively thin, and quite often file names get truncated and aren't always easy to read. This is solved by holding your mouse over each name and waiting for a yellow box to come up showing the full name. Instead of holding your mouse there for a long time, simply hold down the option key to get the yellow box to appear instantly. You can even let go of the option key while you move the mouse up and down a list of shortened filenames.
The best place to use this is in open/save dialog boxes, as that is where I find columns get squished the most.
Another option to use is to double-click the "handle" at the bottom of the column, which is usually dragged to resize it. This will automatically resize your column to fit the longest name in the folder, resulting in no shortened names. Moreover you can option drag the column handle to change the default column width, which the finder will remember next time you open a window.
Create Zip Archives On The Fly
To create a zip archive for a folder, file, or a selection of folders or files, select them, right-click (or Control-Click) on one, and choose "Create Archive".
This will automatically archive your selection into a zip file, ideal for storing away, sending via email or to save space.
Icon Sidebars
Some people will choose to disable the sidebar completely by double-clicking on the divider turning off the toolbar completely (command-option-T) if they want to save space, but there is another option.
You can drag the divider bar until only the icon shows, there should be a point where the bar jumps into place. Now don't worry that you can't tell what the icons are, because putting your cursor over any of them brings up the name. If you still want a way to distinguish between them, try adding custom icons for each item.