A 1Password Power Tip
1Password is my favourite tool for managing my passwords. It help keep all my accounts secure by letting me use randomly generated passwords for every service so if one is compromised, all the others are still safe.
I’ve always thought that I’ve been using 1Password in the quickest and most efficient way possible. When I get to a login screen on a web site, I simply press Command-\ (or click the 1Password button in the Safari toolbar), type in my master password if needed, and voilà, I’m logged in.
However, Brett Kelly recently shared a “Super sweet 1Password trick” that allows you to skip out the login page altogether by adding a bookmark to your bookmarks bar that performs the entire login process for you.
Start by opening the 1Password app, and find one of your commonly used logins from the list. Then just drag the login into your bookmarks bar in Safari (or whichever browser you prefer to use).
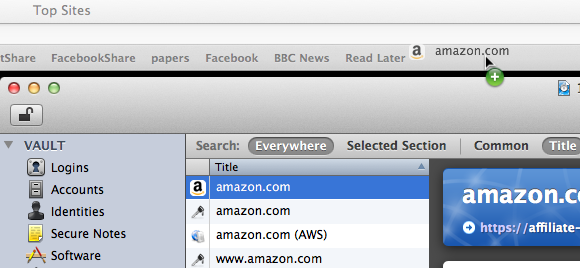
What have we just done? Try clicking on the newly created bookmark — you should see the web site load as expected, but then 1Password automatically fills out your username and password and logs you in. This means you can log into your most commonly used web sites with a single click!
If you haven’t typed in your master password in a long while, 1Password will prompt you for this before logging you in. But this is still quick (just type the password and press enter) and is clearly a good security measure.
How To Build Your Own Safari Extensions
I’ve just written a tutorial over at Macs in Chemistry on how to create a Safari Extension. It’s aimed at beginners, with no prior knowledge required. A bit of experience with JavaScript will be useful to really understand what you are doing, but this is something you can pick up along the way.
The tutorial guides you through making an extension that searches the PubChem database, but you can easily adapt it to work with any search engine you want. If there is interest I can write a follow up that addresses some more advanced concepts like automatic updating and injecting content into web pages.
If you are interested in Safari Extensions check out the Mac OS X Tips Safari Extensions collection, and feel free to copy any of my code.
Quickly enable Private Browsing
Normally when you are browsing the internet, Safari keeps a record of things like the pages you have visited, the files you have downloaded and the searches you have made. In most circumstances this is great as it can save time and help you retrace your steps. However, in some cases you may prefer to leave no record of your browsing, for example when you are using a public computer.
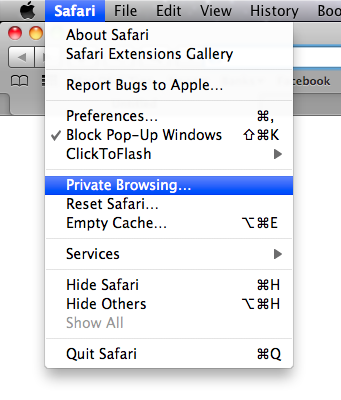
Safari’s Private Browsing mode is great for this. Just go to the Safari menu and choose “Private Browsing.” Click OK in the dialog box that appears and then you are browsing privately. Safari won’t store the sites you visit in the History menu, and your Google searches won’t be added to the Recent Searches menu.
Enabling and disabling Private Browsing through the Safari menu can be a bit annoying, especially if you find yourself doing it often. Luckily there are a couple of ways to speed this up.
In all menus in Mac OS X, an item followed by an ellipsis (…) means that action will be followed by a dialog box. If you hold down the Option key while the Safari menu is open, you will notice that the ellipsis after Private Browsing disappears. Now when you click it, you will skip the dialog box. This is a great trick for skipping the “Are you sure?” type dialog boxes in any Mac OS X application.
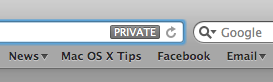
When Private Browsing is enabled, a “Private” button will appear the in address. Just click this button to quickly exit Private Browsing mode and return to normal browsing. This also has an “Are you sure?” dialog box, but Option-clicking it will skip it in a similar way.
You can also create a keyboard shortcut that does the same thing. Open up System Preferences and go to the Keyboard section. Under the Keyboard Shortcuts tab, click the “Application Shortcuts” item at the bottom of the list on the left.
Now click the plus (+) button to add a new shortcut. Choose Safari from the Application drop-down menu, and type “Private Browsing” into the Menu Title field. Make sure you don’t add the ellipsis (…) unless you still want the dialog box to pop up. Finally, choose your keyboard shortcut. I use Command-Shift-P.
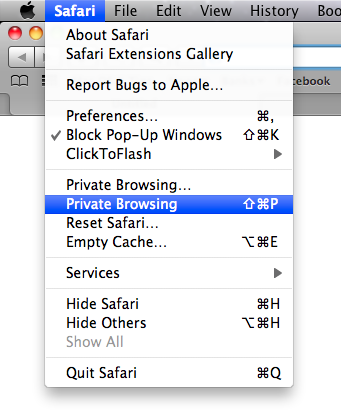
Now when you return to Safari, there should be a new Private Browsing item in the Safari menu, without the ellipsis and with your chosen keyboard shortcut next to it. Pressing these keys should quickly toggle Private Browsing on and off without you dealing with dialog boxes or having to go to menus.
Official Apple Safari Extensions gallery goes live
Just a quick note to say that the official Safari extensions gallery is now live on the Apple site, and Safari 5.01 is available via Software Update. Note that if you visit the extensions gallery with an older version of Safari, you won't see any of the download links.
There are a few extensions by Mac OS X Tips included, but it seems Apple are being quite picky and have only included a small selection of all the extensions that are out there.
You can view and download all of the Mac OS X Tips extensions over on our extensions page.

Extract the code from any Safari Extension
If you have been using any of the new Safari Extensions you might want to peek inside them to see how they work. Fortunately this is really easy because .safariextz files are just xar archives that can be extracted using the Terminal. Here's how you do it.
Start by downloading the Safari extension. It should come in the form of a file with a .safariextz extension. If you wanted to install the extension to use it in Safari you would just double-click it, but don't do that now as the file will disappear from your Downloads folder.
Instead open Terminal, located in the Utilities folder inside the Applications folder. In the window that appears, type the following line and then press return.
cd ~/Downloads/
This should be the path to the folder where the .safariextz file is located. You will need to change this if you have saved the extension somewhere else. For example you might use cd ~/Desktop/Extensions or /Users/matt/Documents/safariextensions/
If you are new to using the Terminal, note that starting with ~/ is a shortcut to inside your user folder, and starting with / is for inside your hard drive. The cd command is for changing directory, i.e. 'moving' to a folder.
Next paste in the following line and press return.
xar -xf 'TheExtensionName.safariextz'
You need to replace TheExtensionName with the filename of the extension. The quotes around the filename are only really important if it contains spaces. If you want to avoid typing in the name, you can just drag the file into the Terminal window from the Finder and it will be entered for you.
After you press return, a new folder will appear with the same name as the extension. This folder contains all the javascript, plist and HTML files that make up the extension. You can then go to the Extension Builder in Safari and click the plus (+) button to add the extension and edit it.
Try this out with some of the extensions I've made. Feel free to use any of my code for your own extensions. If you are feeling nice, leave a link back to http://www.macosxtips.co.uk/extensions.
Undo reopens last closed tab in Safari 5
Here’s a tip I forgot to include in the Safari 5 tips roundup.
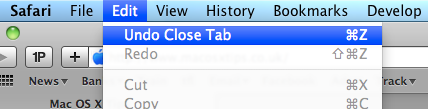
If you accidentally close a tab in Safari 5, you can just press Command-Z or choose “Undo Close Tab” from the Edit menu. This is fast becoming one of my favourite new features in Safari 5, and I use it all the time. Unfortunately it only works with the last closed tab, not the last closed window, but I guess things would start to get complicated if it did both.
Tips for Safari 5
Now we’ve all had a few days to play around with Safari 5, here are some tips for getting the most out of the new features.
1. Update plugins
The first thing you are going to want to do after you install Safari 5 is make sure all your plugins are up to date. Updates are available for 1Password, SafariStand and Saft. PithHelmet is not yet Safari 5 compatible, but an update is expected within days. ClickToFlash doesn’t require updating. For other plugins you will have to check on a case by case basis. Also keep an eye out to see if any of these plugins change to become Safari Extensions.
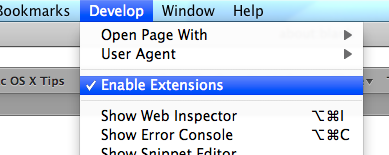
2. Enable Extensions
To enable extensions, check “Show Develop menu” under the Advanced tab in the Safari Preferences. Then find the Develop menu in the menubar and choose “Enable Extensions.” Now you can download extensions and double-click on them to install them in Safari. I’ve written a few that are available here, and there are loads of others available on the Safari Extensions Tumblr site.
Update: Extensions are now enabled by default in Safari 5.0.1.
3. Reader keyboard shortcut
On any page where the new reader function is available, just press Command-Shift-R to quickly bring it up. This will only work on pages that Safari decides are suitable for reader. Safari seems to be quite clever at figuring out whether a page contains an article. If there is not enough text in one place, or if there are clearly multiple articles on one page, the feature is disabled.
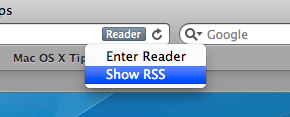
4. Access RSS feed on reader pages
On article pages, the reader button replaces the RSS button. If you want to access the RSS feed for the page, just click and hold on the reader button to bring up a menu with a list of all the available RSS feeds.
5. Print from reader
Reader provides a great way to print articles. It automatically strips out all the unnecessary stuff on a page such as adverts, while keeping in important images. For articles spread out over separate web pages, it even gathers them all together so you can read and print them more easily.
6. Change the look of reader
The only change that you can officially make to reader styles is the text size. With reader enabled, just press Command-+ (plus) and Command-- (minus) to increase and decrease the size.
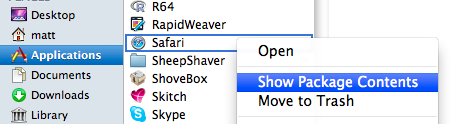
Modifying the look further can be done by editing a file within the Safari bundle, but be warned that this can disable Safari’s Keychain access (a precaution as the application has been tampered with). If you really want to do it, find Safari in your Applications folder, right-click it and choose Show Package Contents. Inside the package, in the Resources folder, you should find a file called Reader.html, which you can edit in your favourite text editor. To open it properly in TextEdit, choose Open from the File menu, press Command-Shift-G, paste in /Applications/Safari.app/Contents/Resources, and make sure you check “Ignore rich text commands.”
This file is mainly just CSS that defines the appearance of reader. Just experiment with it to figure out what changes what. Some popular changes are stopping the text from being justified, changing the colour of the links, and changing it to white text on a black background. Remember to make a backup of Reader.html before you make any changes.
7. Always open windows in new tabs
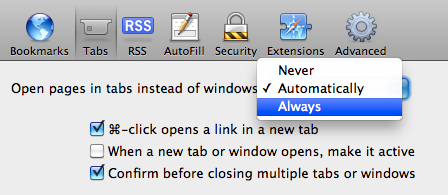
There is now a new setting in the Tabs Preferences to specify the behaviour of links that are set to open in new windows. Choosing “Never” keeps the old behaviour of opening in a new window, whereas “Automatically” opens these links in new tabs instead of windows. New window links that have a specified size like a small popup will still open in a new window unless you choose “Always.”
8. Improved Web Inspector
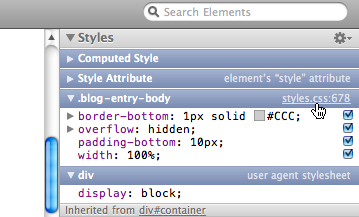
If you’re a web developer, this will be a welcome improvement. It’s also really useful for those developing extensions for Safari. One useful change that I noticed is that you can now click a link in the CSS inspector on the right to jump straight to the rule definition in the source file. The Javascript inspector also has improved breakpoint support, and there is a new Timeline Panel.
9. Searchable address bar
The address bar now Spotlight searches your history and bookmarks. So now when you start to type into it, instead of just matching URLs, pages with titles or contents that contain what you are typing will appear. I’m not sure if I really like this yet, as it’s a bit of a big change to get used to. Also it seems that Apple have decided to go in a different direction to Google Chrome and devote the address bar to history searching rather than Google searching.
10. Private Browsing mode
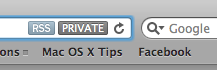
Safari now reminds you when you are in Private Browsing mode by placing a “Private” badge in the address bar. It’s a helpful reminder if you often accidentally leave Private Browsing enabled. When you’re are done, simply click on the badge to return to normal browsing mode.
11. Go watch some animated gifs
Finally Safari seems to be able to load animated GIFs in an acceptable amount of time, comparable to Firefox and Chrome. To test it out, head over to a page like this. If you’re feeling really ambitious, try loading a whole load of them simultaneously using my Linked Images extension.
Extensions in Safari 5
For me, yesterday’s most exciting announcement was the release of Safari 5. If you haven’t yet downloaded it, you can get it by going to Software Update in the Apple menu, or by downloading it from the Apple site. It has a whole load of great new features like Reader and Extensions, and we get our nice blue loading bar back and animated GIFs actually load in less than an hour.
Arguably one of the best new features is the support for Extensions. If you’ve ever used Firefox or Chrome you might be familiar with these. While the Safari Extensions gallery isn’t opening until “later this summer,” it is possible to enable Extensions right away.
To do this, first go to Preferences in the Safari menu. In the Advanced section, click the checkbox at the bottom to enable the Develop menu. Go to this menu (it should just appear in the menubar) and the select third item in the list, “Enable Extensions.” Now, when you go back to the preferences there is a new Extensions section. Considering the complexity of this process, I’m sure it won’t be long before Extensions are enabled by default.
So now Extensions are enabled, where can you get them from?
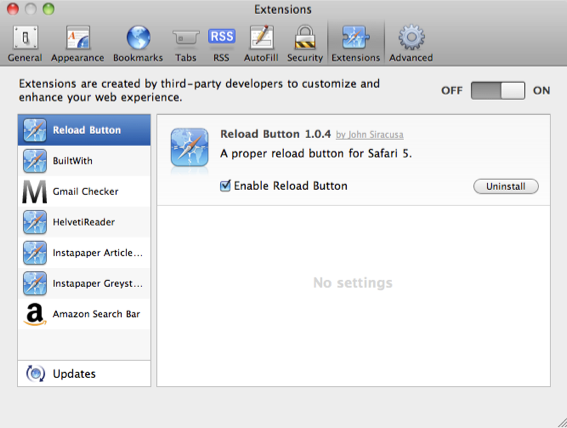
Well, before Safari 5 was even available, Panic managed to announce their Coda Notes extension. It looks great, but unfortunately it’s still “Coming Soon.” Almost as quick was John Siracusa, who has posted a simple extension on his Twitter feed that you can actually download. All it does is add a Reload button to the toolbar, something that many people have been asking for since it moved into the address bar in Safari 4. After you download the file, just double-click on it and it will be installed. It will actually be deleted from your downloads folder after it is installed, so don’t get confused when it disappears. Note that the button won’t be added to the toolbar automatically, you have to go to the View menu and choose “Customize Toolbar” to add it.
There are a whole load of other Extensions listed at this page. Currently there are things like a Gmail unread messages checker and an Amazon search bar, and it looks like new ones will be added as they are released. It is probably worth noting that as far as I know these haven’t been screened by Apple, so there might be an element of risk in downloading them. As always, you should only really download things from sources that you trust, so if you want to be really safe you might want to wait until the official Apple Extension Gallery is live.
[Update: There’s another great list of extensions over at reddit]
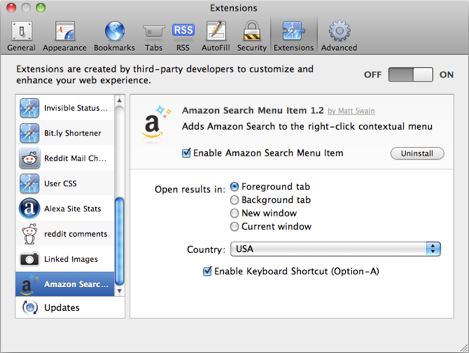
Once each Extension is installed, it should show up in the Extensions section of the preferences. From here you can enable and disable all Extensions, turn on automatic updates and uninstall any Extensions that you no longer want.
Remove the Add Bookmark button in Safari
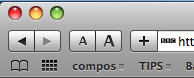
Since Safari 4, the Add Bookmark button (+) is now attached to the left hand side of the address bar. If you choose “Customize Toolbar...” from the View menu you can remove just about every item from the Toolbar, but unfortunately it doesn’t seem possible to remove the Add Bookmark button without also removing the address bar and the Google search box. However, this is a way to get around this.

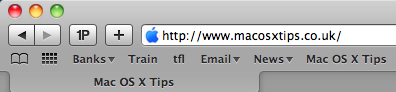

First, open up the Customize Toolbar dialog box and find the Add Bookmark button in the top row that is separate from the address bar. If you drag this to the toolbar, the button that is attached to the address bar will disappear. You are now free to drag off the separate button that you just added. The one that’s attached to the address bar won’t reappear, leaving you with a nice clean toolbar.
Watch videos before they have finished downloading
When you are downloading a video file to your computer using Safari, it is possible to start watching it before the download has finished. This is great for really long movies that take ages to download.
To do this just go to the downloads window in Safari (Command-Option-L) and find your video that's downloading. Click on the little magnifying glass icon to show the file in the Finder.
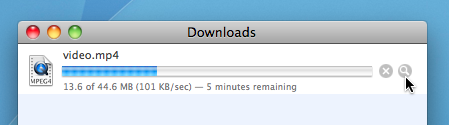
You will notice that the file has an extra extension of .download added to the end, and it doesn't open properly if you double-click on it. However, instead you can right-click on the file and choose "Show Package Contents". A new folder should open up, containing two files.
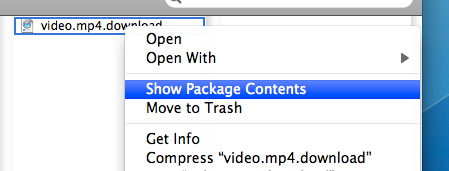
One will be called "info.plist" and the other will be the video you are downloading. Now you can just open it to watch the portion that has already downloaded. For some videos QuickTime will be unable to play them when they aren't completely downloaded. If you have problems, you can try using VLC instead.
10 Security and Privacy Tips

1. Disable "Open safe files after downloading"
If you do one thing this article suggests, this should be it. Unticking just one checkbox will protect you from most of the few dangerous Mac exploits around on the internet.
In Safari, choose Preferences from the Safari menu and then click on the General tab. Near the bottom, un-check the checkbox that says "Open safe files after downloading". There. Done.
2. Disable automatic login
Even if you only have one user on your Mac, requiring a username and password when starting up is great for security, especially if you have a laptop that can more be easily lost or stolen. You can do this from the Security section of System Preferences, by checking the checkbox "Disable automatic login".
While this isn't going to stop someone intent on stealing your personal data, regular thieves are more likely to just wipe the hard drive rather than going through all your personal stuff first.
3. Lock screen when away
There are a couple of ways to make your Mac require a password when you leave it. The easiest way is to set "Require password after sleep or screen saver begins" in the Security section of System Preferences. Here, you can also set a time limit so a password isn't required right away, but only after 15 minutes for example.
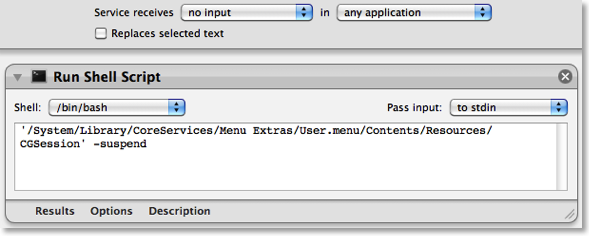
If you would prefer a keyboard shortcut to lock the screen, you can create this yourself. Open up Automator (in the Applications folder) and choose a Service template. From the library choose "Run Shell Script" and drag it across to the workflow area. In the text box paste the following command:
’/System/Library/CoreServices/Menu Extras/User.menu/Contents/Resources/CGSession' -suspend
Finally, change the "text" drop-down menu above the workflow to "no input" and then save you workflow as "Lock Screen". To add the keyboard shortcut, go to the Keyboard section of System Preferences and click the Keyboard shortcuts tab. Select Services from the list on the left, then scroll down to the bottom of the list on the right to find "Lock Screen". Double-click on the area to the right "Lock Screen", then press the keyboard shortcut you want. I used Command-Control-L.
4. Use 1Password to create and store internet passwords
One of the problems with having lots of accounts on the internet is that for them to really be secure, they should all have a different password. For example, if you use the same password for your bank account, your email account and some shady disreputable website, you are asking for trouble.
My solution to this is to use an application called 1Password to create and remember all my passwords for me. The only three passwords that I remember myself are my email password, my bank password and a master password for 1Password. All the others - for Facebook, reddit, Amazon, etc - are randomly generated 20 character strings that are created and remembered for me by 1Password. When I go to one of those web sites, 1Password simply prompts me for my master password, then fills in the rest for me.
Some of this functionality can be replicated for free using Keychain Access, but the real benefit of 1Password is its automation, and the fact that it works in Safari, Firefox and on your iPhone so you don't have to save your passwords separately for each.
5. Turn on the firewall
Mac OS X comes with a built in firewall, but it is actually turned off by default. You can turn it on in the Security section of System Preferences. The Mac OS X firewall is really simple to set up - just click start to turn it on. Some applications will have trouble working through the firewall, instant messengers for example. If you find you start having connection problems with an application, just add it to the allowed list in the firewall preferences.
6. Little Snitch
While a Firewall protects your computer from unwanted connections from the outside, Little Snitch does the opposite and blocks your private data from being sent out. If you start an application and it tries to send some data out to a server on the Internet, Little Snitch will inform you and ask if you want to allow it. Read more over at the Little Snitch site.
7. Encrypt and hide your private files
It isn't entirely obvious how to password protect files or folders in Mac OS X but there are a couple of ways.
If you just want to protect a single iWork or PDF document, you can do this from within the specific iWork application or from within Preview. In Pages, Keynote and Numbers '09 you can choose "Require password to open" from the Document section of the Inspector window. In Preview, when choosing "Save As.." on a PDF there is a checkbox to encrypt.
If you want to password anything else, you have to password protect an entire folder. The way this is done is using encrypted disk images. Once created these appear as a single file on your hard drive with a dmg extension. When you double-click on one, it will ask you for the password. If you enter the password correctly, it will mount a disk image on your desktop. So while unlocked, the disk image is just like a temporary folder on your desktop. You can copy files to it and delete files from it, and as soon as you eject it, the contents will be password protected again. Here’s a detailed article about how to set up a disk image.
8. Use FileVault
Personally, I don't use this option, but for those who want to be ultra-secure it is an amazing feature. It is similar to creating an encrypted disk image for some files, but instead it does this for your entire user folder. It is much more straightforward and transparent than setting up an encrypted disk image too. Just turn it on the Security section of System Preferences, and all your files will be unencrypted and encrypted on the fly when you log in and out of your computer.
I would say this is probably overkill for most users. If you have an encrypted disk image for your most sensitive files, then it is a bit redundant to then encrypt your entire user folder. It also causes some problems concerning Time Machine backups, and also huge problems if you happen to forget the password…
9. Secure Empty Trash
More and more people now realise that when you delete something off your hard drive, it doesn't actually get physically removed from the disk. All references to it are gone, but it stays there until something else is written over it. For private documents this is a bad situation because someone with some special software can recover you supposedly deleted files.
To prevent this, you can use the "Secure Empty Trash…" option which is in the Finder menu. This takes longer than the normal trash emptying, because your computer is actually writing nonsense data over the top of your deleted files.
10. Securely erase an entire hard disk
If you have an old Mac you are thinking of selling or throwing away, it might be a good idea to securely erase all the data from it. To do this you need to start up from the installer CD that came with your Mac by inserting it and holding the C key while the computer starts up. In the installer, choose Disk Utility from the menu bar.
If the hard drive you want to erase is not your main hard drive, you can skip starting up from the install disk and just open Disk Utility from the Utilities folder inside the Applications folder.
In Disk Utility, choose the hard disk from the list on the left, click on the Erase tab, and then click on the Security Options button. Now you have four levels of security to choose from. Each higher level of security takes longer to erase, so the 35-pass erase will take upwards of 24 hours and is only for the truly paranoid.
Of course, if you are throwing away the Mac or even just the hard drive, nothing works better and is quite as satisfying than the physical destruction option. Just take the hard drive out of the Mac and completely destroy it with a hammer.
14 Tips for Safari 4 Beta
1. Download Safari 4 beta
2. Update your plugins
While most plugins for Safari should be fine with the new version, InputManagers are likely to need updating. 1Password has released an update, but you have to go to the 1Password app in your Applications folder to access it. Go to the Preferences and in the updates section, check the box that says Include Beta versions. Now when you check for updates it should download a version that works with Safari 4. Updates for Glims and Saft are already available from their respective sites, but as far as I know PithHelmet and SafariStand haven't been updated yet.
3. Safari breaks Xcode
This one is mainly for developers. If you are using the 3.0 version of Xcode, you will find that it crashes on launch once you have downloaded the Safari 4 beta. Just head over to the Apple Developer Connection to download version 3.1.2 of Xcode that works fine.
4. New keyboard shortcuts
Now Control-Tab will allow you to cycle through your tabs (as opposed to Command-Tab that cycles through applications). Don't worry if you were used to the old shortcut though, Command-Shift-Arrows still work.
5. Add the zoom button
The new zoom feature works just like Safari on the iPhone. Instead of just increasing the font size, it increases the size of images and other media too. You can access this from the View menu or with the Command-+ and Command-- shortcuts. Alternatively, choose Customize Toolbar from the View menu to add the zoom button to the toolbar.
6. Restore the old style tabs
One of the biggest changes visually is the new tabs, located along the top of the window. If you aren't a fan of this, a simple Terminal command will move them back to the old position. Just open up Terminal (in Applications/Utilities) and paste in the following line:
defaults write com.apple.Safari DebugSafari4TabBarIsOnTop -bool FALSETo bring back the new tabs on top, just repeat the command with
TRUE at the end. You will need to restart Safari for changes to take effect.7. Disable search suggestions
Now the Google search box gives suggestions for your search as well as recent searches. To disable this, just use the following Terminal command in the same way as above:
defaults write com.apple.Safari DebugSafari4IncludeGoogleSuggest -bool FALSEAs before, repeat with
TRUE at the end to bring back suggestions.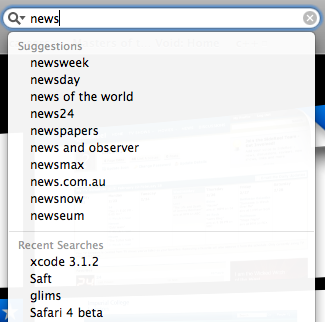
8. Bring back the old progress bar
Unfortunately, the new spinning progress indicator doesn't give you a good idea of how far the page has loaded. To bring back the old style, you have to use both of the following commands.
defaults write com.apple.Safari DebugSafari4IncludeToolbarRedesign -bool FALSEThis changes the progress indicator to a blue pie chart. To get the blue bar, now use the following command:
defaults write com.apple.Safari DebugSafari4LoadProgressStyle -bool FALSERepeat both commands with
TRUE at the end to go back to the new style.9. Disable bookmarks Cover Flow
If Cover Flow isn't your thing, you can get rid of it in the Bookmarks window by using the following Terminal command:
defaults write com.apple.Safari DebugSafari4IncludeFlowViewInBookmarksView -bool FALSERepeat with
TRUE at the end to bring back Cover Flow.10. Disable dimming in Top Sites zoom
When you choose a page in Top Sites, it zooms in to take up the whole page with a neat animation effect. To stop the page dimming during this, use the following Terminal command:
defaults write com.apple.Safari DebugSafari4TopSitesZoomToPageAnimationDimsSnapshot -bool FALSERepeat with
TRUE at the end to revert back to the original behaviour.11. Disable Top Sites
If, for some reason, you want to completely disable the Top Sites feature, use the following command:
defaults write com.apple.Safari DebugSafari4IncludeTopSites -bool FALSERepeating with
TRUE at the end will enable Top Sites again.12. Disable "fancy" URL suggestions
This is actually one of my favourite new features in Safari 4. When you are typing in a web address, suggestions are separated into Bookmarks, History and a Top Hit. If you prefer the old window, use the following command:
defaults write com.apple.Safari DebugSafari4IncludeFancyURLCompletionList -bool FALSERepeat the command with
TRUE at the end to enable the fancy completion list again.13. Add web sites to Top Sites
If you click the Edit button in Top Sites, it is easy to use the pins to force sites to stay in Top Sites. To manually add a site that isn't already there, open it up in a separate window, then drag the favicon (next to the address) over to one of the positions in Top Sites. You can also drag sites from your bookmarks to Top Sites.
14. Fix GrowlMail
Unfortunately GrowlMail will now cause Mail to crash. There is a quick workaround that involves putting GrowlMail into summary mode. Do this by using the following Terminal command:
defaults write com.apple.mail GMSummaryMode -int 2Supposedly the next version of GrowlMail should fix this problem.
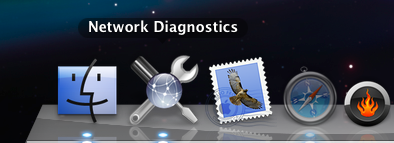
Diagnostics on the Dock
One of the great features of Safari on the Mac is the way it handles a network outage. If youre somewhere with an unreliable connection, say because youre using a distant wireless network (or if like me you live in Africa), then Safari will give you a message if it can’t connect to the internet with a button to click to open the network diagnostics window. What’s more, it automatically loads pages if the network becomes reconnected.
The diagnostics window is great because it gives you clear red/green indicator lights that show whats working and what isnt so you can quickly diagnose connection issues and find out whether its something wrong with your computer or with the network.
But what if your favourite browser is Firefox or if you have to deal with tricky or unreliable network issues without using Safari? Well, you dont need to go and use Safari, you can just open the Network Diagnostics application directly. The problem is, its not in the Applications or Utilities folder, its buried in
/System/Library/CoreServices. For a quick convenience diagnostics tool this is not so handy. To make the Network Diagnostics application more accessible, first navigate to
/System/Library/CoreServices. Look in this folder for Network Diagnostics, and drag it to the Dock. Now, whenever you have problems connecting to the internet via an application other than Safari, you can simply click on the icon in the Dock to find out what’s wrong.If you dont like a whole dock space being taken up with it, then you could make a shortcut to the application and add it to a folder of other applications stored in a neat stack at the documents end of the dock.
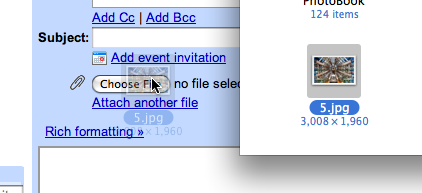
Drag and drop onto "Choose File" buttons in Safari
Simply drag your file from the Finder, hold it over the button and then let go.
Enable Single Window Mode in Safari
If you use Safari regularly, you may notice that certain links refuse to open in the same window. If a link is set to open in a new window, normally holding down Command while clicking it will make it open in a tab instead. However, in certain places (like Gmail messages) links open in a new window no matter what you do.

defaults write com.apple.Safari TargetedClicksCreateTabs -bool truePress return, and quit and reopen Safari. Now all links targeted for a new window will open in tabs instead. To change back to the normal settings, use the same command but with
false at the end instead:defaults write com.apple.Safari TargetedClicksCreateTabs -bool falseDon't forget there are loads of other tricks for Safari 3, such as enabling the web inspector and bookmarking all open tabs.
Disable Tooltips in Safari and Firefox
Most of the time you can solve this by hitting return or enter. The tooltip should disappear. If you want to completely disable them, it is a little bit trickier. Annoyingly, tooltips are applications specific, so you have to enable/disable them in every application. Some applications have a preference to do this. Frustratingly, many do not.
defaults write com.apple.Safari WebKitShowsURLsInToolTips 0Then press enter. You will need to quit and reload Safari for changes to take effect. Repeat with a 1 at the end instead of a 0 to reverse this. Note that tooltips are disabled by default in Safari 3. You can use this to enable them.
If you want to disable tooltips in Firefox, start by typing
about:config into the address bar. In the list that appears, find browser.chrome.toolbar_tips. An easy way to find it is to start typing browser.chro into the filter box. Once you have found the item, double-click on it to change it from true to false. Now when you are browsing, tooltips should be disabled. Simply double-click again to change things back.Tips for Safari 3

Merge Windows
Safari 3 now allows you to drag and drop tabs. You can drag a tab off the bar to create a new window or drag it onto an existing window to add it. You can also use this to rearrange the order of your tabs. If you have lots of open windows each with different numbers of tabs, there is an easier way to get them all into one instead of dragging and dropping. In the Window menu you will find the "Merge All Windows" command. This will instantly combine all your open windows into one tabbed window.
Enable Web Inspector
The Web Inspector allows you to easily see how the source code creates the web page. You can inspect various elements of the web page and view their style, metrics and properties. If you select an element in the inspector window, it will briefly be outlined in red on the web page.
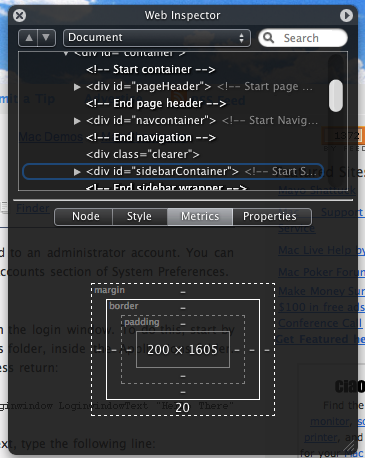
To enable the Web Inspector, open up Terminal (located in Applications/Utilities), type the following line and press return:
defaults write com.apple.Safari WebKitDeveloperExtras -bool trueNow quit and re-open Safari. Open a web page and right-click (Control-click) anywhere. You should see a new "Inspect Element" item in the list.
Pie Chart Loader
Normally Safari indicates how far a page has loaded using the address bar as a progress bar. The box gradually fills with colour from left to right. If you want, you can easily change this to the pie chart type indicator that is used in Mail. Again, open up Terminal (in Applications/Utilities), type the following command and press return:
defaults write com.apple.Safari DebugUsePieProgressIndicator -bool trueTo switch back to the old progress bar, simply repeat the above command with false instead of true.
Bookmark all tabs
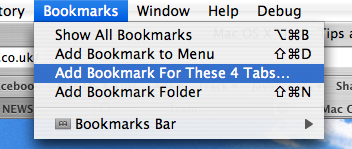
This new feature obsoletes the tip I wrote last month about bookmarking all tabs in Safari 2. Doing this is now much simpler - you just need togo to the Bookmarks menu. Here you should find an item that says something like "Add bookmark for these 4 tabs...". The default settings creates a bookmark called "Saved Tabs" in the bookmarks bar. This is actually a folder of your tabs, but it has been set to automatically open all the pages in tabs when clicked.
Others
There are loads of other new features in Safari 3 that are well known or don't really require any explanation. For example, the find command now dims the page and highlights the words you searched for, web history now indexes the text content of the page for easier searching, you can reopen the last closed window or the windows from your last session and all text fields are resizable.
5 Tricks for the Activity and Downloads Windows in Safari
When you first open the Activity window, it will show a list containing the titles of every Safari window you have open. Clicking the disclosure triangle next to one of the names will expand it to list every item on the page. As well as the HTML files and scripts, this includes media such as images and movies that are on the page.
1. Investigate problems
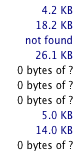
One of the best uses of the Activity window is to check the cause of a problem. If you are browsing a page and it fails to load, or it is taking ages to open, try taking a look in the Activity window. Down the right hand side you will see the size of each item. If an item is still loading this will show you how much has loaded, and if there is a problem you will see "not found" or "timed out".
2. View movies in their own window
Some services (such as YouTube) provide a full screen button, but often you may find yourself having to watch a tiny video embedded in a web page. To get the movie in its own window, use the Activity window. Click the disclosure triangle on the left of the page with your embedded movie in to expand the list of every element in the page.
If you are watching a Quicktime movie, the item you want is probably the biggest one in the list. It may also continue loading after the rest of the page has finished. Look for a file extension of .mov or .mpg. Once you find it, simply double-click on it to open it up in its own window.
If you are watching a flash video that doesn't have a full screen button, you will need to find the .swf file. This is not necessarily the largest file.
3. Download embedded media
When a movie or music file is embedded in a page, it is not always easy to download it. If there was a link to the file, you could just hold the Option key and click it, but what do you do if there isn't?
For Quicktime movies and MP3 files, this is easy. Open up the Activity Window and locate the file. it should be a relatively large file with something like a .mov, .mpg or .mp3 file extension. Once you have found it, simply hold Option and double-click on it. Alternatively, pressing Option-Return will download whatever item is selected in the list.
For flash videos, you will want the .flv file. It's not always obvious which file this is. It should be the largest file on the page, and may still be loading. For YouTube videos, it is called get_video and doesn't have the .flv extension. Double-clicking this file will start it downloading. If the file doesn't have the .flv extension, you will have to add it on after the download has finished. To watch these movies you will need either the Perian Quicktime plugin or a player such as VLC.

4. Paste and drag into Downloads Window
A little known feature of the downloads window is that you can copy and paste an address into it. Say you want to download a movie that you have listed in the Activity window. Simply select it, choose copy (Command-C) and then click on the Downloads window. Now just choose paste (Command-V) and the movie will start downloading. This works with any kind of link or address. One of the best uses for this is if you have a long list of addresses. Simply select them all together and then copy and paste them into the Downloads window. All of the downloads will begin at the same time.
If copying and pasting isn't for you, you can either use the Option-click method, or you can simply drag things into the Downloads window. Drag links, selections, and even pictures onto the Downloads window to download them.
5. Bookmark all tabs
This is a nice trick to bookmark every page you have open at the same time. This is useful if you want to preserve all your open windows when you quit Safari so you can easily open them all up again next time you open Safari.
Start by opening up the Activity window. Collapse all the disclosure triangles so all you see is the titles of each page. Select all (Command-A) and copy the selection to the clipboard (Command-C). Now open up the Bookmarks window (Command-Option-B). Find where you want to keep these bookmarks and then paste (Command-V).
A good place to put them is in a folder on the Bookmarks Bar. Now, next time you open up Safari you can click on the folder in the bar and select "Open in Tabs" from the bottom of the menu. Alternatively, you can use the Auto-Tab method.
This trick is also great for reordering your tabs. Paste them into your bookmarks and them open them up again in the order that you want them.
Quickly Jump to Address Bar in Safari
Hey... Is there anyway to keep the URL address highlighted when I start Safari? It would be so much easier rather than having to always keep clicking the address bar when I want to switch sites as soon as I run Safari... Thank you so much!
When you start Safari or open a new Safari window, normally the address bar is highlighted. This means that you can start typing an address straight away. However, if you have Safari set to automatically display your home page when opening a new window, the address bar is not highlighted.
For example, if you have Google as your home page, when you load up Safari or open a new window the Google home page will load and the search box will be highlighted instead of the address bar. If you type an address and press enter, it will Google search the address rather than just going to it.
So how do you solve this? Well the obvious answer is to stop Safari loading up your home page in new windows. You can do this from the Preferences located in the Safari menu. Under the General tab, set the "New windows open with:" menu to Empty Page.
![]()
![]()
But what do you do if you want to keep the automatic loading of your home page, or if you want to quickly jump to the address bar when you are already viewing a web page? The answer lies with keyboard shortcuts. As you only use the keyboard when typing in a web address, you don't want to have to move your hands to the mouse and click on the address bar before typing. Instead of doing this, simply hit Command-L before typing the address. You will notice that the address bar automatically highlights, ready for you to type away. The command is actually located in the File menu, as "Open Location..." and conveniently the same keyboard shortcut works in Firefox.
If you don't have any Safari windows open, Command-L will open up an empty window and highlight the address bar. This is similar to the function of Command-N for a new window, but Command-L has the added benefit of opening an empty window, even if you have Safari set to automatically open your home page.
As a bonus tip, hit Command-Option-F to quickly jump to the Google search box in the top right.
Address Book Tips
Add Contacts to your Safari Bookmarks
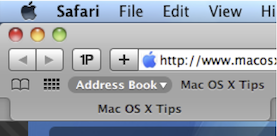
If lots of your contacts have their own web sites, you might be interested to know that you can automatically add these to your Safari bookmarks bar. Open up Safari go to the Preferences (in the Safari Menu). In here click the Bookmarks tab and check the box that says “Include Address Book” in the Bookmarks Bar. Now a new folder will appear at the far left of your Bookmarks bar. In here will be the web sites of all you contacts who have a home page set in their Address Book entry.
Address Book integrates quite well into iChat, the Mac OS X instant messenger. If a person in your Address Book is online and using iChat, a little green dot will appear next to their picture. Clicking on the dot will open up iChat, where you can start a new conversation with the person.
Put your Contacts in the Spotlight
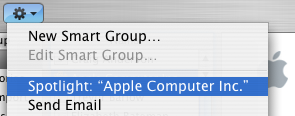
In Address Book, select which contact you want to search, right-click on their name and choose “Spotlight [name]”. The spotlight window will pop up, and show documents, photos, iCal events, mail messages and iChats related to this person. This is one of my favourite features of Spotlight — it allows you to use it as a personal organiser and links together Address Book, iCal, Mail and iChat.
If you don't have Address Book open, you don't need to bother opening it up to Spotlight search someone. Simply type their name into Spotlight for the same results.
Moreover, Spotlight remembers files that people have sent you. When searching for one of your contacts, Spotlight will list any files they sent as attachments to you, providing you received them in Mail.
Highlight Groups
If you hold down the Option key while you are viewing a contact, all the groups that they are in are highlighted in a lovely yellow.
Merge two contacts
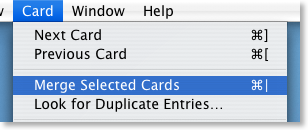
If somehow you end up with two entries in your address book for the same person, you can easily merge the two. Select the two entries by clicking on one in the list and then Command-clicking on the other. Now click on the Card menu and choose “Merge Selected Cards”. If you have a huge contact list and you suspect some duplicate entries, you can also choose “Look for Duplicate entries” from the Card menu.
Large Type
If you want to read a person's phone number off the screen while dialing it across the room, you can make it display in large numbers across the screen. To do this, click on the number and choose “Large Type” from the pop-up menu.
Address Book Sharing
If you want to share your address book (for example with your family or secretary) you can do so via MobileMe, Yahoo!, Google or an exchange account. In Address Book just go to the Preferences and click on the Accounts tab. Be careful with the Google and Yahoo synchronisation though, you might end up accidentally adding everyone you ever sent an email to into your address book.
Using vCards
In reality, most people don't have .Mac, so the standard way to share contacts is using vCards. A vCard is a file containing a contact's information that you can attach to an email and send to whoever you want. Luckily, vCards work really well with Address Book.
To create a vCard for a specific contact, select them from the list and right-click (Control-click) on their name. From the pop-up menu choose "Export vCard...".
To create a vCard that contains the information for all the people in a certain group, select the group you want from the list, right-click on it and choose "Export Group vCard...".
If you receive a vCard from someone else as an email attachment, you can add it to your address book in a couple of ways. If you received it in Mac OS X's Mail application, simply drag it from the email message across to Address Book. If not, save it to your Hard Drive and then choose Import vCards (Command-O) from the File Menu in Address Book.
Make Your Own Card

Restrict Private Information
If you don't want to share all of your contact information with everyone you send your vCard to, you can choose to keep certain parts private. Go to the Address Book Preferences and check "Enable Private Me Card". Now when you edit your own card, you can use the check boxes to choose which information is exported as your vCard.
Printing Envelopes
You can print an envelope addressed to a contact by choosing Print from the File menu with the chosen person selected. In the print dialog you might have to click the blue disclosure triangle to show all the settings, and choose Envelopes from the Style drop-down menu.
Drag Chunks of Text onto Dock Icons
Doing this with different applications will produce different results. If the application will accept the text, it will darken when you hold the selection over it. Note that some applications will only accept the text if it is in a certain format (a web address for example). Here are the results with a few common applications. If you know of any more, add them in the comments.
1. Safari - If you drop a web address (i.e. something that starts with http://) on Safari, it will load up that address. If you drag any other bit of text, it will perform a Google Search on it. This is mainly useful if the text is from a non-cocoa app that doesn't have the "Search in Google" item in the right-click context menu.
2. Firefox - If dropped text is a web address, Firefox will load it. This is helpful if you want to view a site in a browser other than your default browser.
3. Mail - A new message will load up with the dropped text as the main message body. Annoyingly the text is placed in the body even if it is an email address.
4. TextEdit - As expected, this loads a new document containing the dropped text.
5. Skype - If the dropped text is a phone number, Skype will call it. This will also work with nicknames in your contact list.
6. Script Editor - A new script window will open up containing the dropped text. Script Editor will then attempt to compile it.
7. iTunes - If you drop a podcast address onto iTunes, it will subscribe to it. If the address isn't a podcast, iTunes will attempt to do it anyway (and fail).
8. Acquisition - Starts a new search with the dropped text.
9. Newsfire - Adds a new feed with the text as the address. (Why not try it out with http://feeds.feedburner.com/macosxtipsfeed )
10. Stickies - This will make a new Stickies note containing the text open up.
11. Dictionary - This will show you the definition of the dropped word. If you drop a selection of words, Dictionary will display the definition of the first. (In cocoa apps, it's probably quicker to use this keyboard shortcut).
Most of these also work if you drag the text to the desktop to create a text clipping first, and then drag it to the Dock icon.
Top 15 Terminal Commands for Hidden Mac OS X Settings
Update: This article is very old. Most of the Terminal Commands still work, but consider checking out our top Terminal commands for Leopard and Snow Leopard. Our Terminal Tips category also has loads of other ways help you get the most out of your Mac.
There are a huge amount of hidden settings for Mac OS X and its applications that aren't accessible from preferences dialog boxes or the System Preferences. Applications such as Tinkertool and Mac Pilot allow you to access some of these, but the real flexibility is from the Terminal. From here it is possible to edit any preferences file for any application on your Mac.You'll find the Terminal in the Utilities folder within the Applications folder. To carry out any of the following commands you will need to copy/paste or type in the line of text then hit enter. For the most part, applications will need restarting before changes take place. For most applications you can just quit and open them again, but for the Finder and the Dock it is easiest to just type “killall Finder” or “killall Dock” into Terminal after the command.
To reverse any of them, just repeat the command with NO at the end instead of YES, or vice versa.
Feel free to add any of your favourites in the comments.
1. Make hidden applications' dock icons translucent.
defaults write com.apple.Dock showhidden -bool YES![]()
defaults write com.apple.iTunes invertStoreLinks -bool YES3. This allows you to drag widgets out of Dashboard onto the desktop. Requires the dock to be relaunched to take effect, so type "killall Dock" and press enter. Now, if you click and hold onto a widget in the dashboard and press F12 to return to the desktop, the widget won't disappear with the rest.
defaults write com.apple.dashboard devmode YES
defaults write com.apple.mail PreferPlainText -bool YES5. Set expanded save dialogs as default (showing column/list view of folders rather than a drop down menu). Replace TRUE with FALSE to reverse.
defaults write -g NSNavPanelExpandedStateForSaveMode -bool YES6. Display the currently chosen screen saver to be shown as the desktop background. Press Control-C or Command-. to stop. More details here.
/System/Library/Frameworks/ScreenSaver.framework/Resources/ ScreenSaverEngine.app/Contents/MacOS/ScreenSaverEngine -background7. Display useful system stats in the login window. More details here.
defaults write /Library/Preferences/com.apple.loginwindow AdminHostInfo SystemVersion Replace "SystemVersion" with one of the following for different stats:
SystemBuildSerialNumberIPAddressDSStatusTimeHostName
8. To remove accounts from the login window type this command with the short name of each account you wish to remove. More details here.
sudo defaults write /Library/Preferences/com.apple.loginwindow HiddenUsersList -array-add shortname1 shortname2 shortname39. Skip disk image verification. Potentially risky, use with disk images from trusted sources.
defaults write com.apple.frameworks.diskimages skip-verify -bool YES10. Put double scroll arrows at both ends of scroll bar. Use Appearance pane in system preferences to reset.
defaults write "Apple Global Domain" AppleScrollBarVariant DoubleBoth![]()
defaults write com.apple.CrashReporter DialogType none12. Set the history limit in Safari to a certain number of items and and/or a certain age.
defaults write com.apple.Safari WebKitHistoryItemLimit 2000defaults write com.apple.Safari WebKitHistoryAgeInDaysLimit 3013. Show hidden files in the Finder.
defaults write com.apple.finder AppleShowAllFiles -bool YES14. Enable the debug menu in Safari.
defaults write com.apple.safari IncludeDebugMenu -bool YES15. Deactivate Dashboard. Requires the dock to be relaunched to take effect, so type "killall Dock" and press enter.
defaults write com.apple.dashboard mcx-disabled -bool YESSeven Simple Safari Shortcuts
1. Use Tabs
This feature is arguably one of Safari's most useful, but, surprisingly, it isn't turned on by default. Tabbed browsing allows you to cut clutter by opening multiple web pages in one window. A tabs bar appears below your bookmarks bar, allowing you to switch between different web pages in the same window. To enable this, Go to Safari --> Preferences, and click on Tabs. Then choose "Enable Tabbed Browsing." Now Safari has a whole world of new abilities. Command-Clicking a link or bookmark will open it in a new tab. You can use your keyboard to quickly cycle between tabs. Even dragging links onto a tab or the tab bar will open it in a different tab. Command-W will just close the tab you are on, and Command-Option-W will close all tabs but the one you are on.2. Visit www.pimpmysafari.com/
This site has all the great plug-ins, bookmarklets and applescripts that allow you to enhance Safari. It promotes three plug-ins as the essentials: Saft, Pithhelmet and SafariStand, saying "If you only install three, make it these". Note that although much of the stuff on Pimp my Safari is free, some is shareware, which means you will have to pay to access all the features.3. Use Snapback
The Snapback button is not very well known, but is extremely powerful. Imagine you are at a page you really like, but then you stumble off, browsing the web. Snapback allows you to instantly jump back to your original page. It works in three ways:Firstly, when doing a google search, the results page is set as the snapback page. You can click a link in the results, navigate though a few more pages, and then hit the Snapback button to return to the search results. The snapback button for google searches is located in the google search field in the top right of each window.
Secondly, when you type a URL into the address bar, choose a bookmark or click an item in your history, it will be set as the snapback page. The snapback button to jump to this page is located at the far right of the address bar.
Finally, you can override the automatic snapback setting, and press Command-Option-K to set a page for snapback. This can also be accessed through the History menu, choosing "Mark Page for SnapBack."
Note that Snapback is a temporary thing. The page assigned for trackback will only last until you do one of the above things.
4. Autofill Passwords
Safari's autofill feature can do anything from remembering passwords to automatically filling your your name and address from your Address Book Entry. To make Safari automatically remember a password for you, enter it yourself, and click "yes" when safari offers to remember it for you. If you have already selected "Never for this Web Site" in the past, check out this tip for if you have changed your mind. You can manage all of your passwords in Keychain Access (Applications/Utilities). The way keychain access works is that all of your passwords are accessible by using just one password, by default, your login password. As a result, most web site passwords will just appear automatically on a web page, as the "login" keychain is unlocked when you log into Mac OS X. Use the search field to find the web site you want the password for, and double click its entry. Under Attributes, click show password, when you will be prompted for your login password.5. Combine RSS feeds
One of the great things about using Safari as an RSS reader is the ability to make a folder of RSS feeds from related news sites (for example, all the mac tips sites I visit regularly) and setting it to Auto-tab. Then, when you click on the folder, Safari will combine all the RSS feeds and give you a list of the latest news from all the sites in the folder.6. Make web Receipts
The PDF Services button in the Print dialog can be used throughout Mac OS X, but it is especially useful in Safari. This is because of the shortcut to the web receipts folder. You know those important pages, like your bank statement and the receipt from buying something online, that recommend you to print the page. Well Web receipts is an easier alternative. Press Command-P as if you were going to print the page, but then click on PDF and select "Save to Web Receipts Folder..." This will create a PDF of the page in Documents/Web Receipts, a handy place to store all your important information should you need it. Also, Branin Johnson sent in this tip regarding Web Receipts with the same name getting overwritten.7. Use pop-up blocker
A really obvious one, and a popular one. With the pop-up blocker enabled (Go to the Safari menu, and select "Block Pop-up windows") you can almost forget that pop-ups exist. However be wary that although most pop-ups are annoying adverts, some contain useful information. If you come across a web site that doesn't seem to be working properly, or you think you might be missing some information, temporarily turn of the pop-up blocker and check to see there isn't a useful pop-up window.Browsing a Site with the Title Bar
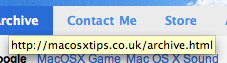
You could always click the back button over and over again, but this is a fairly laborious method. Clicking and holding the back button will give you a list of all thepages you have been too, but only by title.
If you Command-Click on the title of the page in the title bar of the Safari window, a list will pop up with all the pages above your current location in the file hierarchy. If, for example, you are on http://www.apple.com/findouthow/mac/, Command-Clicking on the title bar will display:
http://www.apple.com/findouthow/mac/
http://www.apple.com/findouthow/
http://www.apple.com/
This gives you a quick way to navigate back to a main page of a site.
Drag and Drop Bookmarks
This is a much quicker way to fill your bookmark folders than using the Bookmarks menu, and also has a few other useful features. For example you can drag a URL into an unused place in the tab bar, it will open it in a new tab. If you drag a URL onto an already open tab, it will load the page in that tab.
URLs can be dragged from your files, links in web pages and from the location bar at the top of every safari window.
If you want to file your bookmarks away somewhere that isn't in the bookmarks bar, a quick way to do it is to click the bookmarks icon at the far left of the bookmarks bar (or press Command-Option-B) while you are viewing the page you wish to save. Then, when the bookmarks page is open, the URL will stay in the location bar at the top. You are now able to drag and drop that into any folder you wish.
Web Receipts PDF Services
The Save to Web Receipts option in the print dialog box overwrites other documents with the same website name. There is an easy way around it however, there is an automator action controlling this function.
Save PDF to Web Receipts Folder.workflow is located in the /Library/PDF Services folder of the root of the hard drive. I added two lines to this file that would append the date and time to the filename. Now, pdf files of websites with the same site title, will have unique files in the web receipts folder.
You can easily modify all of the scripts in that folder to add additional functionality to your print dialog boxes.
Here's the modified file: http://www.braninjohnson.com/downloads/Save PDF to Web Receipts Folder.workflow.zip
The automator workflows are stored in the Library at the root level of your hard drive, not in your individual user library. As a result, this will change the way the web receipts function works for all users on your mac, and will require a administrator password to change. As usual I recommend creating a backup copy of the old file before you replace it with anything, just incase everything goes pear-shaped.
Undo Preventing Safari Autofill
Once it has been clicked, Safari refuses to remember any passwords for that website, which can get to be a lot of hassle, especially if you visit the site daily. Luckily there is an easy fix for this, which lies in Keychain Access.
Firstly, open up Keychain Access (Applications/Utilities) and look for the site address in the "login" keychain. In the list you will see an entry that looks something like this:
www.examplesite.com (Passwords not saved)
Just delete that item from the login keychain, and then restart Safari. The next time you enter your unsername and password on that site, Safari will prompt you to save it.
Cycle Between Tabs
In Safari and Firefox this is a piece of cake. Pressing Command-Shift-Left Arrow (or Right Arrow) in Safari will cycle through all your open tabs.
In Firefox its Command-1 through to Command-9, for the first nine tabs at least. Confusingly these are the same shortcuts Safari uses for the first nine bookmarks. If you have more than nine tabs open, Control-Page Up and Control-Page Down Will let you scroll through them.
Email Bookmarklet
Note: Safari now has this feature — just look in the File menu. For more features check out this Safari Extension.
One feature that Safari lacks is the option to email a web page to someone. This can easily be done by creating a bookmarklet to place in the bookmarks bar.
A bookmarklet is a small piece of Javascript that you can save as a bookmark and reuse. For the email page bookmarklet, enter the following into the address bar in Safari:
javascript:location.href='mailto:?SUBJECT='+document.title+'&BODY='+escape(location.href)
Now drag the globe icon at the start of the URL to the bookmarks bar, and name the bookmarklet "Mail this page" or something similar. When you click it, your email client will open with a new message containing the web address and the title of the web page. Now all you need to do is choose who to send it to.
Auto-Tab Bookmarks
If you visit the same collection of website every day, this will save you making multiple trips to the bookmarks menu.
Launch Safari and make sure tabbed browsing is enabled. (In the Tabs section of Safari preferences make sure Enable Tabbed browsing in clicked)
Click on the bookmarks button and create a new folder, giving it a descriptive name. Copy/Move all your favourite bookmarks into it, and drag it to the bookmarks bar.
Then enable the "Auto-Click" option next to the folder. Now a small square will appear next to your bookmark folder instead of a downward arrow, and when you click it, each site will open in a separate tab.