10 Security and Privacy Tips
1. Disable "Open safe files after downloading"
If you do one thing this article suggests, this should be it. Unticking just one checkbox will protect you from most of the few dangerous Mac exploits around on the internet.
In Safari, choose Preferences from the Safari menu and then click on the General tab. Near the bottom, un-check the checkbox that says "Open safe files after downloading". There. Done.
2. Disable automatic login
Even if you only have one user on your Mac, requiring a username and password when starting up is great for security, especially if you have a laptop that can more be easily lost or stolen. You can do this from the Security section of System Preferences, by checking the checkbox "Disable automatic login".
While this isn't going to stop someone intent on stealing your personal data, regular thieves are more likely to just wipe the hard drive rather than going through all your personal stuff first.
3. Lock screen when away
There are a couple of ways to make your Mac require a password when you leave it. The easiest way is to set "Require password after sleep or screen saver begins" in the Security section of System Preferences. Here, you can also set a time limit so a password isn't required right away, but only after 15 minutes for example.
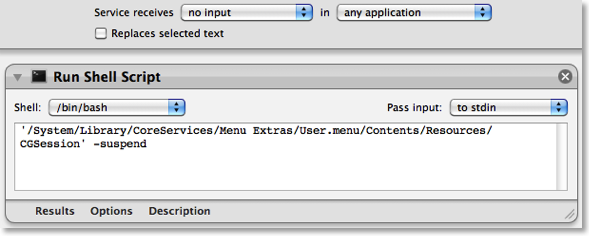
If you would prefer a keyboard shortcut to lock the screen, you can create this yourself. Open up Automator (in the Applications folder) and choose a Service template. From the library choose "Run Shell Script" and drag it across to the workflow area. In the text box paste the following command:
’/System/Library/CoreServices/Menu Extras/User.menu/Contents/Resources/CGSession' -suspend
Finally, change the "text" drop-down menu above the workflow to "no input" and then save you workflow as "Lock Screen". To add the keyboard shortcut, go to the Keyboard section of System Preferences and click the Keyboard shortcuts tab. Select Services from the list on the left, then scroll down to the bottom of the list on the right to find "Lock Screen". Double-click on the area to the right "Lock Screen", then press the keyboard shortcut you want. I used Command-Control-L.
4. Use 1Password to create and store internet passwords
One of the problems with having lots of accounts on the internet is that for them to really be secure, they should all have a different password. For example, if you use the same password for your bank account, your email account and some shady disreputable website, you are asking for trouble.
My solution to this is to use an application called 1Password to create and remember all my passwords for me. The only three passwords that I remember myself are my email password, my bank password and a master password for 1Password. All the others - for Facebook, reddit, Amazon, etc - are randomly generated 20 character strings that are created and remembered for me by 1Password. When I go to one of those web sites, 1Password simply prompts me for my master password, then fills in the rest for me.
Some of this functionality can be replicated for free using Keychain Access, but the real benefit of 1Password is its automation, and the fact that it works in Safari, Firefox and on your iPhone so you don't have to save your passwords separately for each.
5. Turn on the firewall
Mac OS X comes with a built in firewall, but it is actually turned off by default. You can turn it on in the Security section of System Preferences. The Mac OS X firewall is really simple to set up - just click start to turn it on. Some applications will have trouble working through the firewall, instant messengers for example. If you find you start having connection problems with an application, just add it to the allowed list in the firewall preferences.
6. Little Snitch
While a Firewall protects your computer from unwanted connections from the outside, Little Snitch does the opposite and blocks your private data from being sent out. If you start an application and it tries to send some data out to a server on the Internet, Little Snitch will inform you and ask if you want to allow it. Read more over at the Little Snitch site.
7. Encrypt and hide your private files
It isn't entirely obvious how to password protect files or folders in Mac OS X but there are a couple of ways.
If you just want to protect a single iWork or PDF document, you can do this from within the specific iWork application or from within Preview. In Pages, Keynote and Numbers '09 you can choose "Require password to open" from the Document section of the Inspector window. In Preview, when choosing "Save As.." on a PDF there is a checkbox to encrypt.
If you want to password anything else, you have to password protect an entire folder. The way this is done is using encrypted disk images. Once created these appear as a single file on your hard drive with a dmg extension. When you double-click on one, it will ask you for the password. If you enter the password correctly, it will mount a disk image on your desktop. So while unlocked, the disk image is just like a temporary folder on your desktop. You can copy files to it and delete files from it, and as soon as you eject it, the contents will be password protected again. Here’s a detailed article about how to set up a disk image.
8. Use FileVault
Personally, I don't use this option, but for those who want to be ultra-secure it is an amazing feature. It is similar to creating an encrypted disk image for some files, but instead it does this for your entire user folder. It is much more straightforward and transparent than setting up an encrypted disk image too. Just turn it on the Security section of System Preferences, and all your files will be unencrypted and encrypted on the fly when you log in and out of your computer.
I would say this is probably overkill for most users. If you have an encrypted disk image for your most sensitive files, then it is a bit redundant to then encrypt your entire user folder. It also causes some problems concerning Time Machine backups, and also huge problems if you happen to forget the password…
9. Secure Empty Trash
More and more people now realise that when you delete something off your hard drive, it doesn't actually get physically removed from the disk. All references to it are gone, but it stays there until something else is written over it. For private documents this is a bad situation because someone with some special software can recover you supposedly deleted files.
To prevent this, you can use the "Secure Empty Trash…" option which is in the Finder menu. This takes longer than the normal trash emptying, because your computer is actually writing nonsense data over the top of your deleted files.
10. Securely erase an entire hard disk
If you have an old Mac you are thinking of selling or throwing away, it might be a good idea to securely erase all the data from it. To do this you need to start up from the installer CD that came with your Mac by inserting it and holding the C key while the computer starts up. In the installer, choose Disk Utility from the menu bar.
If the hard drive you want to erase is not your main hard drive, you can skip starting up from the install disk and just open Disk Utility from the Utilities folder inside the Applications folder.
In Disk Utility, choose the hard disk from the list on the left, click on the Erase tab, and then click on the Security Options button. Now you have four levels of security to choose from. Each higher level of security takes longer to erase, so the 35-pass erase will take upwards of 24 hours and is only for the truly paranoid.
Of course, if you are throwing away the Mac or even just the hard drive, nothing works better and is quite as satisfying than the physical destruction option. Just take the hard drive out of the Mac and completely destroy it with a hammer.