Make the Most of iPod Notes
Creating Your Notes
![]()
The easiest tool to use to create plain text files is TextEdit. Open it up and press Command-Shift-T or choose Make Plain Text from the Format menu. Once you are done writing your note, choose Save As from the File menu. You'll want to save it in the Notes folder inside your iPod.
Warning: Now you have enabled disk use for your iPod, you will need to eject it before you unplug it. Drag it to the trash or right-click and choose eject.
Each notes file is limited to 4KB by the iPod and if yours is too long, the end will be cut off. To avoid this, Daniel Duris has created an online tool to divide up long eBooks into 4KB sections. At the end of each section is a link to the next one, making it as simple as turning the pages of a book.
Format Notes with HTML
These links are interesting because they show that iPod notes have basic HTML support. You can use this to create links between your notes, just like the links you see on web pages. There are a few HTML tags that are supported by the iPod.
will create a link break, and to choose the title at the top of the iPod screen, put it between
Here's an example:
<title>Chapter 1</title>Once upon a time there was a man named John.<br>He lived in a bright yellow house.<br><br><a href="chapter2.txt">Next Chapter</a>When viewing these notes on your iPod, you can select links using the scroll wheel. If there is more than one link, the active one will have a blue underline. Using the scroll wheel will allow you to activate different ones.
Link to Songs and Videos
These links aren't just limited to notes. You can link to any song, video, album, artist or playlist on the iPod. For example, to link to the song "Song 2" using the text "Play Music" you would type
<a href="song=Song 2">Play Music</a>.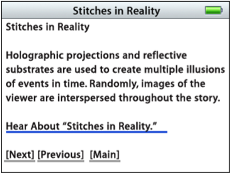
Linking to a video works in much the same way as with a song.<a href="video=Song 2">Link to Song 2 Music Video</A>
To link to groups of songs, you have to use a slightly different tag. Here are a couple of self-explanatory examples:<a href="ipod:music?genre=rock">Link to rock music</A> <a href="ipod:music?artist=Radiohead">Link to Radiohead</A>
You can even combine these to create the equivalent of Smart Playlists:<a href="ipod:music?genre=rock&artist=U2">Combo</A>
Set Notes Preferences
There are a few settings you can change involving the notes on your iPod. The first is a "Notes Only" mode, which was mainly designed for iPods being used as tour guides or in museums. This means that when your iPod loads up you are shown the Notes folder, and can't navigate out of it. You can only get to songs (or a audio tour) via links in your notes.
To enable this mode, create notes file called Preferences (without the .txt extension) and put the following line in it:<meta name="NotesOnly" content="true">
The second setting you can change is the title of the Notes folder. By default it is just called Notes, but if you are using the Notes Only feature, you might want to call it something like "Museum Tour". To do this, add the following line to the Preferences file:<title>Museum Tour</title>
The final setting is to do with linking to songs. Normally when you choose a song from a link in a note, the Now Playing screen appears. To set you iPod to continue displaying the note instead, add the following line to the Preferences file:<meta name=“NowPlaying” content=false>