5 Ways to Speed up GarageBand
03 July 2007 - Filed in: GarageBand
GarageBand is everything you would expect of an iLife application. It's intuitive and easy to use for even the newest users, and produces great results. While it definitely isn't one of Apple's Pro Apps, it does use professional quality instrument loops and effects and these can take quite a toll on your Mac. If you are using an older Mac you may find GarageBand is very slow and might even crash when performing certain tasks. Here are a few tips for speeding up things up.
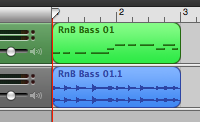
1. Turn Software Instrument Loops into Real Instrument Loops. If you didn't know, Software Instrument Loops are green and have dots on the track while Real Instrument Loops are blue and have audio waves on the track. The Software Instrument Loops are more customisable as you can change the instrument that plays them and the notes that they play. The Real Instrument Loops are harder to change as they are just recordings of an instrument playing.
Software Instrument Loops take a much higher toll on your CPU. If you are using a G3 or G4 you might find that GarageBand crashes when you try to play a song with lots of software instruments. Using Real Instruments instead of Software Instruments will help you avoid crashes and make you Mac run faster, especially during playback. To convert, hold the Option key when dragging Software Instrument Loops to the timeline. This will turn the loops into Real Instruments.
2. Optimise for Faster Response. In the Preferences (in the GarageBand menu) click on the MIDI/Audio tab and set the Optimisation to what you find more important. A large buffer size will allow you to have a large number of simultaneous tracks, while a small buffer will give a shorter loading time for playback. This doesn't always give great improvements, as results depend on individual system specifications.
 3. Lock Tracks. You can lock tracks by clicking the padlock button. This means that you can't change effects, instruments and notes, but it does free up your CPU and RAM by transferring the burden to your Hard Drive. After you have locked a track, click the play button to render it to your Hard Drive. The locked tracks will sound exactly the same during playback as when they were unlocked. This tip doesn't work as well if you have a slower Hard Drive and has the greatest effect when there is too great a burden on your CPU and RAM.
 4. Hide the Track Mixer during Playback. Your Mac will be more responsive and run faster with the Track mixer hidden. This is especially noticeable during playback. Do this from the Track menu or press Command-Y.
5. Reduce the number of Tracks. While you might not want to delete tracks from your song, you can combine them. Once you have a number of tracks the way you want them in the final song, choose Export to iTunes from the File menu. Delete the tracks in your GarageBand project (you might want to save before you do this). Locate the file you just exported and drag it onto the timeline. This will create a single new track to replace the ones you just deleted. This process also has the benefit of converting the Software Instrument Loops to a recording.
Software Instrument Loops take a much higher toll on your CPU. If you are using a G3 or G4 you might find that GarageBand crashes when you try to play a song with lots of software instruments. Using Real Instruments instead of Software Instruments will help you avoid crashes and make you Mac run faster, especially during playback. To convert, hold the Option key when dragging Software Instrument Loops to the timeline. This will turn the loops into Real Instruments.
2. Optimise for Faster Response. In the Preferences (in the GarageBand menu) click on the MIDI/Audio tab and set the Optimisation to what you find more important. A large buffer size will allow you to have a large number of simultaneous tracks, while a small buffer will give a shorter loading time for playback. This doesn't always give great improvements, as results depend on individual system specifications.
5. Reduce the number of Tracks. While you might not want to delete tracks from your song, you can combine them. Once you have a number of tracks the way you want them in the final song, choose Export to iTunes from the File menu. Delete the tracks in your GarageBand project (you might want to save before you do this). Locate the file you just exported and drag it onto the timeline. This will create a single new track to replace the ones you just deleted. This process also has the benefit of converting the Software Instrument Loops to a recording.
blog comments powered by Disqus