Automatically create Calendar events when receiving email
I’m always looking for ways to automate the most repetitive tasks I find myself doing on my Mac. The other day, I realised that I spend a lot of time manually creating Calendar events by copying information from booking confirmation emails. This is exactly the sort of task that can be easily automated to save you a little bit of time and effort every day.
Here’s how you can set up a custom rule in Mail app that runs a short AppleScript to create a new event in Calendar app.
To illustrate how to do this, I’m going to use an example that I’ve set up for myself. I regularly receive booking confirmation emails from my local cinema that look like this:

All the information to create a Calendar event is there in the text, but it is annoyingly time consuming to do this manually. Let’s set up a Rule to process these emails automatically.
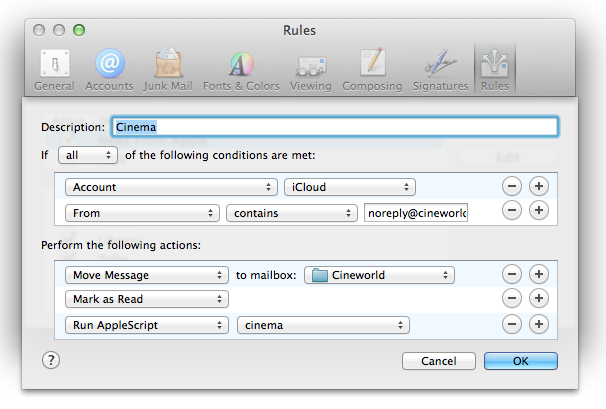
In Mail app, choose Preferences from the Mail menu, and click on the Rules tab. Create a new rule, and adjust the drop down menus to look like the screenshot below. The first section shows the conditions required to apply the rule to a message. In my case, I restrict the rule to only messages from “noreply@cineworldmail.com” in my “iCloud” account. When an email that meets these criteria is received, a series of actions are performed. First the message is moved out of my inbox into another mailbox, and it is marked as read.
The final action is the most complicated. It is a custom AppleScript that reads the email, figures out the name, date, time and location, then creates a Calendar event.
When you first choose Run AppleScript from the drop down menu, there will not be any AppleScripts available for you to run. First we have to create one.
To do this, open up AppleScript Editor. This is located in the Utilities folder in the Applications folder, or you can find it using Spotlight search or Launchpad. In the script window that appears, paste the following script:
-- Triggered by Mail rule.
using terms from application "Mail"
    on perform mail action with messages msgs for rule theRule
        tell application "Mail"
            repeat with msg in msgs
                try
                    set msgcontent to content of msg
                    set msgid to message id of msg
                    set {movie, runtime, cert, bref, starttime, addr, screen} to my parseMsg(msgcontent)
                    my createEvent(movie, runtime, cert, bref, starttime, addr, screen, msgid)
                end try
            end repeat
        end tell
    end perform mail action with messages
end using terms from
This is the general format of all Mail rule AppleScripts. One of the benefits of AppleScript is that it is very close to normal English language, and you can get some idea of what a script does even if you aren’t familiar with AppleScript. The above script takes each email message that the rule matched, and runs a function called parseMsg on it to extract the event details. Then it runs a function called createEvent using those details.
Next, below this paste the following functions:
-- Parse the email content to extract movie details.
on parseMsg(msgcontent)
    set movie to extractBetween(msgcontent, "You are going to see: ", "Cert: ")
    set cert to extractBetween(msgcontent, "Cert: ", "Running Time: ")
    set runtime to extractBetween(msgcontent, "Running Time: ", " minutes")
    set bref to extractBetween(msgcontent, "Booking Reference: ", "Date: ")
    set datestring to extractBetween(msgcontent, "Date: ", "Cinema: ")
    set addr to extractBetween(msgcontent, "Cinema: ", "Screen: ")
    set screen to extractBetween(msgcontent, "Screen: ", "Number of people going: ")
    set starttime to parseDateString(datestring)
    return {movie, runtime, cert, bref, starttime, addr, screen}
end parseMsg

-- Extract the substring from between two strings
to extractBetween(theString, startText, endText)
    set tid to AppleScript's text item delimiters
    set AppleScript's text item delimiters to startText
    set startComps to text items of theString
    set AppleScript's text item delimiters to endText
    set endComps to text items of second item of startComps
    set AppleScript's text item delimiters to tid
    return trim(first item of endComps)
end extractBetween

-- Trim all whitespace from start and end of a string
on trim(theString)
    set theChars to {" ", tab, character id 10, return, character id 0, character id 8232}
    repeat until first character of theString is not in theChars
        set theString to text 2 thru -1 of theString
    end repeat
    repeat until last character of theString is not in theChars
        set theString to text 1 thru -2 of theString
    end repeat
    return theString
end trim

-- Parse date and time from the string given in the email.
on parseDateString(datestring)
    set theDate to current date
    set dateWords to words of datestring
    set day of theDate to text 1 thru -3 of item 2 of dateWords
    set time of theDate to (item 5 of dateWords) * hours + (item 6 of dateWords) * minutes
    set monthList to {January, February, March, April, May, June, July, August, September, October, November, December}
    repeat with i from 1 to 12
        if item 3 of dateWords = ((item i of monthList) as string) then
            set monthNumber to (text -2 thru -1 of ("0" & i))
            exit repeat
        end if
    end repeat
    set month of theDate to monthNumber
    return theDate
end parseDateString
This is the core of the AppleScript, which parses the email to extract the event details. The way it works is to extract the text between two other pieces of text. For example, it extracts the text between You are going to see: and Cert: and sets it as the name of the movie. You will need to modify this to match the exact format of your email. A bit of trial and error may be necessary, so you may want to test the rule on emails you send to yourself.
Finally, paste the following function that creates the Calendar event:
-- Create a calendar event for the specified movie.
on createEvent(movie, runtime, cert, bref, starttime, addr, screen, msgid)
    set endtime to starttime + runtime * minutes
    tell application "Calendar" to tell calendar "Home"
        set theEvent to make new event with properties {start date:starttime, end date:endtime, summary:"Cinema: " & movie}
        set location of theEvent to screen & ", Cineword " & addr
        set description of theEvent to "Booking Reference: " & bref & return & "Run Time: " & runtime & " minutes" & return & "Certificate: " & cert
        set url of theEvent to "message://" & "%3c" & msgid & "%3e"
    end tell
end createEvent
You will also need to modify this to match the exact details in your email messages. Above, I set the name of the even to the title of the movie and I calculate the end time by adding the running time of the movie to the start time. I set the location of the event to the screen number and the cinema address, and I add a few details to the event notes like my booking reference number. Setting the url of the event to the email message id also provides a handy link back to the original email message from within Calendar.
You can find the full script here.
Now all we need to do is save the AppleScript somewhere Mail can see it. Choose Save from the File menu, and then press Command-Shift-G to bring up the Go to folder dialog. In the text field, type ~/Library/Application Scripts/com.apple.mail and press Return. Give the script a memorable name and save it. Now, when you return to Mail, your script should be available in the drop down menu next to “Run AppleScript”.
A secret shortcut to use Emoji in Mavericks
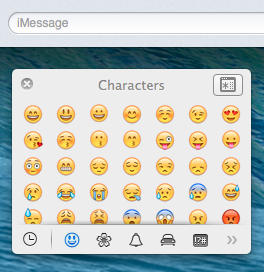
Emoji are the cute little smileys and emoticons that originated in Japan and have grown popular around the world since they became available on the iPhone. Here’s a neat trick for using Emoji on the Mac in OS X Mavericks.
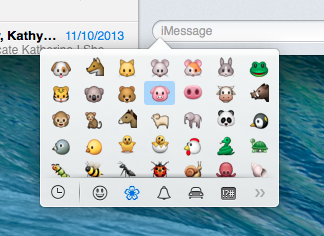
Whenever you are in a text field in Mavericks, just press Command-Control-Space and an emoji panel will appear. Then click any of the Emoji icons to insert it at the current position in the text.
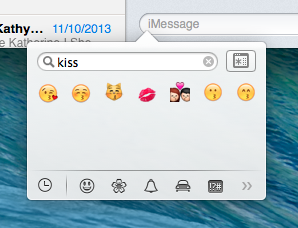
For those who find it quicker to use the keyboard than the mouse, you can navigate between the Emoji icons with the arrow keys, and shift left and right between the different sections using Tab and Shift-Tab respectively. If you know what you are looking for, just begin to type the name, and the Emoji will filter as you type. Give it a try with “dog” or “kiss” or “poo”.
By default, the Emoji panel will disappear once you choose an icon. However, if you find yourself using it a lot, just drag it away from the text field to “detach” it, and it will stay open until you click the close button in the top left. Also, the button in the top right expands the panel into the full size “Character Viewer” that was previously available in Mountain Lion.
Continuous offline dictation in Mavericks
The dictation feature introduced last year in OS X Mountain Lion left a lot to be desired. Just like Siri on iOS, it required you to speak in short bursts, then wait while the data was sent to Apple’s servers and the results were returned. As well as requiring a constant internet connection, it was almost unusable for dictating anything more than a couple of sentences.
Fortunately, with OS X Mavericks, there is now an option to enable “Enhanced Dictation”, which solves a lot of these problems. To do this, open up System Preferences and go to the Dictation and Speech section. Here you will find a checkbox, Use Enhanced Dictation, which “allows offline use and continuous dictation with live feedback”.
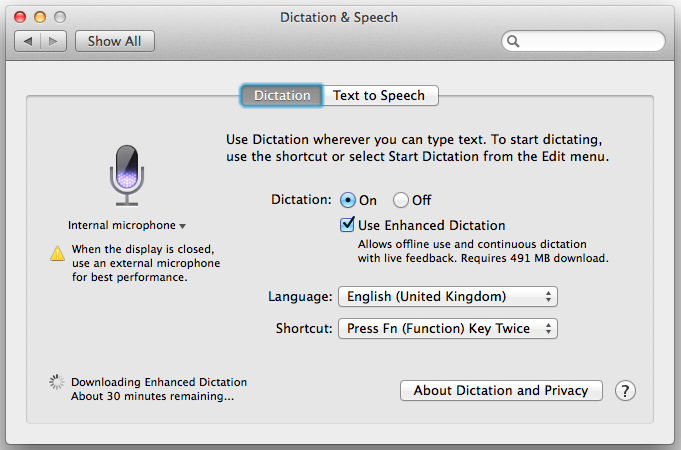
As you will probably notice, enabling this feature requires a fairly large download. For me this was 491 MB, but others have reported between 700 and 800 MB, so I suspect it depends on your chosen language.
Once the download has completed, you can dictate text just as before, using the shortcut specified in the Dictation and Speech preferences. Only now you will find the transcription happens locally on your Mac instead of on Apple’s servers. This allows the words to appear “live”, as you speak, resulting in a much more enjoyable and useful dictation process.
There are a number of dictation commands to help with formatting and punctuation. As far as I can tell, these are just the same as in Mountain Lion, however they become much more useful with this new enhanced dictation feature. Apple provides a full list, which contains things like “all caps”, “smiley face”, “new paragraph” and “next line”.
While this is a massive improvement over Mountain Lion’s dictation features, there are still a few further additions needed before the free built in OS X dictation will be a serious competitor to commercial alternatives such as Dragon Dictate. For example, there needs to be a quick and easy way to edit existing text and correct transcription errors, preferably without needing to use the keyboard or mouse. It would also be great if the system automatically learnt from your corrections over time, or allowed manual training through the addition of tricky words such as names and places to the dictionary. Maybe next year...
Hidden settings to adjust Dock animations
Here are a couple of tips for customising the delay and animation speed of your Dock if you have it set to automatically show and hide (in System Preferences).
Custom delay time
You may have noticed that there is a short delay before the Dock appears when your mouse hits the edge of the screen. There is a hidden setting that allows you to adjust the delay time using the Terminal.
Start by opening up the Terminal app (in Applications/Utilities). To remove the delay entirely, paste in the following line and press Return.
defaults write com.apple.Dock autohide-delay -float 0
The changes won’t take effect until you restart the Dock, which you can do by typing killall Dock and pressing Return.
The number at the end of the command is the delay time in seconds, which you can customise to your liking. My preferred delay is 0.1, which is a bit quicker than the default. To return to the default, just use the following command:
defaults delete com.apple.Dock autohide-delay

Custom animation speed
There is a related hidden setting that allows you to customise the speed of the animation when the Dock slides onto the screen. As before, paste the following line into the Terminal and press Return.
defaults write com.apple.dock autohide-time-modifier -float 0.5
Remember to restart the Dock with killall Dock for the changes to take effect. Just like the delay, the number at the end is the length of the animation in seconds. 0 will make the Dock instantly appear with no animation. My preferred time is about 0.5, which makes things just a little snappier than the default.
To return to the default, just use the following command:
defaults delete com.apple.Dock autohide-time-modifier
Using Finder labels for tagging files and automating actions
Labels are a handy way to organise your files in the Finder by colour-coding their icons. Until OS X Mavericks is released later this year, they are a pretty good substitute for having a proper way to tag files in the Finder.
Adding a label to a file or folder is simple. Just right-click the icon and choose one of the coloured squares from the menu. Alternatively, you can select the icon by clicking on it, and choose the label from the File menu in the menubar.
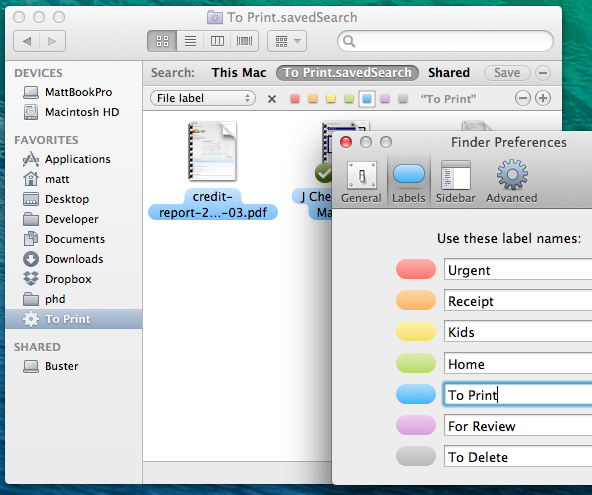
If you want to use labels a bit more like tags, it is possible to choose a custom name for each label colour in the Finder Preferences (under Finder in the menubar). Once you have done this, the only limitation compared to a real tagging system is that you are restricted to only having 7 different tags.
Using labels as tags can work really well in conjunction with Saved Searches (also known as Smart Folders).
Most people will have their documents organised into separate folders for each project, and will have separate folders for work and home files. But sometimes, for example, you might want to see all your receipts from all your different projects together, or all the files that you need to print. Instead of duplicating all your receipts into a separate “receipts” folder, you can just use labels along with a Saved Search that displays all the files with that label.
To set up the saved search, start by switching over to the Finder and choosing Find from the File menu (or type Command-F). Choose Other from the left hand drop-down menu, and choose File label from the list. Then just choose the desired label, and click the Save button to add the Saved Search to your sidebar.
Power users can take this idea even further using a tool like Hazel. Firstly, Hazel can automatically add labels to your files based on your own criteria. For example, automatically adding a red label to files that have been in the Downloads folder for more than a week, or adding a purple label to files that were downloaded from your bank website.
Secondly, Hazel can automatically perform actions when you assign a specific label to a file. For example, it could import MP3 files into iTunes if they you label them purple, or resize images to 800x600px and upload them to a server if they are labelled green, or run any AppleScript or shell script you want.
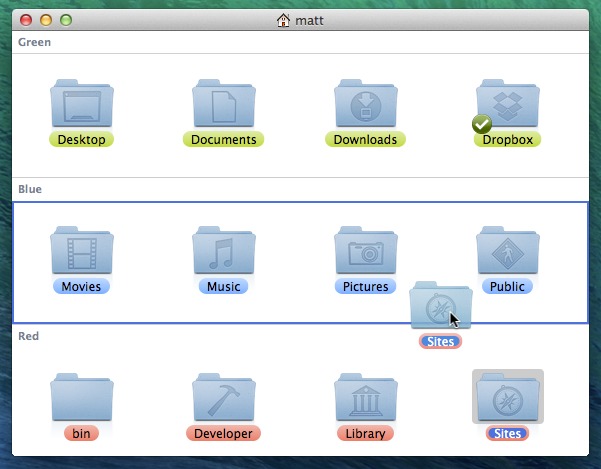
Bonus tip: You can quickly change the label of a file by dragging it into the section for a different label in the folder, as show in the screenshot below. For this to work, you must have your folder in Icon View, and have the folder Arranged by Label.